DIY Wall Organizer: An Easy, Budget Wall Pocket System for Any Room
7 min read ·
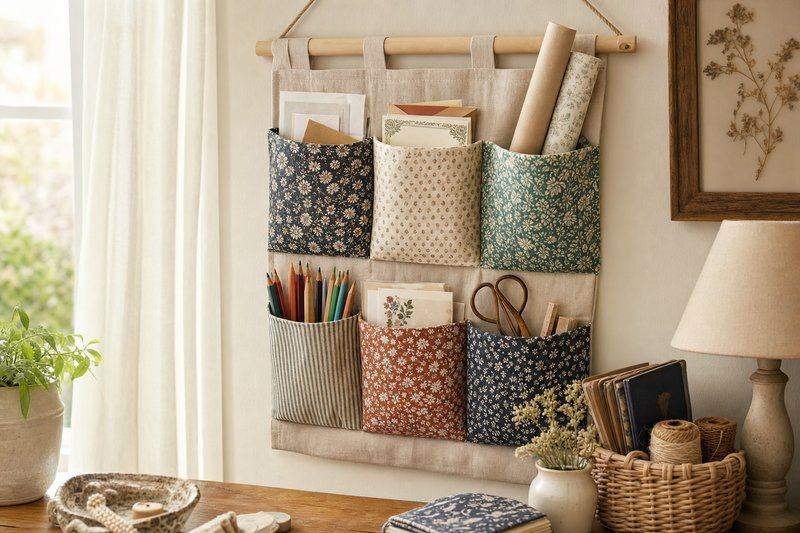
A fabric wall pocket organizer solves a specific kind of clutter: the pile of mail, loose craft supplies, or kids’ artwork that never has an actual home. Unlike a drawer, everything in a wall pocket system stays visible, which makes it easier to actually use day to day, so it doesn’t become another place things get lost.
What You Need
- Sturdy fabric (canvas, denim, or an old pair of jeans works well for pockets)
- A wooden dowel or a thin curtain rod, sized to the width you want
- Fabric glue (for a no-sew version) or a needle and thread (for a sewn version)
- Twine or ribbon for hanging loops
- Scissors and a ruler
- Optional: a plain fabric backing panel to mount the pockets onto
Repurposed materials work well here. Old jeans pockets, cut out with a wide seam allowance, are already reinforced and ready to attach as-is, which is where a lot of the budget-friendly part of this project comes from.
No-Sew Version: Step by Step
- Cut your backing panel to the finished size you want the organizer to be.
- Cut pocket pieces from your fabric, each roughly 1.5 times as wide as you want the finished pocket to allow for the folded edge.
- Fold the top edge of each pocket piece down about an inch and glue it flat, which keeps the opening from fraying and gives it a clean finish.
- Glue each pocket onto the backing panel along the sides and bottom only, leaving the top open, and let it dry fully before handling.
- Attach twine or ribbon loops to the top corners of the backing panel for hanging, and thread the dowel through if you want a rod-mounted hanging method in place of a directly-glued one.
Fabric glue needs real drying time, usually a few hours, before the organizer can hold any weight, so this isn’t a same-hour project if you’re using glue and not stitching.

Simple-Sew Version: Step by Step
- Follow the same cutting steps as the no-sew version.
- Fold and press the top edge of each pocket, then stitch it down with a straight seam instead of gluing, which holds up to more repeated use than glue does.
- Stitch each pocket onto the backing panel along the sides and bottom, backstitching at the top corners where the most stress from repeated use will land.
- Attach hanging loops the same way as the no-sew version.
A basic straight-stitch machine handles this easily; hand-stitching works too, just with more time invested, especially around the reinforced top corners.
What to Store in a DIY Wall Organizer
- Mail and paperwork: sorted by pocket into “to file,” “to pay,” and “to read,” so the pile stays visible and stops growing on a counter
- Craft supplies: scissors, tape, and small tools kept upright and visible, never buried in a drawer
- Kids’ artwork: a rotating display that’s easy to swap out weekly without anything getting lost in a pile
- Kitchen odds and ends: takeout menus, coupons, or a notepad, mounted near a kitchen entry
The right use often comes down to where it’s hung. A mail organizer works best near an entryway; a craft-supply version works better in a craft space or kids’ room.
Choosing the Right Fabric Weight
Fabric weight matters more for a wall organizer than for most sewing projects, since every pocket has to support the weight of whatever’s stored inside it. A lightweight quilting cotton works fine for very light contents, like a few pieces of paper, but sags quickly under anything heavier. Canvas, denim, and twill all hold their shape well under real daily use, which is why repurposed jeans are such a common choice: the fabric is already exactly the weight this project calls for, without any extra reinforcement needed.
Adding Labels or Dividers Within Pockets
For an organizer meant to sort several categories of mail or supplies, a small fabric or cardstock label, glued or stitched to the outer edge of each pocket, makes it obvious at a glance which pocket holds what. For pockets meant to hold multiple thin items without them sliding to the bottom, a single line of stitching or glue partway down the inside of the pocket creates a divider, splitting one pocket into two narrower sections without needing a second piece of fabric.
Making a Larger Multi-Row Version
The same technique scales up easily into a bigger organizer with multiple rows of pockets, since one row is only the starting size. Cut a taller backing panel, and space pocket rows evenly down its length, leaving enough gap between rows that the tops of lower pockets aren’t blocked by the bottoms of the ones above. A multi-row version is worth the extra materials for anyone sorting more categories than a single row comfortably holds, like a family mail station sorting by each household member.

Matching the Organizer to Room Décor
Since a wall pocket organizer stays visible, its fabric choice doubles as part of the room’s overall look. A neutral canvas in a color already in the room blends in as a functional piece. A patterned fabric or a mix of two or three coordinating prints across different pockets, on the other hand, turns the same basic project into more of a deliberate décor piece, which works especially well in a kids’ room or craft space where a bit of visual personality is welcome.
Where to Hang It
Command strips or hooks work for a lightweight, glued version, since there’s no drilling required and the whole piece removes cleanly later. A sewn version with heavier contents (like several full mail pockets) holds up better on an actual wall hook or a mounted dowel bracket, since the added stitching means the piece can safely carry more weight without pulling loose.
Troubleshooting Common Problems
A few problems show up more often than others once a wall pocket organizer is in regular use, and each has a simple fix. If a pocket starts pulling away from the backing panel where it’s glued, a fresh line of fabric glue pressed firmly along the loose section and clamped with a few clothespins while it dries usually resolves it without redoing the whole seam. A dowel that bows under the weight of several full pockets is a sign the dowel is too thin for the load; swapping to a slightly thicker dowel or a metal curtain rod solves the sag without changing anything else about the design. Fraying along a cut fabric edge that wasn’t folded and glued or stitched down can be stopped with a thin line of fabric glue traced right along the raw edge, which seals the fibers in place. And a pocket that gapes open at the top, making it hard to slide items in without them falling back out, usually just needs a slightly deeper fold at the top edge so the opening sits at a better angle.
Alternative Materials and Hanging Hardware
The core materials in this project are flexible enough to swap for whatever’s easiest to find. A tension curtain rod works in place of a wood dowel for a lighter version, and a length of PVC pipe wrapped in fabric or paint is a sturdy, cheap substitute if a dowel isn’t readily available. For the backing panel, a stretched canvas (the kind sold blank for painting) gives a slightly stiffer, more finished base than plain fabric alone, while a thin sheet of plywood covered in fabric works well for a version meant to hold noticeably heavier contents. Metal grommets, set into the backing panel’s top corners with a simple hand press tool, give a cleaner finished look than tied loops and hold up to more repeated on-and-off-the-wall use if the organizer gets moved between rooms.