Spooky, Easy Halloween Lanterns Kids Can Help Make
8 min read ·
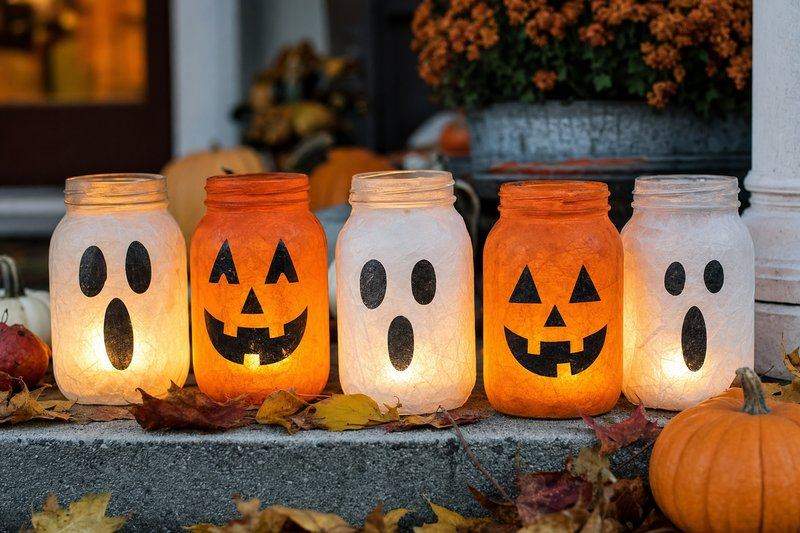
Halloween lanterns are one of the most forgiving decorations to make from scratch, because a slightly wobbly painted line or an uneven cutout still reads as “spooky” and not “wrong.” This walks through easy Halloween lanterns built from jars you already have, a few genuinely spooky variations for the front porch, and how to keep the whole project kid-friendly from start to finish.
What You’ll Need for Halloween Lanterns
Almost any clean glass jar works as a lantern base: pasta sauce jars, old candle jars, or mason jars all hold up fine. Beyond the jar, you’ll want black or orange tissue paper or acrylic paint, a paintbrush, painter’s tape for masking off shapes, and battery tea lights, especially for anything kids will be handling or displaying in their own room.
Easy Halloween Lanterns From Recycled Jars
- Tissue-paper silhouette jars. Tape a paper cutout (a bat, a cat, a simple ghost shape) to the outside of a jar, brush diluted craft glue over torn tissue-paper pieces layered on top, then peel the paper template off once dry to reveal the silhouette.
- Painted spiderweb jars. Paint a jar solid black, then use a toothpick dipped in white paint to draw a simple radiating web pattern once the base coat is dry.
- Frosted glow jars. A light coat of frosted glass spray paint over a plain jar gives a soft, diffused glow from the tea light inside without any drawing or cutting at all.

Spooky Halloween Lantern Designs for the Front Porch
For a bigger visual impact outdoors, these lean spookier and slightly more involved:
- Cracked-glass effect. Black paint splattered thin and dry-brushed across a jar, left uneven on purpose, reads like aged, weathered glass under lantern light.
- Glowing eyes jars. Two small cutout ovals in black paper wrapped around a jar, with the tea light behind them, look like glowing eyes peering out from inside.
- Skeleton hand silhouette. A hand-shaped cutout taped to the jar before a black spray-paint coat leaves a pale, ghostly handprint once the stencil is removed.
Kid-Friendly Halloween Lanterns for Trick-or-Treat Night
- Simple jack-o’-lantern jars. Orange tissue paper on the outside of a jar, with a black paper triangle-eyes-and-mouth face glued on top: no cutting required for the child, just gluing.
- Ghost jars. A jar wrapped in white tissue paper with two small black paper dot eyes glued on is one of the simplest true kid-made lanterns.
- Painted handprint bats. A child’s painted handprint, once dry, folds into a simple bat shape that glues directly onto a plain jar.
Keeping every kid-involved step to gluing, painting, or tearing paper (no cutting glass, no spray paint, nothing hot) is what actually makes a Halloween lantern kid-friendly, not just kid-themed.
Grouping Lanterns for a Bigger Display
A single jar reads as a small accent, but a cluster of three to five lanterns at slightly different heights makes a much bigger visual statement for the same amount of work per jar. Mixing a couple of finished styles together, say a few plain frosted-glow jars alongside one or two more detailed silhouette jars, gives a display some visual variety without needing every jar to be a standout on its own. For a porch step or entryway, staggering jar heights on small risers (books, overturned bowls, or a simple wooden block hidden under a cloth) adds depth that a single flat row of jars doesn’t have.

Choosing the Right Tea Light for Best Glow
Not every battery tea light produces the same quality of glow. Warm-white LED tea lights read as more traditionally “candlelit” than the cooler bluish-white light some cheaper sets produce, which matters more than it might seem for how spooky or cozy a finished lantern looks in the dark. A tea light with a slight flicker mode adds a surprising amount of atmosphere to even a simple frosted jar, since the flicker mimics real candlelight far better than plain steady light does. Buying a multi-pack beats single lights on value if more than two or three lanterns are planned.
Keeping Halloween Lanterns Safe
Battery tea lights do the same visual job as real candles without the fire risk, and they’re the only sensible choice for anything a child made or will be near. If lanterns are going outside, bring them in on rainy nights even with a battery light inside, since tissue paper and cardboard-backed designs won’t hold up wet. For jars going on a porch step or walkway, a small amount of double-sided tape or museum putty on the base keeps them from tipping when trick-or-treaters brush past.
Choosing and Prepping the Right Jar for Each Style
Not every jar suits every lantern design. Wide, squat jars, like large pasta sauce or pickle jars, give tissue paper and paint more flat surface to work with, which makes silhouette and spiderweb designs easier to see clearly from a few feet away. Tall, narrow jars like olive or vinegar bottles work better for the glowing-eyes design, since the shape reads more like a peering face than a flat design would on a wider jar. Before starting any design, soak jars in warm soapy water for ten to fifteen minutes to loosen label glue, then scrape off any residue with a plastic scraper or an old credit card. A metal blade will scratch the glass. A few drops of cooking oil rubbed into stubborn sticker residue, left for a few minutes, usually finishes the job when soap alone doesn’t fully lift it.
Common Halloween Lantern Mistakes and How to Fix Them
A handful of small issues come up often enough to be worth planning around. Tissue paper that wrinkles or bubbles under the glue usually means the glue was brushed on too thick in one spot; a thin, even layer applied a little at a time smooths out far better than trying to fix bubbles after the paper’s already down. Paint that drips or pools at the jar’s base is almost always a sign of too much paint loaded onto the brush at once; two thin coats, each fully dry before the next, cover better than one heavy coat and dry more evenly too. If a frosted spray coat comes out streaky, holding the can too close to the glass is the usual cause; a light, even pass held eight to ten inches back, repeated two or three times, gives a smoother, more consistent finish than one close-up heavy coat. And if a stencil-based design like the skeleton hand or a silhouette shifts while the paint is still wet, a small piece of painter’s tape at each corner holds it in place far better than trying to hold a paper template still by hand.
Storing Halloween Lanterns for Next Year
A finished lantern that survives past one Halloween is worth the extra few minutes of storage prep. Wrapping each jar loosely in tissue paper or a soft cloth before boxing it prevents painted or tissue-covered surfaces from scratching against each other, and storing jars upright keeps any glued paper from shifting or peeling loose. A cardboard box divided into sections, or a case originally meant for wine bottles, keeps jars from knocking together during a move to the attic or garage. Real glass jars stored this way typically last several Halloweens before the paint or paper needs any real touch-up, which makes the upfront design work worth more than a single season’s use.