Category

Holiday

Category

Hi, I’m Erin from Fundamentals and Fripperies and I am so excited to be guest blogging at Thrive today.

ffpic1-2


I feel very honored to be asked because Thrive is one of my favorite blogs. I love seeing Nike continually rock what she’s got in such a creative and classy way. I feel a special kinship to her because I, too, get a thrill of satisfaction from making something awesome from nothing, and I, too, have my own dirty half dozen. I know how difficult it is to fit blogging into an already over-full family life, so she amazes me even more!

Gushing introductions aside–I want to tell you a sad story that you may be able to relate to.

Every Christmas, I start out gift wrapping with a happy heart and put all my love into each carefully tied bow and crisply folded corner. HOWever, about halfway through wrapping my family’s gifts, with other holiday demands starting to heat up, my evil inner martyr mother comes out. The wrapping gets uglier along with my mood, and I have a Scarlett O’Hara-like moment where I say, “I will never be stuck spending hours wrapping Christmas presents again.”

My husband’s solution to this problem (in addition to helping me wrap a few as long as I stop verbally abusing him long enough to pass him the scotch tape 🙂 ) is to suggest that we just stick the presents under the tree in the shopping bags and shipping boxes they came in. He reasons that the kids will still have something to undo, and we won’t have to do a thing. Problem solved.

Except, that it would look ugly.

Really, reallyugly.

And I am just shallow/proud/perfectionistic enough that I mind putting super ugly presents under the tree like I’ve given up all pretense of a beautiful
holiday.

Luckily, there is a third option beyond becoming a wrapping paper martyr, and giving up on life. My very talented mother-in-law often gives gifts in personalized fabric gift bags. Also, a dear friend of mine wraps all her family’s gifts in fabric gift bags that an environmentally-conscious neighbor gave her as a gift many years ago.

Hmmm. I think re-useable, pretty, fabric gift bags are a good thing. And now finally, after years of meaning to make them, I have done it.

And, I am willing to give you all the benefit of my experience and wisdom with lots of lazy shortcuts and tips (you’re welcome 🙂 ).

To make your very own bags, you will need:
•a fabric stash to pilfer (oh, come on–you know you have one, too)
•and/or other fabric, such as pillowcases you don’t need, pillow covers, old sweaters, etc.
•ribbons, cords, old (clean!) shoelaces, etc.
•a sewing machine with thread
•scissors
•pins

That’s it. Probably all stuff you have lying around.

ffpic2

Now, I am not one to re-invent the wheel. There are some great tutorials for making a drawstring bag here and here and probably lots of other places on the web as well. If you don’t already know how to make one, I suggest brushing up on the basics.

Then, using those tutorials (or your own awesome innate drawstring bag wisdom) as a basis, here are the shortcuts I’ve devised for making your bags more quickly and simply:

Lazy Shortcut #1:  Use pinking shears so you don’t have to zig-zag. These aren’t going to be used every day, so you don’t need to finish them perfectly, but you still don’t want your hard work to fray into un-useability.

Lazy Shortcut #2: Instead of making the casing for the bag and then feeding the ribbon or cording through, pin it into the casing when you fold the casing over (see above–my pins are holding both my ribbon and casing in place). Then sew your casing seam, taking care to keep a safe distance from your cording or ribbon. Then all you have to do is take out your pins, and Voila! You are ready to go!

ffpic3

Lazy Shortcut #3: Unless you really want a drawstring bag that has handles on either side, you can just leave the casing open on only one side of your bag and then tie it in a bow. It saves time and ribbon.

ffpic4

Lazy Shortcut #4: Another option is to make a buttonhole towards the top of your bag before you fold your casing over. Feed the ends of your ribbon through the buttonhole, then pin the rest into your casing. Sew the casing seam and unpin everything. You can close it by pulling on the ends of the
ribbon and tying it into a bow, or put the ribbon ends through a toggle or large bead–then you can just cinch it up. 

Lazy Shortcut #5: You don’t have to make a casing at all. Just make your bag with an open top (like a pillowcase) and tack some ribbon near the top. Then all you have to do is bring the ends around to the front and tie it in a bow. Just like this one below with the double-ribbon tie. Easy peasy.

ffpic5

ffpic6

If you don’t have a fabric stash (and if that is true, I pity you 🙂 ), I’ll bet you still have access to other free/cheap sources of fabric.

For example, I made a gift bag out of a thrift-store throw pillow cover I wasn’t using anymore.

I unzipped the zipper on the side and removed the pillow to add a gift …

ffpic8

… then I just used a zig-zag stitch to tack the ribbon on one side of the pillow cover, put the present in,
zipped up the side zipper and tied the bow.

ffpic7

So simple!

I made this one out of an old pillowcase. It was cute and soft, but it had shrunk, and just ended up
looking skimpy on the pillow.

ffpic9

However, with a cute black grosgrain ribbon tacked to the back and tied into a jaunty bow on the front, Santa couldn’t do any better :).

You probably have some unused pillowcases in your linen closet, but if not, most thrift stores in my area sell them for about $1. That’s less than a new throw-away gift bag.

Some other options I didn’t try yet, but that would work really well:

An old/shrunk crewneck sweater. Cut off the arms (which could probably be used to make small, thin gift bags, by the way), turn it inside out. Sew straight across the top from shoulder to shoulder, and up each side from the waistband to the seam you just created (closing up the arm holes). Trim to a 1/
2″ seam allowance on each seam and zig-zag to prevent fraying. Turn right-side out and add a ribbon. That would be so cute, especially if you used a holiday-themed sweater.

Made cut-offs last summer? Use the bottom part of the jeans/pants that you cut off! You end up with kind of a tube when you make cut-offs, so you could just turn this tube upside down, and sew a seam where the knee used to be. Turn right-side out and add a ribbon and you’re in business.

Really, the sky’s the limit in terms of places you can find fabric for this project.

Good luck, and may adorable fabric stash gift bags keep your evil martyr mother at bay this holiday season!

ffpic10

And hope you’ll stop by Fundamentals and Fripperies and say hi!

erin

******************************************************************

Thank you so much Erin! I’ve made my first bag for my family, too, and am sooooo excited at the thought of NOT being up at 1 am on Christmas morning swearing complaining about wrapping presents.

Erin is another amazing e-friend that I’ve been lucky to find in blogland. We have living in Utah and Washington in common besides chasing around six kids – it makes you close.  🙂

I love reading Erin’s blog because she’s awesome at pretty much everything:

Decorating?

kitchen and issaquah 021-1

Check.

Cooking?

mousse-1

Check.

Remodeling?

December 2011 BLOG

Oh heck yeah CHECK.

Oh, and did I mention that she’s funny and real and inspiring and a total Craigslist-shopping rock star?

No?

Well she is, so there’s four more reasons I hope you’ll stop by Fundamentals and Fripperies and visit Erin.

Happy forget-the-tape-and-paper Holidays!

Finding Christmas outfits for my girls continues.

Having several yards of brand new, adorable, FREE fabric was so much fun to play with, but reality has set back in and we’re in full Rock-What-Ya-Got mode again. And since I’ve been doing a lot of sewing, I was hoping to find some existing outfits to just tweak a bit for the holidays.

Guess what I had to work with?

Yup.

November 2011 BLOG1-11

Hand-me-down EASTER dresses.

Welcome to Pastel City. Population: 2


But if the picked-over isles at Walmart can teach us anything, it’s that every color is a Christmas color.

November 2011 BLOG1-10

And that means with a little work, every solid colored dress can pull double duty as a Christmas special.

What?!

Even those pastel numbers?

100_6281

Especially those pastel numbers. See?

And all I had to work with was ric-rac and a bunch of old poinsettia blooms. But it was enough. Those of you with more stash stuff and Christmas decorations could really go nuts.

I started on Kid #3’s pink dress and twisted some red and white ric-rac together to make my own Candy Cane trim.

100_6146

You can twist any colors together to make lots of fun looks. Make sure your iron it really well after you twist it together to help it lay flat.

And I went the total cheaters route and simply hot glued my candy cane ric-rac right along the bottom hem. If you wanted a temporary fix, just stitch in place with clear thread.

November 2011 BLOG1-9

(And yes, you can totally wash clothing with hot glued trim in cold water on the delicate cycle with a cool dryer. Works fine.)

To dress up the collar I removed the bow and glued my trim over the existing pink stuff, then pinned on a single poinsettia using a few safety pins.

November 2011 BLOG2-3

Five minutes later I had a completely different look.

November 2011 BLOG1-6

 Done and done.

Kid #6’s dress was even easier to dress up … as in I spent three minutes on hers instead of five.

The worn out bow came off with a quick snip …

November 2011 BLOG1-7

… and the flower I pulled off the fake poinsettia plant got safety pinned in place.

Add some sparkle shoes, another bloom for the hair and an already-in-the-closet sweater and voila!

November 2011 BLOG1-12

Baby Girl just decked the halls.

100_6291

So take a look in your girls’ closet.

And pull out those boxed-up spring and summer clothes.

Go dig through your ornaments, ribbons and bows.

November 2011 BLOG2-4

 Bet you have the makings of a little Christmas outfit magic, too.

Happy Easter Merry Christmas!

Linking up to:

Skip To My LouCraft-O-ManiacC.R.A.F.T. *  Stories of AtoZ, Tip JunkieSugar BeeToday’s Creative BlogSassy SitesMy Uncommon Slice of Suburbia * Someday CraftsLil LunaWe Are That FamilyBlue Cricket DesignsThe Thrifty Home, * House of Hepworths, *Tidy MomWhipperberryKojo DesignsChic On A Shoestring, Momma’s Kinda Crafty, *Tatertots & Jello, Be Different Act Normal * I Heart NaptimeUnder The Table and Dreaming

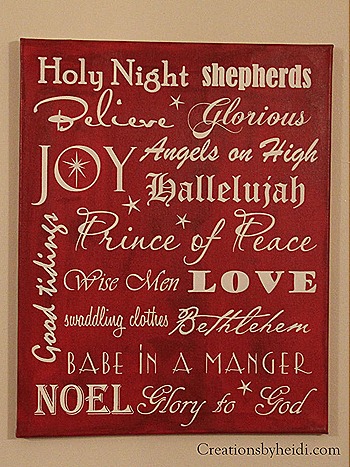
You asked and now it’s here – Christmas subway art submitted with words chosen by you awesome THRIVE readers! 

Several of you who emailed me about the Thanksgiving design were disappointed when it sold out so quickly. I’m not a professional vinyl lady and am limited by the amount of time and materials I can cut. So when I got emails asking for a Christmas design, I asked my awesome neighbor Heidi to handle the cutting and shipping for me. That way I can work on more no-cost holiday projects to share with all of you – deal?

Here’s what we came up with using the suggestions submitted on THRIVE’s facebook page.

christmas subway art on canvas

I love it! You guys picked the best, most fitting words to describe the season!

The picture above is vinyl on red painted canvas, but you can apply it to a board or wall. And to accommodate the reader requests for different sizes/colors, here’s what’s available: 8”x10” – $8.00, 12” x 14” – $10.00, 16”x20” – $14.00. You can pick the color when ordering HERE.

And as always, I’m all about the freebies and rockin-what-ya-got, too.

You can download a free printable 5”x7” of either version below.

November 2011 BLOG-13

Red background with white text HERE –or- White with red letters HERE 

So there you go!

Have fun picking the perfect vinyl design color for your home or enjoying the awesome free version in a frame.

I hope this helps bring a little bit of the magic of the season to your home!


Thank you so much for all the love you showed my good friend Brandi. Reading how much she’s touched each of you made me float.

***

As I sit here tonight, Thanksgiving is two weeks away.

Tonight I’m sharing the first of four holiday posts as my family and friends are getting ready for Turkey Day: Being GratefulDecorating Without DollarsDressed for the Occasion and Stuffed! (all about the food!).

This year in particular I’m making a deliberate decision to reclaim Thanksgiving as a holiday in it’s own right and not just the first day of Christmas. I want to linger on thankful, relish in blessings and openly rejoice for everything I have instead of what I think I need. When I’ve taken this approach in year’s past, I find I’m much less likely to be depressed by what we’re not spending on Christmas and recognize how rich and full my life is right now.

So to celebrate today’s theme of Being Grateful, I’m so excited to have another bloggy friend, Becky from Creatively Content, here from half way around the world to share a beautiful Thanksgiving tradition she enjoys with her family.  She writes that her theme for this season of her life is to ‘use what we have’, and I can tell you that her blog is a beautiful testament to just that.

becky

Becky is an American blog momma living with her husband and three beautiful children in western Turkey near the Greek border. I’m always inspired by Becky’s faith, grace and creativity as she builds a wonderfully unique life for her kids.  I hope you’ll love the Thanksgiving Mailbox that she’s sharing today as much as I do.

*************************************************************************************

Hi everyone at THRIVE! I’m Becky from Creatively Content.

Creatively Content - Mozilla Firefox 11112011 120507 AM.bmp

The Thanksgiving Mailbox started because my girlies and me were sitting around making envelopes out of an old magazine and they played mail for a LONG time, sending sweet love notes to everyone in the family.

DSC00789

So I thought it would be fun to have a Thanksgiving mailbox where we wrote notes every morning starting 2 weeks before thanksgiving of things we are grateful for and put them in our mailbox. We used heavy duty cardboard for the bottom and the sides and a cereal box to shape the middle and back.

November 8,2011

The stand came together using cardboard circles and toilet paper tubes.

DSC00820-1

And everything was held together using hot glue.

The kids tackled the decorating with strips of magazine pages + mod podge since my scrapbook paper supply is small and precious.

November 8,2011

The envelopes are stored on the back of the mailbox in a little pouch with 5 little cards for each of us in the family to write what we are thankful for. 

One special thing I added was that 5 envelopes have each of our families initials on it and so each of us will write (some with help) 😉 one thing we are grateful for about that person. 

DSC00808-1

On Thanksgiving day we will open up all the 14 envelopes and remember what we were grateful for and each have our own envelope to open and see all the special things our family has to be grateful for about us. (The kids will love to get their own mail!  We have one for Jesus, too. 

Thanks Nike for including me in your Thanksgiving posts and hope you come and stop by Creatively Content.

Happy Thanksgiving everyone!

    **********************************************************

You’re so welcome, Becky! I’m making one of your mailboxes for Family Home Evening with my Dirty Half Dozen.

I’ll hope you’ll stop by and say hi to Becky this week. Her corner of the world is literally thousands of miles from craft stores or fabric shops, yet she always finds amazing ways to use what she has and make do with what she doesn’t. Her blog is full of projects that celebrate the spirit of recognizing and being thankful for everything we do have in our lives.

Case in point:

No theatres to watch movies? Or too expensive to hit the theatre? No problem.

Becky just whipped up the coolest invite-the-neighborhood-over-and-watch-Toy-Story-2-kids-theatre.

November 2011 BLOG-4

No cool race car floor mat? No problem.

Becky made one on the floor using masking tape. Genius.

becky.5

No sewing machine? No problem.

Becky just whipped up this adorable tiered skirt for her daughter without one. Seriously.

becky.4

Thanks again Becky for sharing your Thanksgiving Mailbox with us!

******************************************************

And to all you out there in blogland…

… tell me …

what are you GRATEFUL for right now as you get ready for THANKGIVING?

(Can’t wait to show you part 2 of the THRIVE Thanksgiving series on holiday outfits. Like I mentioned at the end of Brandi’s post, this has been the happiest little accident ever.)

Share this:

100_5473

Where were we?

Oh that’s right … the naked wall under my Chevron wreath.

100_5381

My favorite, favorite quote/phrase/scripture for Thanksgiving is the 100 Psalm and I knew I wanted to have that displayed somewhere in my home. The words are so beautiful:

Make a joyful noise unto the Lord, all ye lands.

Serve the Lord with gladness: come before his presence with singing.

Know ye that the Lord he is God: it is he that hath made us, and not we ourselves;

we are his people, and the sheep of his pasture. Enter into his gates with thanksgiving, and into his courts with praise:

be thankful unto him, and bless his name.

For the Lord is good; his mercy is everlasting; and his truth endureth to all generations.

I thought about making a plaque with wording, but decided to apply the vinyl right to the wall since it won’t damage the paint and can easily be changed for Christmas. I planned on using all white vinyl, but my awesome neighbor had this beautiful copper/bronzy vinyl that she hooked me up with that I am smitten with.

Here’s how it turned out:

100_5464

I love how the colors work together with the Chevron Wreath and the way the copper vinyl glows as the sun streams into the room.

100_5462

(Love the still unfinished trim work in the living room, eh?)

Have you ever tried using two shades of vinyl on your projects?

I hadn’t.

I cut the whole scripture in white vinyl first and then removed the letters I wanted to display in copper.

100_5387

The I recut a few of the words from the copper scrap …

100_5384

… and carefully applied them to the wall.

100_5477

100_5474

100_5480

And just like that, one of my favorite scriptures came to life on my wall.

And as I sit here typing this, I can’t help smile at my view:

100_5392

Now I realize that a lot of you don’t have Silhouettes so having a bunch of these projects can get frustrating. So … to make this project assessable to everyone and keep a Rock What Ya Got vibe, I’ve created several versions of this scripture in different formats so you can pick the one that works for you.

Option A: FREE COPIES

(yeah FREE!)

Silhouette users: email me at choosetothriveblog at gmail dot com and I’ll send you the file to cut your own. This should save you a couple hours of formatting and/or paying for a designs for the Silhouette store. A little tip here: weed slowly.

Silhouette Studio thanksgiving.studio 1142011 102619 AM.bmp

Non-Silhouette users: below are printable 8”x10” and 5”x7” versions that you can easily print out and pop into a frame you already have for a similar look.

8” x 10” Printable: Download HERE

thanksgiving.printable.pdf - Adobe Reader 1142011 114211 AM.bmp

5”x7” version: download HERE

5x7.thanksgiving.printable.pdf - Adobe Reader 1142011 114203 AM.bmp

Option B: Order Choices – SOLD OUT

1) If you need vinyl, my neighbor has kits for enough white and copper vinyl for this 12”x24” design for dirt cheap: $5. That way you don’t have to order a full role for a color like copper that you may only want a little piece of.

2) If you’d like to purchase a ready-made 12” x 24” version, I will cut a small number of these for $15 since they take quite awhile to feed and prep for application on a wall or board.

Again, email me if you’re interested.

100_5418

So there you go …

lots of options for a beautiful reminder of this season of thanksgiving.

Linking up to:

Skip To My LouCraft-O-ManiacC.R.A.F.T. *  Stories of AtoZ, Tip JunkieSugar BeeToday’s Creative BlogSassy SitesMy Uncommon Slice of Suburbia * Someday CraftsLil LunaWe Are That FamilyBlue Cricket DesignsThe Thrifty Home, * House of Hepworths, *Tidy MomWhipperberryKojo DesignsChic On A Shoestring, Momma’s Kinda Crafty, *Tatertots & Jello, Be Different Act NormalFunky Junk Interiors * I Heart NaptimeUnder The Table and Dreaming

Welcome to the holiday season everyone!

Halloween costumes and decorations were packed up this morning in gleeful anticipation of Thanksgiving. I hate the blitz to Christmas and the rush to throw red and green up too soon. Because there are so, so many things to be thankful for. And I know that for me, the more time I spend focusing on my blessings and the spirit of Thanksgiving, the more likely I am to remember the true spirit of Christmas.

So … first up on the Thanksgiving decorating agenda?

cover

I made this little beauty with the last of my gleaned wheat and some scrap chocolate satin.

The frame was a double thickness of cardboard wrapped in scrap fabric, just like I did for my wheat and burlap wreaths.

100_5353_00

Two tones of wheat were hot glued in a chevron pattern to give this little frame some fun pattern and texture.

100_5356

The edges on the outside …

100_5360_00

… and inside of the frame were covered with a double layer of wheat.

100_5361_00

I was going to print off a quote or picture on scrapbook paper and tape it to the back (which would look great), but I decided to leave it open and tie a simple ribbon bow from scraps.

And don’t worry if you don’t have any gleaned wheat laying around. Any dried flowers, seed pods, weeds or even wheat from the craft store would work. You could also get a similar look by skipping organics all together and using two tones of burlap or muslin. Hey, rock what ya got, right?

A quick bow and a cheapie thumb tack later … welcome Thanksgiving.

 100_5376_00

This little half wall next to my computer is the perfect spot for this holiday frame .

100_5381

Tomorrow I’ll show you what I put beneath the frame to finish off the wall.

Until tomorrow … (Edited to add)

Here’s the link to the Thanksgiving subway art I added below the frame HERE:

100_5462

Hey thanks guys!

craft.gossip.feature

Linking up to:

Skip To My LouCraft-O-ManiacC.R.A.F.T. *  Stories of AtoZ, Tip JunkieSugar BeeToday’s Creative BlogSassy SitesMy Uncommon Slice of Suburbia * Someday CraftsLil LunaWe Are That FamilyBlue Cricket DesignsThe Thrifty Home, * House of Hepworths, *Tidy MomWhipperberryKojo DesignsChic On A Shoestring, Momma’s Kinda Crafty, *Tatertots & Jello, Be Different Act NormalFunky Junk Interiors * I Heart NaptimeUnder The Table and Dreaming

Today my kids will don their homemade costumes, upcycled treat bags and eat their body weight in Halloween candy.

Tomorrow I will box up those costumes, recycle their treat bags and confiscate their candy in the hopes of some slower, healthier consumption.

The day after that I officially kick into Thanksgiving and Christmas mode.

First thing on the agenda: ordering Christmas cards.

Why?

With all of texting, emailing, Skyping, Facebooking and calling, personal mail has almost disappeared.

And I miss that so much.

I miss the anticipation of bright envelopes and Christmas stickers in my mailbox … the happy sight of all those cards taped to my pantry door … the nostalgic part of me that won’t let me take down the pictures of the people I love most until well into January.

2009-12-31

And it’s going away.

Every year there are less cards in the mail box, less cards up on that pantry door and less excitement about seasons greetings when I know it’s probably going to be just a quick “Merry Christmas Friend #215” on my Facebook wall.

That first Christmas after the Layoff Fairy found us, I insisted on sending out Christmas cards. I only dared send out a handful … but I sent them. And I was so grateful for all the ones that landed on my doorstep—cards that said not only Merry Christmas, but we love you … we’re so sorry that you’re going through this … we’re thinking and praying for your family … in ways that no digital greeting could possible convey. And I kept everyone one of those cards to remind me just how blessed my family has been.

There’s another reason I love the whole ritual of sending out Christmas cards and it’s purely selfish I suppose. For all of the busy, all of the budgeting and all of the blur of the holiday rush, I appreciate more than ever the chance to stop … pause … relish the magic of the season … think of each of the wonderful people on my greeting card lists … take a minute to hand-write a little note on the bottom of their card … address their envelope with red and green markers … and affix just the right holiday stamp to say:

I love you.

I’m thinking of you.

You’re worth two minutes and .44 cents of my time.

That’s why I’m so excited to partner with Shutterfly again this year to help make this tradition more affordable for us all.

I’ve ordered from Shutterfly several times and am always impressed with the results. Some of you who have been with THRIVE since the beginning will remember last year when I wrote about our terrible luck getting traditional Christmas cards—a fact that I’ve come to embrace and even look forward to. Last year I hauled my Dirty Half Dozen down to the isles of Walmart to take our annual Walmart Walk of Shame holiday cards … then picked out and customized the heck out of my favorite Shutterfly design … and  squealed out loud when my box showed up a few short days later.

Dec 2010 BLOGI adore orange. This box made me soooo happy.

And the cards?

100_2196

Pure delicious awesomeness.

I LOVED my cards from Shutterfly and the chance to use their great discount code to order enough cards for everyone on my list while keeping my budget right where it needed to be.  These cards captured my family’s spirit and energy in a completely professional , completely unique, yet completely this-is-so-cool-that-I-can-create-the-perfect-Merry-Christmas-From-Produce-card sort of way.

And the designs this year?

Be still my beating heart. How ‘bout these?

October 2011 BLOG3-13

Or maybe the coolest snow globe ever … or a precious declaration of faith.

October 2011 BLOG4-2

This Alleluia card slays me. I’d pick this one hands-down if we had a newborn in our house. But since we’re done, I’m crushing on this gorgeous monogram / collage number.

October 2011 BLOG5-1

Or course then I’m in love with all things plaid right now, too.

 October 2011 BLOG6-1

And these tea length cards? I’m dying here. Tree collages? Snowman smiles? Double-dog dares?

 October 2011 BLOG7

Good luck picking just one design.

Shutterfly also has photo gifts like books, puzzles and our go-to favorite for grandparents: the calendar.

calendar

This never gets old and is always appreciated. I love being able to personalize our calendar with pictures and special occasions to make it easy to remember all those dates.

So …

I’m marching down to Walmart this week with the Dirty Half Dozen to snap our annual Walk of Shame pictures to share with friends and family. I’m trying to decide between 1) Merry Christmas from Small Appliances, or 2) Merry Christmas From Paper Goods: wishing you all a spare square

(I apologize to the non-Seinfeld groupies out there who have no idea why I’m giggling right now).

And I’m looking forward to that bright orange box showing up on my door step … and curling up late one night with hot cider and White Christmas on DVD …

100_2776

… and addressing those funky cards while the lights glow from across the street and across the room …

fogg

… and quietly remembering how magical and wonderful this time of year really is.

Want to join me? How does FREE sound?

I get to giveaway a set of 25 free Christmas cards to 3 lucky THRIVE readers!

AND … to make the deal even better:

All you bloggers out there can have a chance to get 25 free cards by registering here: http://goo.gl/DDw7Q

To win, just leave a comment about my Walk of Shame pictures and which random Walmart isle I should capture the magic.

That’s it.

I’ll draw the winners Wednesday, November 2nd at 10 pm Mountain time.

Happy sliding into the holidays, everyone! Be back tomorrow with the first of several Thanksgiving projects!

** I received free Shutterfly Christmas cards in exchange for writing this post and couldn’t be happier. But free isn’t worth it if it’s crap, so my recommendation is based on my past, very awesome experiences with Shutterfly and my excitement to hook my amazing readers up with the same bit of holiday loot.

Thanks everyone for your patience this week while we got everything transferred over to the new system.(Thanks Jon & Eric!)  It’s soooo nice to be blogging on a computer that isn’t 8 years old.  Now back to the regularly scheduled programming. 🙂

***

I believe the children are the future. Teach them well and let them lead the way …

Sorry. 80’s tangent.

What I’m trying to say is:

When you find a girl with mad crafting skills, hand over the glue gun and get out of her way.

Check out this hat!

hat.17

I so wish I could claim credit for this awesome number, but the round of applause goes to this talented, 13-year-old rock star, Miss{K}.

miss k

Isn’t she sweet? I’m lucky enough to be neighbors with Miss{K} and her amazing mama Miss{A}.

When Miss{A} showed me these pictures, my jaw dropped. Seriously people … Miss{K} is 13 and she just “threw these together.” I asked Miss{A} if I could share the incredible hats that Miss{K} put together for a local Halloween craft festival they went to over the weekend.

I love this project since it can double as decor and a great costume. I’m not big into dressing up for Halloween any more, but I’d totally wear this all month if I had one.  Seriously … if you see me at the grocery store you’ve been warned. The other thing I love is that you could easily adapt these hats to Rock-What-Ya-Got and make your own version using items you already have on hand.

Multi-Colored Tulle Hat

hat.11

Miss {K} loosely wrapped orange, purple and green tulle around the brim and hot glued it in place. The tulle “flower” was made by tying regular bows out of the same colors of tulle and hot gluing them in place. Two rosettes were made from the 1”satin ribbon and tucked in beside the bows, a little scrap of black tulle stands in for a leaf, and a glitter spider adds the  final touch.

Black Widow Hat

hat.14

Same fun look with black and red glitter tulle using a braided band of tulle around the brim.

Purple Potion Hat

hat.15

Miss{K} glued the tulle in bunches around the brim, added a tulle bow and a finishing black glitter spider.

I totally want all three. For me.

*Swoon*

hat.12

Hopefully Miss{K}’s awesome hats will inspire you to make your version using items from around your house, Rock-What-Ya-Got-style. (Or even from the store, tulle and ribbon are pretty cheap).  I’m so planning on making one of these for me and my girls using what we have on hand: scrap t-shirts and ribbon in the same colors.

If you make one, send me an email or post it on Thrive’s facebook page—I’d love to see it!

Thanks again Miss{K} and Miss{A} for sharing your wicked-awesome hats!


Linking up to:

DIY Show Off Fall Festival, Skip To My LouCraft-O-ManiacC.R.A.F.T. *  Stories of AtoZ, Tip JunkieSugar BeeToday’s Creative BlogSassy SitesMy Uncommon Slice of Suburbia * Someday CraftsLil LunaWe Are That FamilyBlue Cricket DesignsThe Thrifty Home, * House of Hepworths, *Tidy MomWhipperberryKojo DesignsChic On A Shoestring, Momma’s Kinda Crafty, *Tatertots & Jello, Be Different Act Normal * I Heart NaptimeUnder The Table and Dreaming

100_4305-1

Another holiday, another chance to blow $5 on Halloween t-shirts at Old Navy or Target or Walmart or whatever.

But you know me—that’s $30 bucks I’d rather not shell out. Plus, I love the idea of making my own designs and using up my never-ending fabric stash.


Besides, how could you not want to make your own when you have ridiculously cute crocheted flowers like these to work with?

shirt.2

I scored these beauties a few weeks ago at a bloggers meet-up from the awesome ladies at Riley Blake Designs. As soon as I saw them I knew they’d be perfect for Halloween sewing.

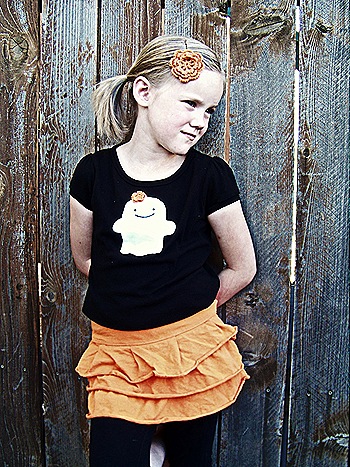
You’ll love how easy it is to make your own tees inspired by favorite prints, fabrics or clothes already in the closet—a perfectly coordinated outfit that comes together in 15 minutes flat.

Want to make your own?

To make this project you’ll need:

100_4209

As for the actual shirt designs, I looked no further than the RBD catalog and fell in love with this fun Halloween print.

riley blake

I loved the ghost and skeleton and made up a pattern to match. (Although I can’t wait to make the owl, spider and bat next!) And if I wasn’t in the middle of my THRIVE challenge, I would so be making matching skirts out of this fabric for both my girls.

*Swoon*

I used plain ‘ol shirts as the base, cut my Halloween shapes out of scrap t-shirt material and just straight stitched around the edge.

Sept 2011 BLOG3-1

And the best part is that you can use shirts that have existing designs. I just pinned right over top of this bird and stitched away—no interfacing, no fusible webbing, no ripping out a bunch of embroidery.

Sept 2011 BLOG3

I wanted the little faces to match the fabric as much as possible so I cut out the eyes and mouth with an craft knife, traced the design with my nicest glue BIC pen …

100_4261

… and then carefully painted over the pen marks using the only black paint I had on hand: interior latex satin paint.

100_4264(Yeah, wasn’t actually kidding about using house paint peeps. Rock What Ya Got., huh? 🙂

Flowers were hand switched in place after the paint was dry.

Sept 2011 BLOG3-3

L*O*V*E*

100_4362100_4360

Kid #3 loves hers and is already plotting which homemade tights to wear with her new Halloween digs tomorrow.

Sept 2011 BLOG3-5(Want to make your own tights? Click here.)

Right now she’s leaning towards skull/green flower shirt + black skirt + Dr. Gru tights + Wizard of Oz shoes.  Oh boy.

So there you go! Have fun making your own Halloween tees to match your favorite skirts, pants or fabric prints!

shirt.3

Linking up to:

Skip To My LouCraft-O-ManiacC.R.A.F.T*  Stories of AtoZ, Tip JunkieSugar BeeToday’s Creative BlogSassy SitesMy Uncommon Slice of Suburbia * Someday CraftsLil LunaWe Are That FamilyBlue Cricket DesignsThe Thrifty Home, * House of Hepworths, *Tidy MomWhipperberryKojo DesignsChic On A Shoestring, Momma’s Kinda Crafty, *Tatertots & Jello, Be Different Act Normal * I Heart NaptimeUnder The Table and Dreaming

firework.9

Ya know that 4th of July kick I’ve been on?

Yup … still there.

I’ve been watching for fun holiday clippies for my girls to go with their new flag tees (more on those later). And while there are so many cute flower-corker-ribbon-tulle clippies out there, I was looking for a bit of a change.

Enter the Firework Clippie.

fireworks.4

Cute and shabby and oh-so easy to switch up for any holiday or outfit.

Want to make your own?

You’ll need your nicest, faded-out Sundance shirt, old-for-painting-only white polo and ratty Superman shirt.

firework.1

Or whatever.  🙂   Rock What Ya Got, right?

And you can make these in minutes.

Cut red, white and blue shirts in 0.5” x 4” lengths. Stack 12 strips together and tack together in the center with a few stitches.

firework.5

Tie a 3” strip around the middle and glue in your clip.

firework.6

Easy. Quick. Done.

fireworks.7

Firework clippies perfect for those hometown parades, pancake breakfasts and firework displays.

Happy Crafting!

Signature

Linking up to:

thecsiproject.com-logo-150 tidy.momWBwwatttandj