It’s time to actually spruce up the ‘ol front porch for the 4th.
Turns out, though, I’m fresh out of décor for the 4th of July or porches in general.
And as usual, my budget is zero dollars and zero cents.
That means I’m left with whatever I can make out of my classy craft stash of old, stained shirts and trashy I’ve-been-through-six-kids stuffed animals.
Nice.
But with a little creative cutting, sewing and repurposing, I still managed to come up with:
3 pillows + 3 ways + 3 stuffing types
As always I hope you can take this idea andRock What Ya Gotand make your own version without a run to the store.
#1 – Striped Pillow with zippered close + old throw pillow
I grabbed two stained polo shirts, pieced together wide stripes for the front and added a solid (red) piece for the back. Stained fabric? No biggie. Use the back side … no one cares or will notice. I added some top stitching for extra awesome points along the stripes, a zipper at the bottom and slid in an old throw pillow to finish. Done and done.
#2 – Blue Star pillow with button closure + fiberfill stuffing
I ironed Heat’n’bond ultra to the back of some scraps and then cut stars on my Silhouette machine (hand cutting works great, too). Shapes were ironed on and top stitched for again—extra awesome points. Because I’m lazy I loved the wide hem on the bottom of the shirt, I used that look to finish the pillow. Fronts and backs were pinned together right sides OUT and then stitched completely shut. How’d I get the stuffing in? Easy! I just flipped the pillow over (to the old front of the shirt) and inserted the stuffing through the three buttons that ran down from the neckline. (Yup, I totally left them attached to save time.) Once the pillow was stuffed, I buttoned the shirt back together, flipped it over and voila! Finished pillow with a sneaky closure.
#3 – Camo U.S.A. pillow + old stuffed animal fluff
Oops, I did it again. I pulled a few ratty stuffed animals out of the ‘toss’ pile and pulled out all the stuffing to add to this pillow. So sick of still having Easter plush around the house. Those clearance isle Easter Bunnies that are falling apart need to go bye-bye. I cut the letters on my Silhouette CAMEO, but again, scissors work great, too. The side seems were already in place from the shirt and the top/bottom edges were machine stitched closed in two seconds flat. I left a small opening along the bottom to stuff the pillow and whip stitched it closed.
So there you go – 4th of July flair no matter what you have on hand!
Now go grab those fabric scraps. Slip cover an old throw pillow or two. Use the buttons on a t-shirt for a quick closure. Put the stuffing in those unused stuffed animals to work.
Bet you come up with something flat-out-free and fabulous!
This shirt can be worn plain. And sometimes plain is fine.
But sometimes plain gets the boot with a funky 3/4 ruffle or striped, full-length sleeve.
Just slip socks or leg warmers on all the way up to the shoulder and you’re set.
You can attach your new sleeves with a zig zag stitch/serger to make them permanent or just wear them opera glove style depending on your fashion fancy. Go for a more polished look by wearing the faux sleeves with the finished edge showing or keep it super casual with the raw edge exposed.
Here’s another example:
most days this is just a plain black shirt.
But add some faux sleeves and you’ve got a holiday wardrobe in seconds.
See?
So …
Go hack up some socks or drag out those old leg warmers
Have you been recycling old shirts, chopping up boxes and turning cake pans into stars? Have you found awesome deals on line and scored some great deals? I hope so.
But if you’re like me and still have a few items on your shopping list (plus the never ending need for more of those staples), make a conscious effort to save money AND support your local businesses.
Why?
Because I’m an official in my city and can tell you how much local businesses drive our economy. I’ve seen first hand how money spent in local stores impacts our communities several times more than online sales. You want more money for roads-schools-police in your neighborhood? Shop local. You want lower property taxes and bond costs? Shop local. When Main Street shops get overlooked, the recovery for all of us is slower.
And stop – before you go there – I’m here to myth-bust about local being more expensive. Shopping local isn’t just a noble idea, but a savvy way to save. You really can get awesome deals. Really.
Yes, they’ve got amazing deals on up-scale catalog furniture—they’re famous for that and their selection rocks.
But I’ve got four – FOUR – great reasons to swing by THIS WEEK and in 2013 even if you’re on a shoe string budget like me and not in the market for a new couch:
1. CLOTHES
DownEast has the cutest, comfiest, most affordable stand-up-in-the-wash-like-a-champ clothing staples like camis and layering tees that everyone needs.
Finding affordable clothes that are actually modest and cute is getting harder and harder. That’s why I’ve fallen in LOVE their in-house DownEast Basics line.
I have two daughters who are crazy tall with wicked cases of plumbers butt. Since I have yet to make camis and tees successfully out of cardboard, these were at the top of my list. Plus it buys me a little more time with those shirts that are getting a little too short. See?
Baby girls was ticked when I told her it was time to retire her favorite black tee. Add a DownEast lace cami and problem solved.
Ah, way better.
This lace one was under $5 and layering tees are 2/$15 right now. Yeah, I’m stocking up. Mr. Thrive loves the price and everyone at church and school appreciates that my girls are no longer mooning them.
DownEast also has designer denim and accessories for 60-80% off what your kids want you to fork out at the mall. And when those cute jeans that you or your daughter want are high two figures (or even three), slashing that price by way more than half gets your attention very quickly. It’s all name brand stuff, but the prices are so low that I’m seriously not allowed to say them out loud … or in print … or even show you pics. I’ve been in their stores several times over the last few weeks and can tell you I checked it all out … and saw the prices … and maybe drooled a little bit since we’re Rock What Ya Got at our house and I’m not used to having “cool” stuff be in my price range – ever.
So don’t worry about the mysterious hey-I-can’t-tell-you-the-brand-names-thing. Let’s just think of it as the designer blinged-out denim Who-Shall-Not-Be-Named. Or the designer blinged-out denim brands that I could tell you about, but then I’d have to …. well, you get the idea.
2. DESIGNER from-the-huge-catalog-companies LINENS, HOME DÉCOR, and KIDS STUFF
(wait … that’s probably #2, 3 and 4. 🙂
DownEast gets the overstocks, seconds and discontinued items from some of the biggest catalog and department stores. Monogramed 300 thread count sheets with the wrong letter or kids backpacks with the wrong name. No biggie. Five minutes with a seam ripper and you’ve got sheets-curtains-bedding-backpacks-suitcases-lunch boxes-pillows-you-name it for half of what you’d spend on the cheapy generics at the box stores. Yeah, half. At least. And the quality kicks butt.
I’ve been on the look out for new sheets for my girls’ room after kid #6 went all Edward Scissorhands on us, but I have completely struck out at thrift stores and online. Again, cardboard is not an option so I’m looking for cheap. Yup … found a complete set (flat, fitted, shams) at DownEast for thrift store prices. Perfect color, too.
3. HOLIDAY DECOR
Do you need stockings still? Or are you thinking that you’ll need to replace them next year if you can find a good sale after Christmas? They’re 50% right now. That means stockings like these are $2.50 – $5 each. They’re thick and heavy and will last for years to come. My favorite is the red and white striped wool number.
But confession: no one in my house is named Jean-Luc.
These were $30 in the catalog and I snagged the 100% wool yummieness for way less that I could have found the fabric even with a coupon (under $5!). Since I don’t have any old wool sweaters or friendly sheep around, this worked out handy. And kid #4 who has a thing for snowmen? Snagged that one for him for $2.50.
I also found this ridiculously cute Santa sack for under $5.
And confession … it’s not the right name (although you may just find yours!)
But … you got it. It’s a cinch to cover or remove and I know the kids are going to freak out when they see that Santa left his sack at our house.
4. AWESOME CLEARANCE & WEEKLY SALES
I’m a THRIVE-r so I went straight for the clearance and sales racks.
Holy cow. Can I just show you my score?
Kid #3’s backpack was a $10 clearance find from Wallys. It was made out of paper (apparently) and lasted us all of four months. I found this extra-thick-padding-and-reinforced-seams backpack AND matching lunch box with the easy-washable-so-you-don’t-get-the-funky-sour-milk-smell liner that she’ll love. Catalog price for the backpack alone was $40. DownEast had it for $11.99. Catch one of their awesome sales and you’ll pick it up for 30-50% off that like I did. And the lunch box? Picked that up for $3.
But kid #3’s name isn’t Gaby. Or Sophi. Big whoop. My seam ripper took care of both in just a few minutes. I could even just cover over the stitching with a cute applique or name tag. Such an easy fix.
Or how about this crazy-cute sleeping-bag-blanket-roll? I’ve seen these in popular children’s catalog and they’re $80+.
Yup … a mere $80. Kid #6 really, really wants one of these for Christmas. Thanks to DownEast’s low prices + great sales, I got the whole furry puppy head, sleeping bag and paws for less than a Pillow Pet. Of course no, my daughter isn’t a Paiyton. I’m going to turn on White Christmas after the kids go to bed and take care of that. I’ll have that name off before anyone gets their life saved by Phil Davis. Easy peasy.
I even did something for myself that I haven’t done in months … I bought a new shirt. I had big, big plans to hack apart a sheet and refashion the heck out of it, but I’m running short on time and wanted something special to wear to church for our Christmas program. I figured I’d grab a cheap-o shirt at the thrift store … or Wallys … or Tar-jay. Instead I found this $10 number that looks awesome even when I’ve been caring kid #6 around all day.
I may have worn it three days in a row over the last week already. I get compliments all the time which is a really big deal for me. Not because I’m vain, but because I usually am so focused on making sure the kids are covered that I never take care of me. Any other moms out there guilty, too? And while I’m so proud of how my kids look at Christmas or Easter, I usually sit next to them in something worn out and frumpy. This year I realized how important it is to treat myself with the same kindness and respect that I give my family. If it was important for my family to look nice for the holidays, it should be nice for me to as well. Finding a shirt for myself that didn’t make me feel like I was “taking away” from my family’s needs made me float. Turns out stick-to-the-basics pricing can still be cute, too.
So skip the traffic at the malls and box stores.
Skip the expense of rush of shipping online.
Check out DownEast for those Christmas items still on your list and save yourself some of that well earned money.
*Disclaimer: I received a gift card to shop at DownEast, but all opinions, stories about my daughter’s plumber’s butt, plans to watch White Christmas, hygiene-pushing “hey-I-really-love-this-shirt-and-seriously-live-in-it” confessions and civic-geek passion for shopping local are 100% mine.
As I mentioned in my last post, me and my kiddos are excited to share what we’re going to BAKE, MAKE, DECORATE and also SHOP this holiday season. This week we’re in DECORATE Land and, true to my word, I’m letting the kids call the shots.
And I gotta admit … it’s tough.
Why?
Is it because I’ve got some awesome ideas on my Pinterest boards?
Sure.
And because I’m pretty crafty and I’ve been planning for months to make stuff?
Yup.
But when I’m really honest I’ll tell you that I want my house to look awesome-wonderful-color coordinated-festive-wow-she’s-amazing-even-though-they’re poor when my friends come over because it helps my self esteem. Letting go of that part of my vanity in favor of letting my kids find their own magic was harder than I thought.
But this ‘kids in charge’ thing has been awesome.
I drug out the Christmas bins over Thanksgiving weekend and sat the kids down to make a plan.
Plan? What’s a plan, mom?
They just wanted to go nuts and start throwing things up. And I almost ruined the whole dang thing by insisting on them planning their spontaneous holiday decorating. When I finally got out of the way and let them welcome Christmas on their own terms, I had the funnest night in a long time.
And so the kids claimed my for-the-entry-way-only mini trees and hauled them down to their rooms. And decorated the heck out of them. And added gobbs and gobbs of extra colored lights. And they were so stinkin’ proud of how they turned out.
See?
And they insisted on using every ornament – every.single.one —on the tree in the living room. I think some potted poinsettias, candy cane pens, a glitter tree headband and wooden power lines from my son’s model railroad also made it on there, too.
Even the old-metal-hanger-tinsel-star that Mr. Thrive and I made after we got back from our honeymoon wound up on the tree, too.
Haven’t seen that thing in forever. Does seem oddly appropriate, though.
And after a solid hour of Christmas music, the kids were in the mood for something a little more upbeat from mom’s playlist. Done. And man did these kids have a blast rocking out and decorating away to 2012’s newest holiday anthem: Gangnam Style.
When they were all done, our Christmas tree looked like this:
A department store “Holiday Dream Tree” this is not.
And my kids’ lovely décor will never, ever make the rounds on Pinterest. As a blogger, that should be a big no-no.
But six kiddos giggled and laughed and rode air horses late into the night while this happy momma snapped pics and finally let go again of that reoccurring feeling of sadness for what I can’t give them. What we can create together as a family is more than enough and I’ve got the pictures and video to remind me when I forget again.
There’s been lots of glue gun action and sewing over the weekend as my kids had fun bossing mom around.
We’ve even got a new holiday playlist on iTunes that we’ve been rocking out to … more Gangnam Style, The Piano Guys, Justin Bieber, the Gummy Bear song and even some Jingle Bell Rock. The rest of this week I’ll be posting the fun projects that we made together to decorate our entryway, faux mantel, tree and walls. Bring on the cardboard, hangers, and repurposed old t-shirt goodness … Gangnam style, of course.
My daughter’s convinced that she needs an extensive Halloween wardrobe.
I’m convinced that it’s not gonna happen.
Luckily for her I have a closet full of these ripped, stained and worn out gems.
Toss in some thin elastic and scissors and I came up with this candy corn themed, ruffled skirt refashion in a single nap time.
Ah, compromise.
And this has got to be one of the easiest sewing projects ever. Start with a white t-shirt that easily fits around your girl’s waist.
When you flip the cut-off rectangle upside down, you see that you’ve got a handy-dandy skirt base with a pre-sewn waistband all ready to go. And since t-shirt fabric doesn’t have to be hemmed, that raw bottom edge doesn’t need any sewing at all.
You’ll need to cut and piece together strips of white, orange and yellow t-shirt scraps to make the ruffles for each layer. The width is up to you and how long you want each layer. The length of all your pieced together strips for each color needs to be double the width of your t-shirt base.
My t-shirt base was 15” wide so I made sure my strips totaled 30” long. I stitched my scrap strips together to make three long loops of fabric …
… and then ran a long basting stitch along the top edge of each one. I gently gathered each loop of fabric until they were the same width as my t-shirt base.
(Make sure that any screen printing, stains, etc. are facing the inside of your ruffled layers!)
Pinning and attaching each ruffle layer to the t-shirt base was a quick and easy.
And the best part was using that already-sewn bottom shirt edge as a casing for the elastic. Love that.
The only thing left to do was sew the elastic ends together!
Sweet! Done and done!
In less than an hour I wound up with a cute t-shirt skirt refashion in time for Halloween that’s the cat’s meow. Um, apparently.
And while I was cleaning up, I put those left-over scraps to good use.
I cut some rag ribbon for easy piggy tail love, Halloween treats, or whatever.
So there you go!
I hope you take a look at your fabric stash and have fun whipping up something awesome during nap time!
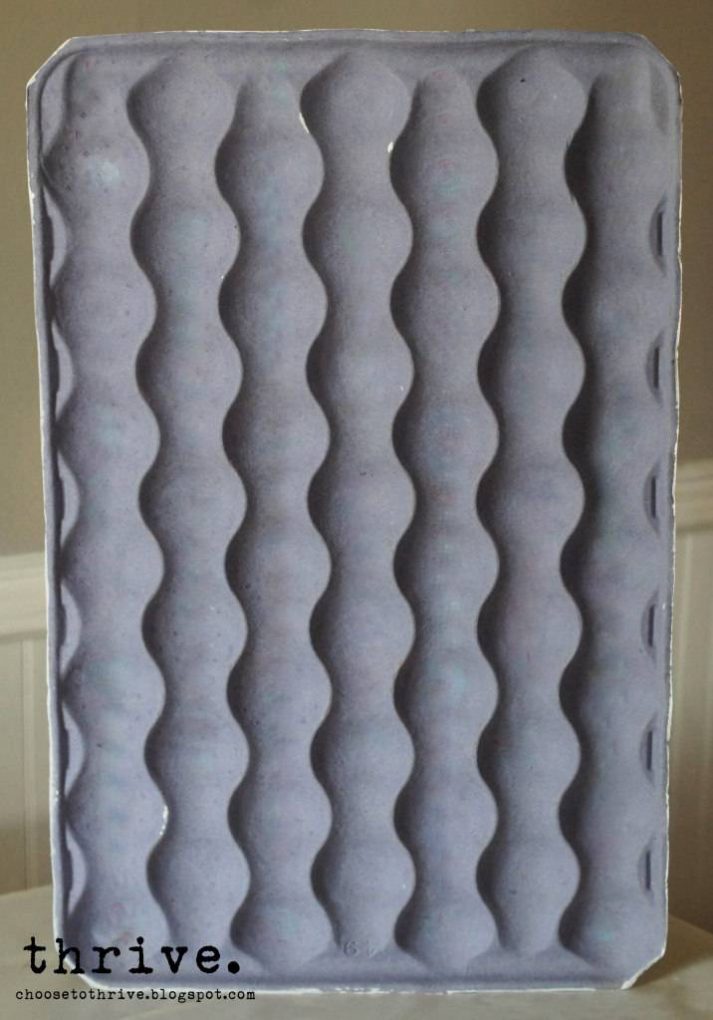
(Originally shared as a guest post on Ucreate Kids here.) Holy cow … Halloween is just around the corner. That means me and my six kiddos have been on the look out for everyday items to repurpose for Halloween. This weekend we hit the mother load … in the produce isle. Turns out with some paint and glue, you can turn an apple tray into something frightfully fun.
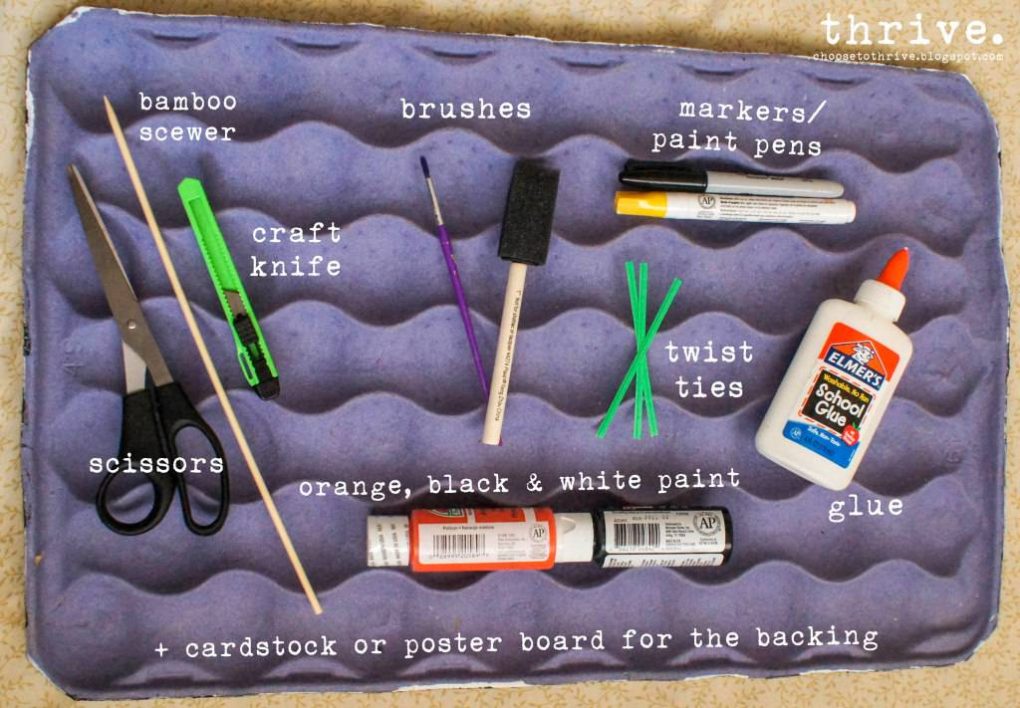
Frightfully fun for flat-out free! You can use this at home or in a classroom as just a calendar or filled with little treats to open each day. Want to make one with your kids, too? For this project you’ll need a cardboard apple tray from the produce section +
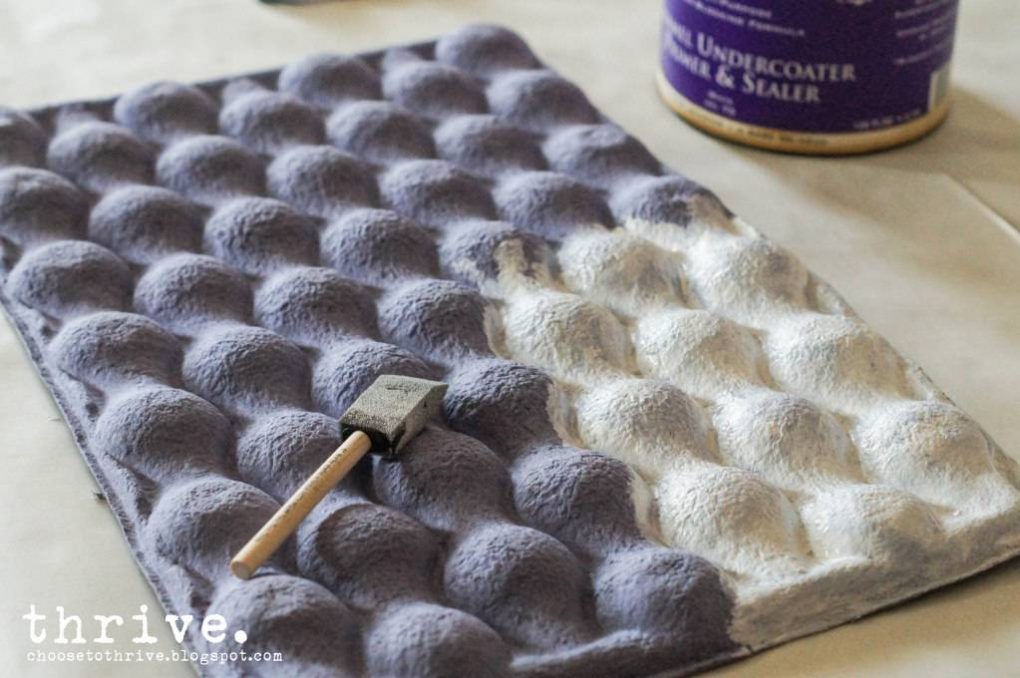
(Produce trays are usually free from your grocery store – just ask the produce guy to grab you one.) As always I hope you’ll rock-what-ya-got and adapt this project to whatever supplies you have on hand so that you can make this for free or dirt cheap. Prime the tray with a cheapy sponge brush and whatever white paint you have on hand: craft paint, house paint, plain ‘ol primer. Just skip the spray paint – the paper tray is crazy porous and sucks it all up.
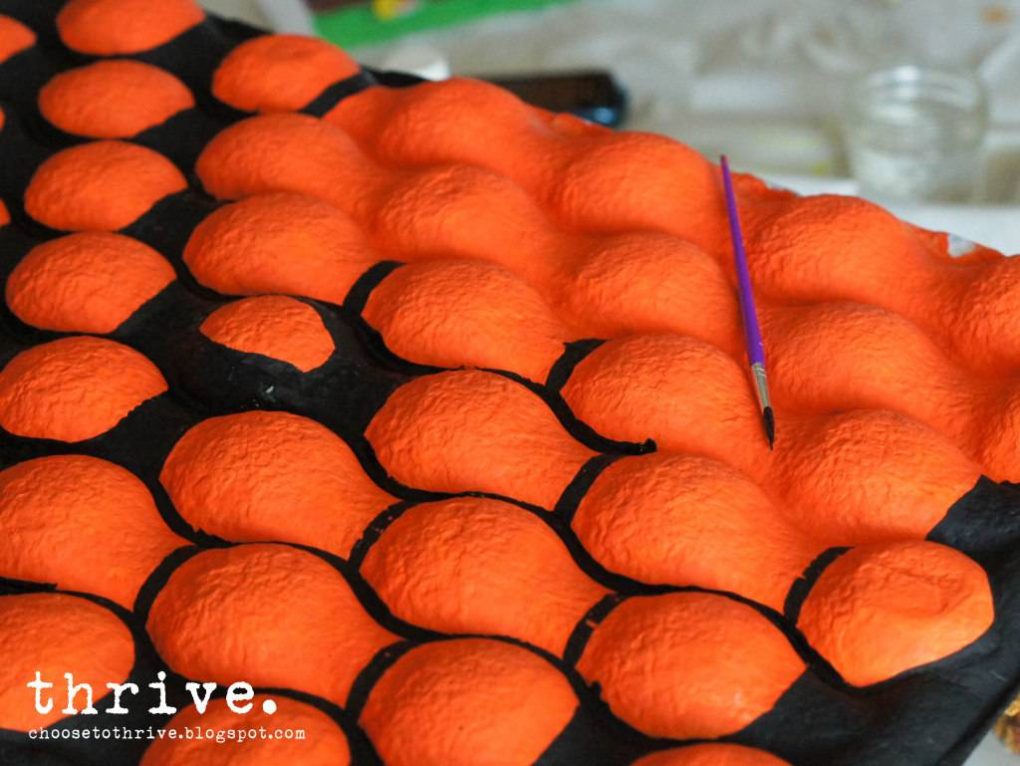
Add a coat of orange paint …
… and then carefully paint the edges and creases black with a small paint brush.
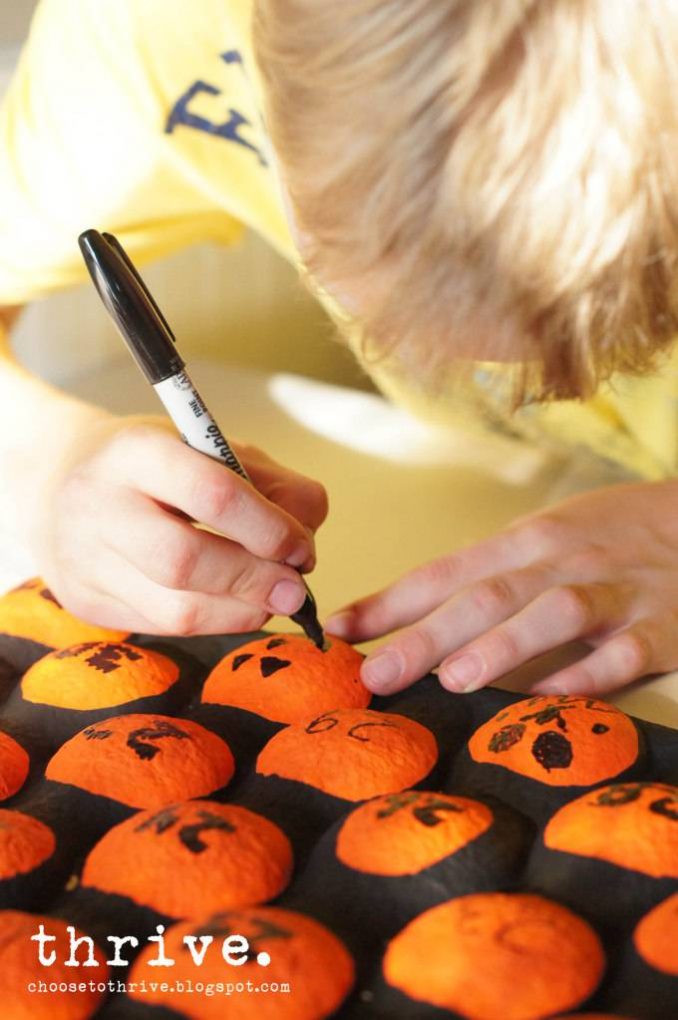
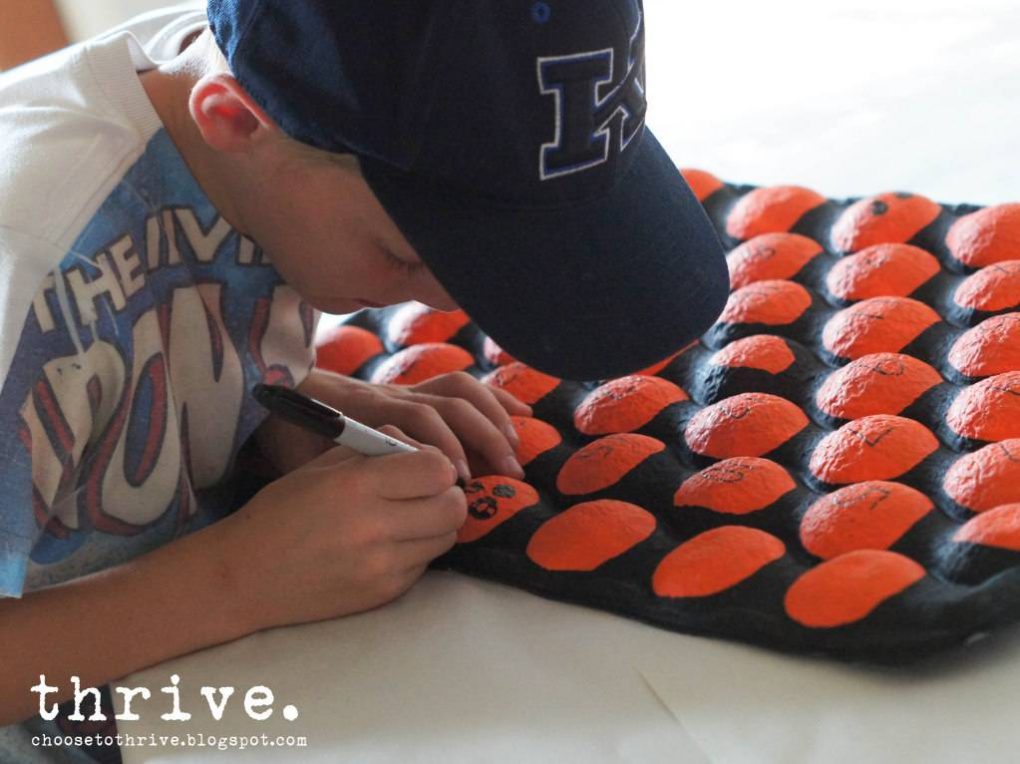
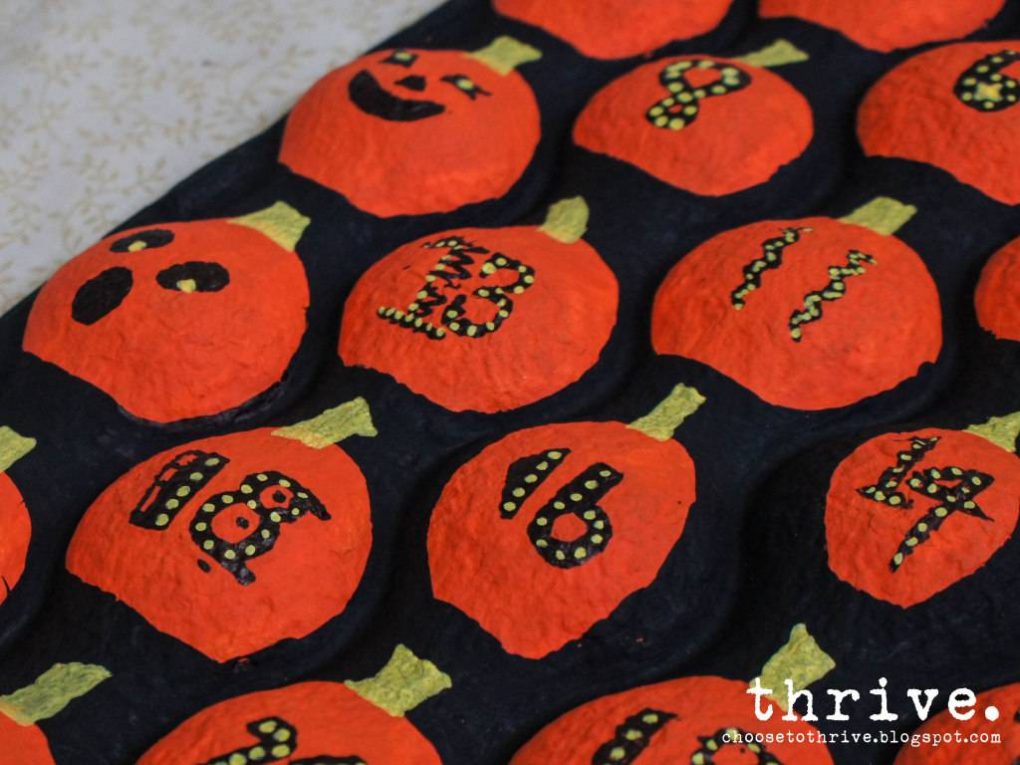
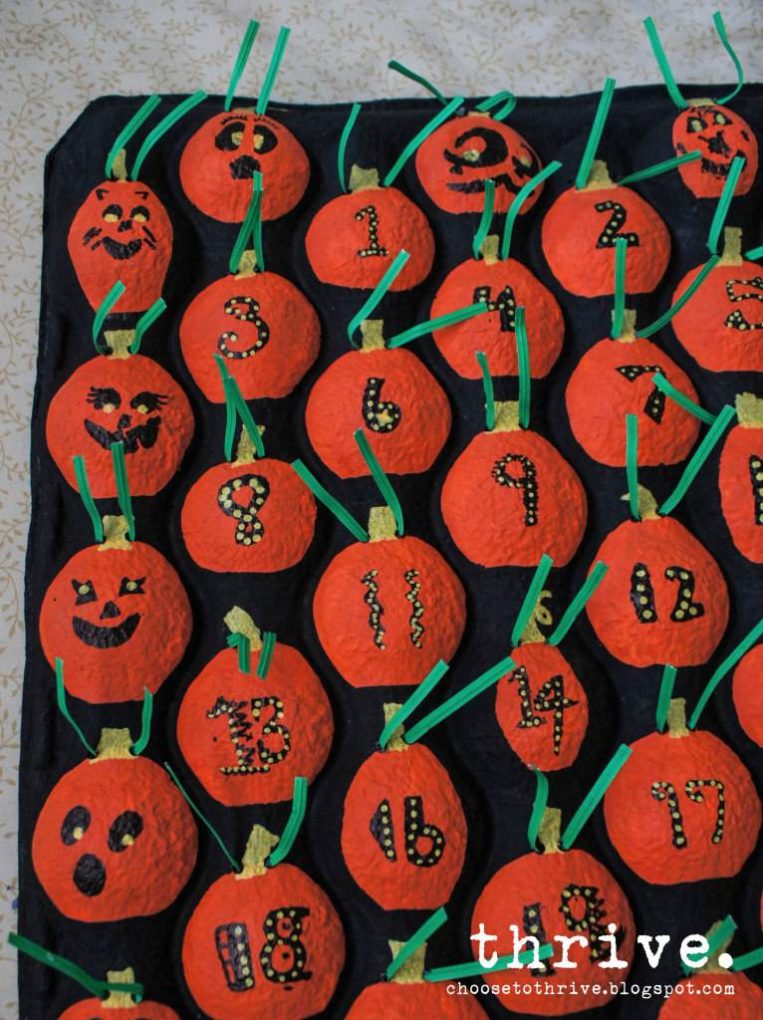
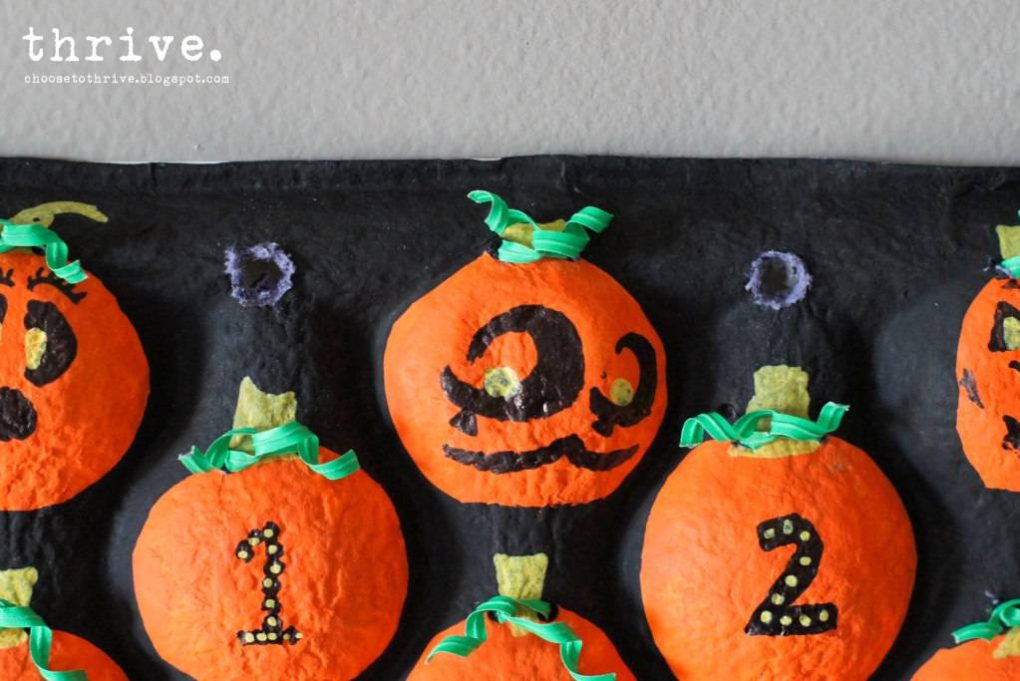
Add stems and calendar numbers with a Sharpie and paint marker.
(I marked the numbers first and let my kids do the decorating.)
The remaining pumpkins on the sides can be dressed up with jack-o-lantern faces or left plain.
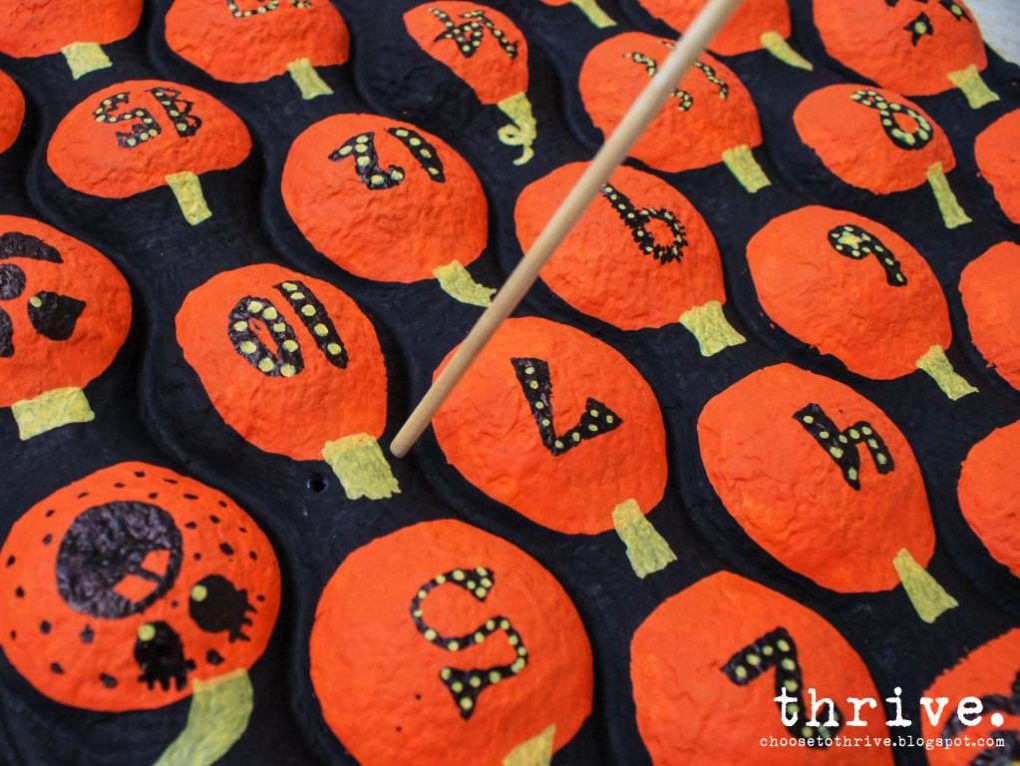
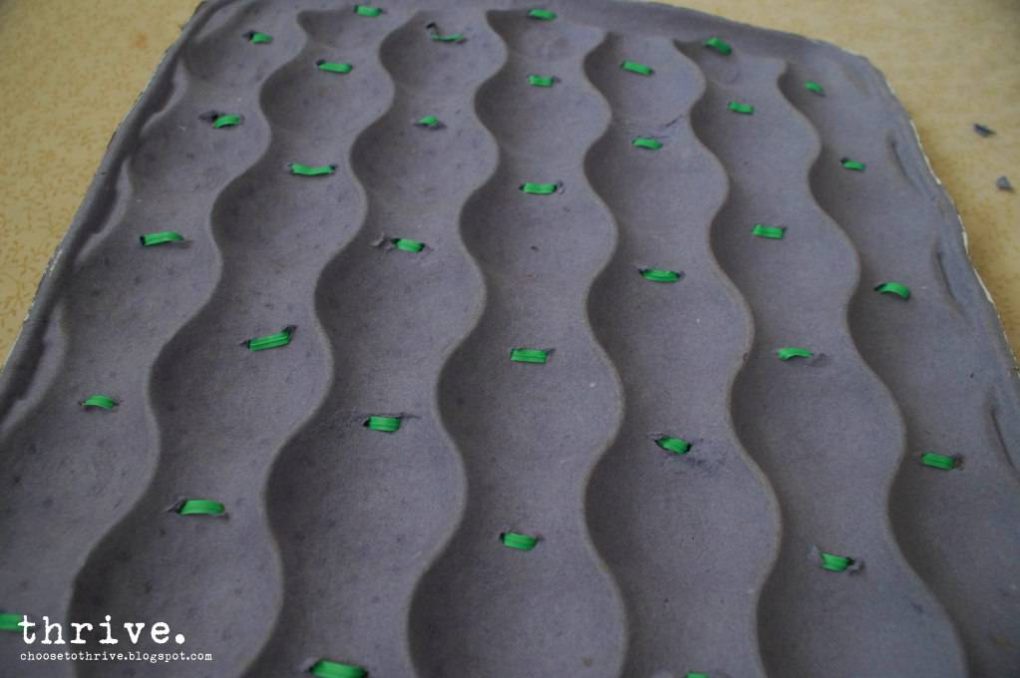
Have a grown up punch two small holes on each side of the stems with a bamboo skewer …
… and thread twisty ties from behind …
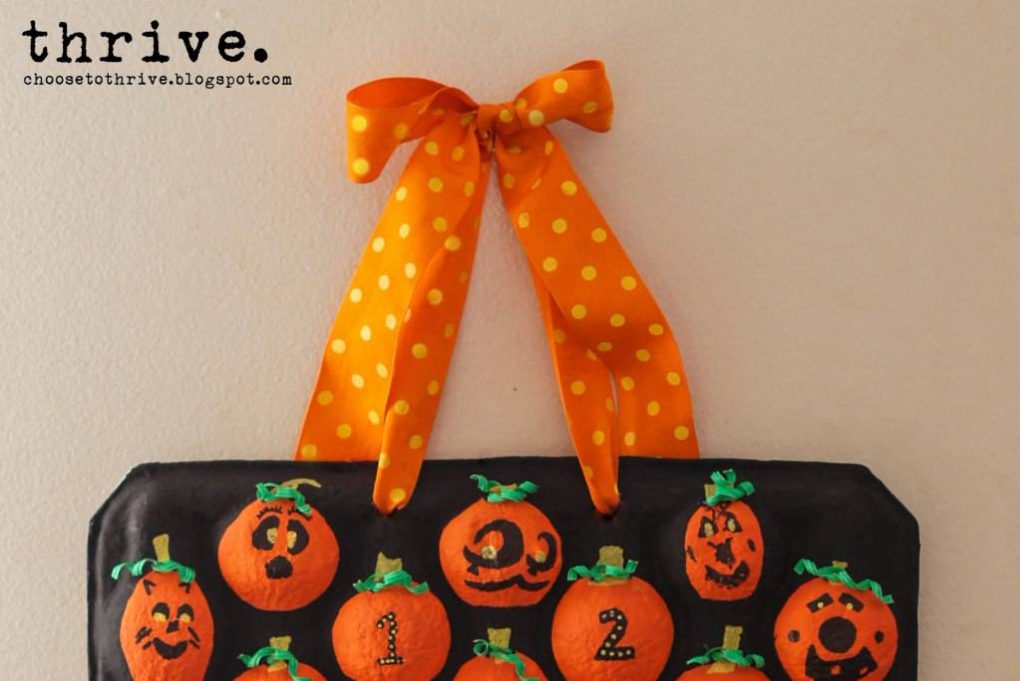
… so that your calendar looks a little something like this:
Tame those unruly twisty ties with a bamboo skewer or paint brush.
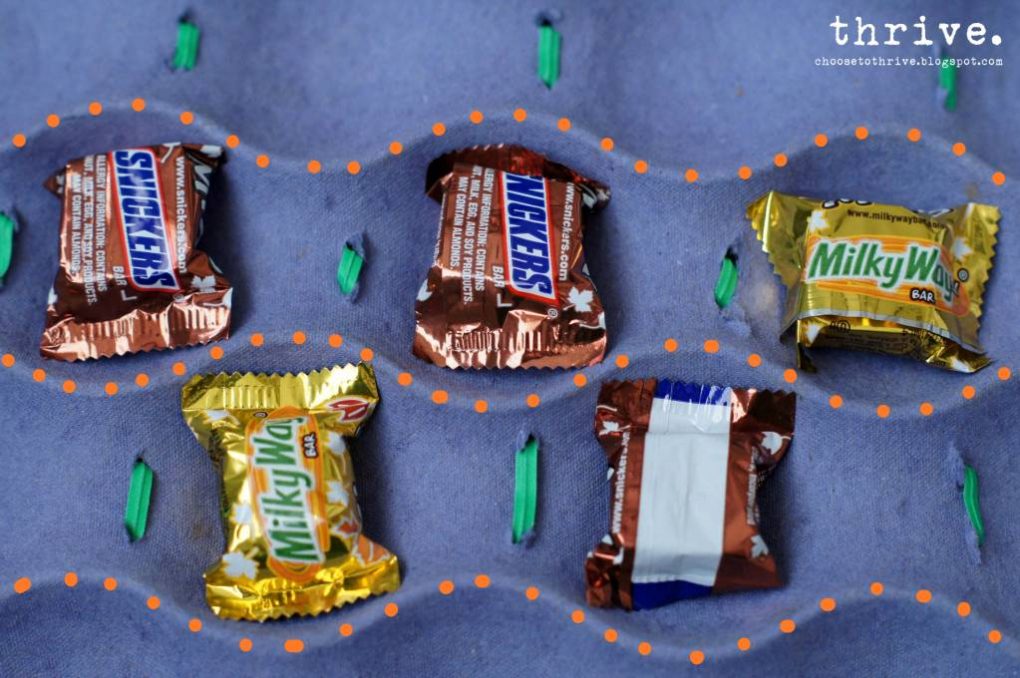
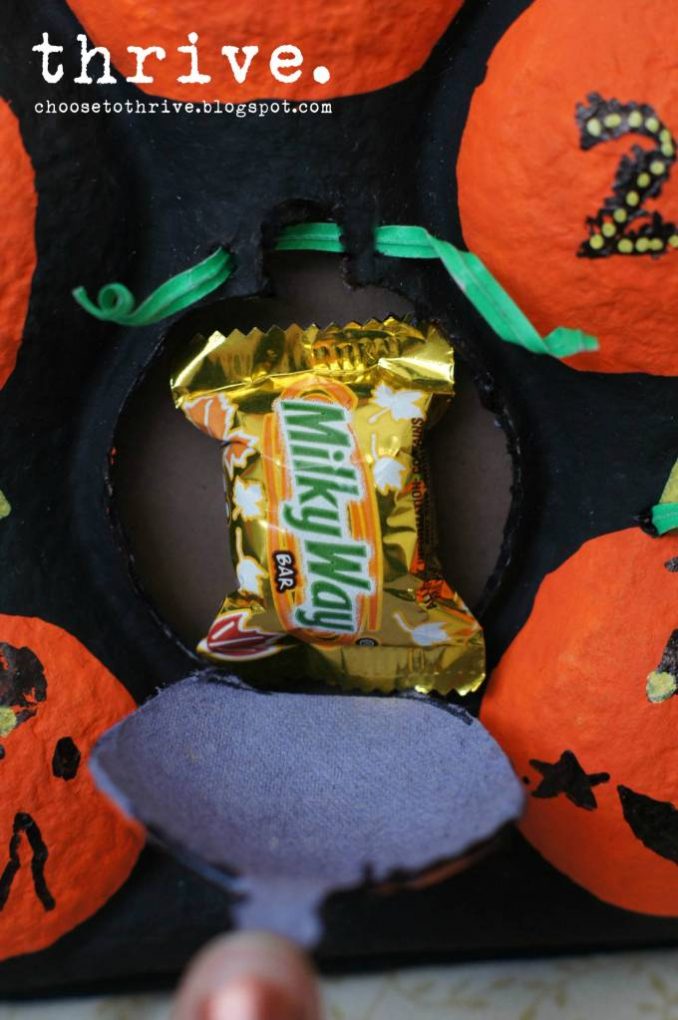
Time to add the treats! Flip the tray over and add some small treats, toys or stickers to each pumpkin back. Then carefully add school glue along the ridges (orange dots below) and sides of the tray …
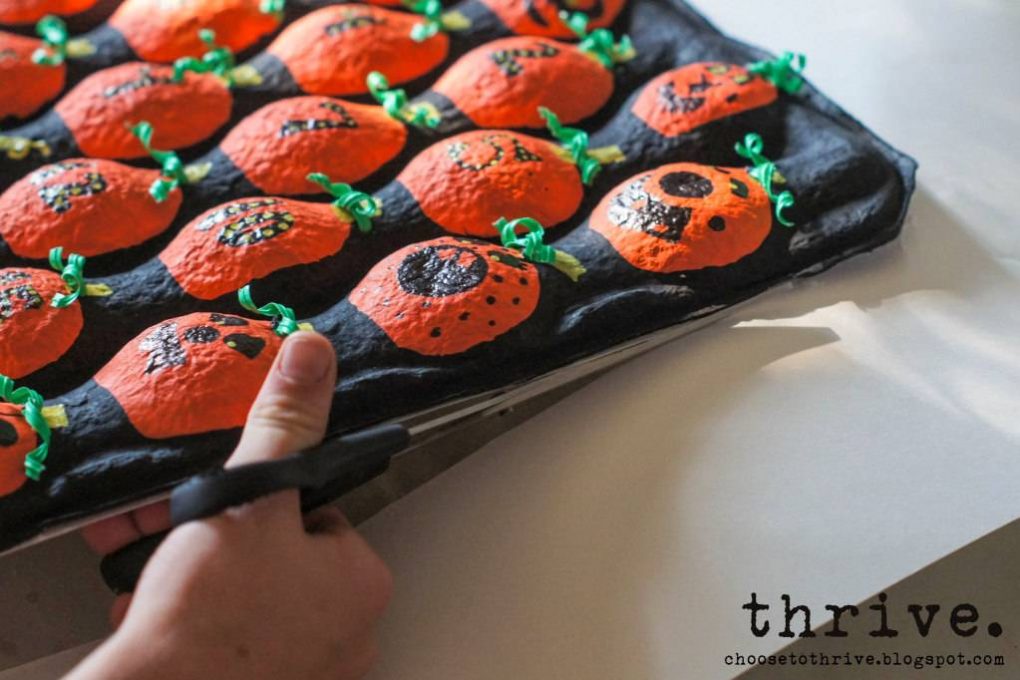
… lay the backing poster board or cardstock over top and gently weight the whole thing down for an hour. When dry, gently turn tray back over and cut away any extra paper or poster board from the back.
Punch two holes in the top with scissors and thread through some snazzy ribbon.
Yup, snazzy.
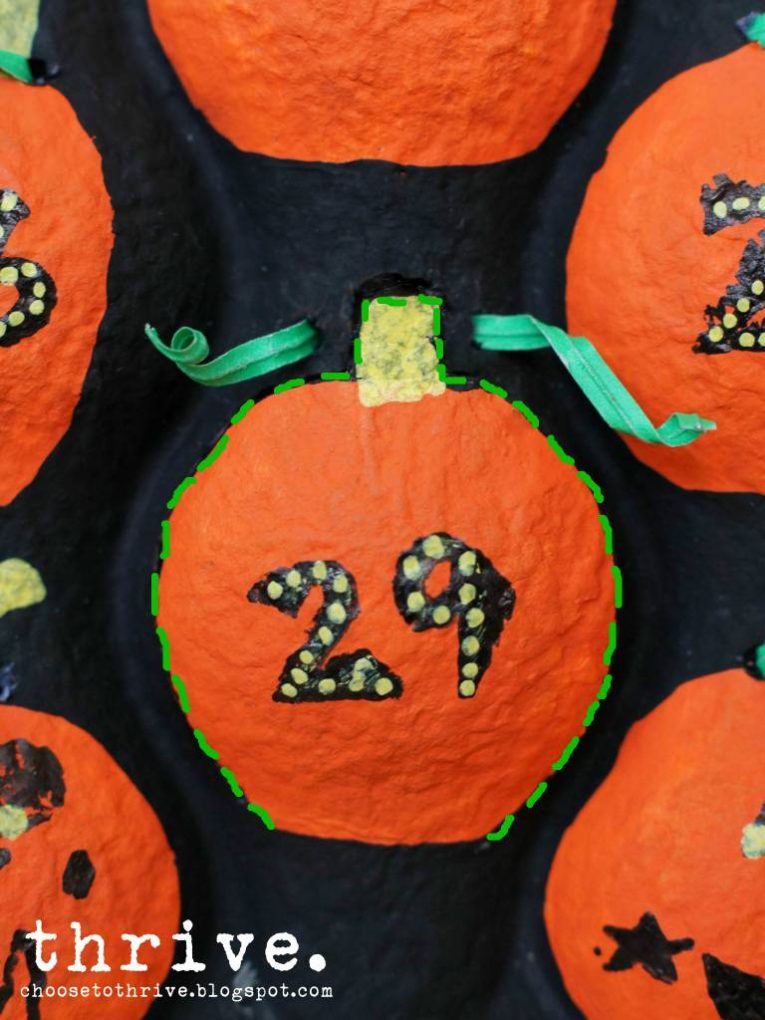
Your calendar is ready to be displayed! Starting on October 1st, you can “carve” each day’s pumpkin and enjoy a little treat one of two ways: 1) turn the calendar over and carefully remove the candy from behind — OR — 2) gently untie the twisty tie, carefully cut around the pumpkin and stem …
… open each pumpkin like a little clam shell and enjoy your yummy treats.
Retwist to close the pumpkin and you’re ready for the next day. (Of course you could cut all 31 pumpkin shapes ahead of time and just retie the little twisty ties, but I chose not to. I don’t trust my little ones to stay out of the treats. 🙂 So there you go – two ways to “carve” a Halloween Advent! And if you’re looking for more fun projects like the ones below, check out Thrive’s holiday tutorial page.
I saw an all-call on Facebook this week from a fellow craft blogger who is fairly connected in social media circles. She was soliciting input for an article for a large media outlet and posed the following question: “Are the Mommy Wars over? Or are moms still judging moms?”
Mommy Wars?
I’d never heard that term before, but knew immediately what she meant.
So after reading the thoughts of fellow craft/mommy bloggers and leaving my two cents, I emailed the reporter. Here’s what I wrote:
Yes, the war (if you want to call it that) still rages on with both sides gaining ground using the same weapon: social media. The pervasiveness of blogs, twitter and Facebook make the crushing weight of comparison available at a mouse click. The glossy, air-brushed triumphs of the moms on screen are often weighed against our own un-showered, weakest moments. The context and perspective are lost, leaving in its wake the damaging illusion of perfection. However, this same medium is being used more and more as a voice for women to drop the illusions, ‘keep it real’ and bravely reveal their short falls, fears and insecurities. Interviews I’ve read in the last few months from a few prominent mom-bloggers reveal that their ‘here’s where I lost it/came apart/totally failed’ posts resonate most with their readership. On my own blogs, I’ve found this to be true as well. This message of being compassionate and patient with ourselves and others is a welcomed counter balance to envying the Jones and their blogspot.
It’ll be interesting to read the article when it comes out and see what direction the finished piece takes. But for now, the question of moms judging moms has been spinning in my head, helping me bring together thoughts about several things that I’ve been thinking about for the past few months—appearances, judging and chasing the illusion of perfection.
A while back my camera went missing. For days I couldn’t find it until one night Mr. Thrive found it in the bottom of our closet … in his guitar case. Naturally.
It was pretty clear that some little body had snuck it back there and played with it for awhile. When Mr. Thrive pulled it out, the new long-life batteries were almost dead, the lense had been messed with and all of the settings had been tweaked. But the worst part was that all 118 images on there were gone. About half of the pictures I could live without, but I had spent hours on a tutorial and had lost all of it. Given the recovery location, I was sure it was kid #5 who walked off with the camera and did all the damage. And though I was so bummed about what was lost, I was surprised by how not mad I was.
I’d been in a funk over the camera thing and surprised by how much this small love turned huge passion meant to me. I’d missed recording some pretty cool things in our family’s life that week and it bothered me. I was seeing how this medium of blogging and photography was helping me finally keep something of a record of this one wild, crazy and precious life I get. Loosing my camera that week felt a little bit like loosing a part of my history—in a very small way, sure—but a piece nonetheless.
I’d been so inspired by the photography of my cousin’s wife and especially love the pictures of her kids. Not only does she capture their souls, but the way in which she does that with her camera also captures her love for them as a mother.
A while back she and her husband almost lost their son to bacterial meningitis. Seeing their son in his ICU bed, in the back of an ambulance and hooked up to wires was heart wrenching—yet they captured this experience in pictures and later wrote about that experience.
A lot of people openly questioned how she could take pictures during moments like that, let alone share them. But I understood why she felt compelled to record and then share these moments amidst tears.
We are the Facebook, Twitter and TV Generation; a generation that is used to both carefully packaged programming and liveon the scene coverage that records life as it happens. And taking pictures is what we do–how we record what happens around and to us. I bet most of us have hundreds of pictures of our family’s life and history, but little journaling or written stories. Blogs and scrapbooks have become a new way to start recording and capturing our lives so that our children and grandchildren will have a record of what we went through.
But part of that new form of recording seems to gloss over the painful and uncomfortable.
In our desire to paint the illusion of the perfect life, perfect family and perfect experiences, the imperfect but powerful forces in our lives are too easily deleted. And what doesn’t get deleted, we wouldn’t dare share: Don’t let them see me weak. Don’t let them see this mess. Don’t let them see this pain or struggle or hurt.
A few years ago I would never have taken pictures of myself stressing over bills or broken down on the side of the road. But today I probably would so that I could look back and remember how precious life is … how difficult moments have an amazing ability to immediately reorder priorities and clear away the crap in our lives … to remember how much we love our kids despite the messes and whining and drama and work, and how shattered we’d be if it was ever gone.
I reread a post this morning on my family blog that I’d wrote a while back on one of my lowest days as mom. I was trying to put into words why I felt driven to record a moment that was hard to look back on, “… to acknowledge that ‘I was here today,’ even if today sucked…” and I think that’s exactly it. In every experience, good or bad, I need to record that I was here today, even if today sucked.
I think it’s why I cried and snapped pictures and cried and snapped pictures when my two youngest wound up in the hospital, just weeks apart.
I think it’s why I drug my camera along for the ride one Thursday when I fought back tears as I was bombarded by broken water lines and standing water and kid barf and vermin and three back-to-back tantrums by three different kids in three different stores all before lunch time–and then felt compelled to blog about it.
I was here today, even if today sucked.
And I can’t help but look back at history and wonder how different it would be if those accounts were recorded scrapbook or blog style with the goal to impress, not recount honestly.
What if all we had from Washington crossing the Delaware was a smiling group shot of the troops in Trenton?
What if no one recorded how bad the storm that night was, or how trapped the American troops were, or cropped carefully around the shoeless feet of those hungry troops who nearly froze to death on the march there because no one wanted to remember just how bad it was?
Or what if the only record we had of the Martin and Willy handcart companies was a picture of the group heading out and then arriving in the valley?
What if no one recorded just how bad the storm was that pressed in on them, or how devastating their losses in the Cove were, or the impassioned words of Brigham Young to go rescue those stranded on the plains, or the courage of those brave men who risked their lives crossing the icy river to bring those pioneers home?
How different would our lives be, even generations later, if we didn’t know what they went through?
Those moments that are the hardest to record–the ones we want to look back on the least–are the ones that mold us, shape us, steel us and sanctify us. They are our Delawares and Martin’s Coves … those places were we are tried, tested, broken and delivered … the places were we find our faith and our God and our strength to keep going.
I was here today …
I’m feeling more and more that the greatest favor I can do my for children, my posterity and especially myself is to be honest and complete as I record this time we have together. Otherwise I worry that the scrapbooks, blogs and status updates I leave behind will be at best, just a hollow highlight reel that teaches them and me nothing, or at worst, a devastating weapon of illusion that another woman uses to beat herself down with. It’s time lower those weapons of false perfection, step away from the air-brush and ease up on the cropping. It’s time to raise up the camera, even if there’s toys on the floor, dirty faces or faces without make-up–and share them. It’s time to be more patient and forgiving of ourselves and trust that others will be, too.
I was here today …
So as I sit here un-showered at the computer this morning with my flat caffeine-free Diet Pepsi, bed head and Mother’s Day hash browns, I issue a reminder call to all of us out there to take a deep breath and embrace the imperfect, un-edited version of our lives and share them—please.
Stuff Doesn’t Matter. Life is Precious and Short. Perfection comes in every shape and size.
I was here today.
Happy Mother’s Day from me and my imperfectly, perfect crew.
It’s the weekend before Thanksgiving so I’m getting my grocery shopping list together for all my holiday favorites. Here’s what’s on our menus for Thursday.
#1 Edible Decorations: The Cookie Bunting
The cuteness of a pennant banner + the yumminess of sugar cookies. This banner does double duty as holiday decorations and after dinner treat. You can find the tutorial here.
#2 Treats for the table / Place card holders
There will be rioting in the streets if my kids don’t get to make up a bunch of these turkeys to use as place holders. There’s so many ways to dress these little guys up and it keeps little hands busy. You can check out the details here.
#3 Sides: The Turkey Veggie Tray
I found this ridiculously cute turkey veggie platter from Eating With Food Allergies. I’m excited to add this fun platter to the regular stuffing and potatoes, and know this will probably steal the show.
#4 Main Course: CREAM BAKED TURKEY
You heard me: Cream. Baked. Turkey.
Ohgoodheavens.
You may never go back to making a traditional bird again. We haven’t.
And despite the lousy blogging-at-midnight pictures, you can see how easy this is to make.
1. Dice your turkey in 1” cubes (white meat, dark meat, both – you can even use chicken.)
2. Mix equal parts flour + seasoning (seasoning salt/garlic powder) and dredge the chicken.
3. Brown quickly in a skillet with a little butter or oil and drain on paper towels. You DO NOT want the turkey cooked all the way through – just browned on all sides. Fill a glass baking dish 2/3 full with turkey pieces.
4. Cover turkey with heavy cream or half-and-half. Cover and bake for 45 minutes at 375 degrees. Remove foil and bake for 15 more minutes.
And then … holy cow.
I wish I had a picture for you but it gets inhaled within seconds of it being placed on the table. The end result is turkey that has absorbed all that cream and is fall-apart tender. It’s practically an emotional experience. Try it – you’re going to love it!
#5 Dessert: PUMPKIN LUST PIE
I can’t wait to try this Pumpkin Lust Pie from Sweet Treats & More! The recipe calls for a box of Jell-O Pumpkin Spice pudding. If you can’t find it (I couldn’t here in Utah), mix 1/2 c. pumpkin puree and 1 tsp. pumpkin pie spice into a batch of instant butterscotch pudding. I know it sounds weird, but trust me … it’s the next best thing and soooooo yummy.
Dang it. I’m so hungry now.
That’s what’s on my menu.
What special recipes are you guys serving for your Thanksgiving?
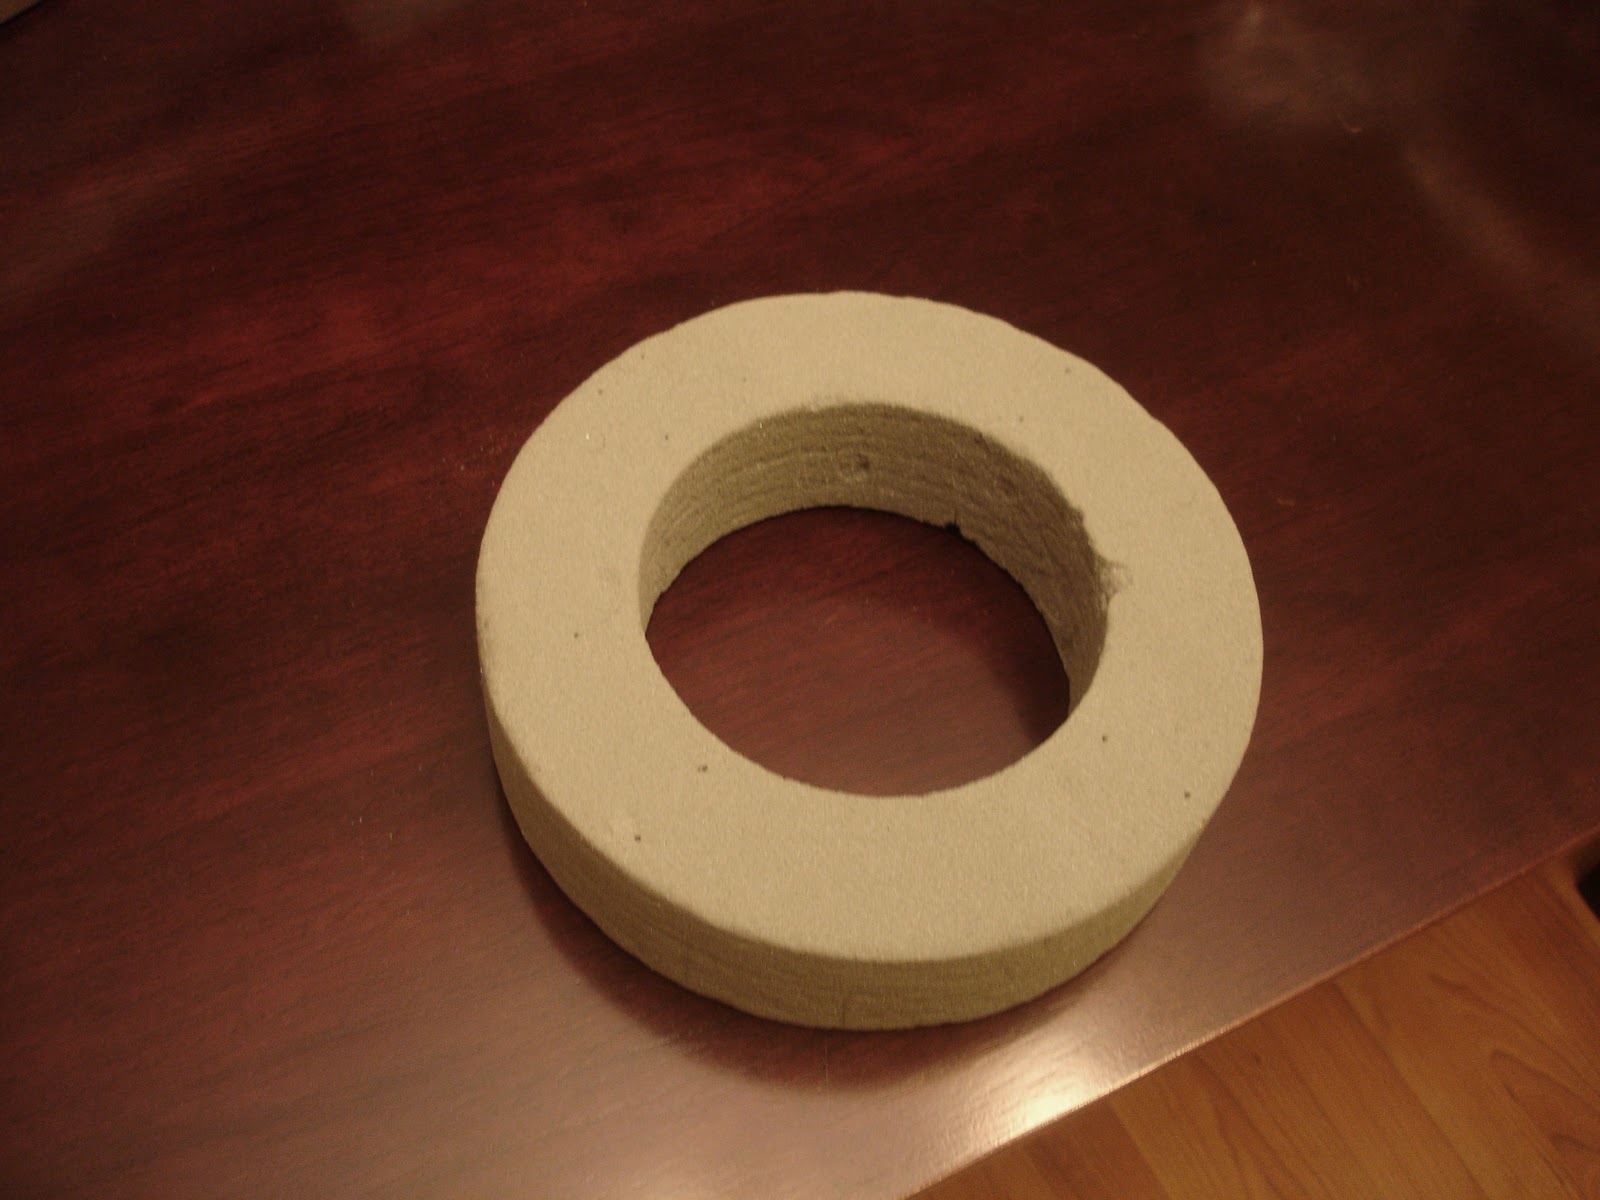
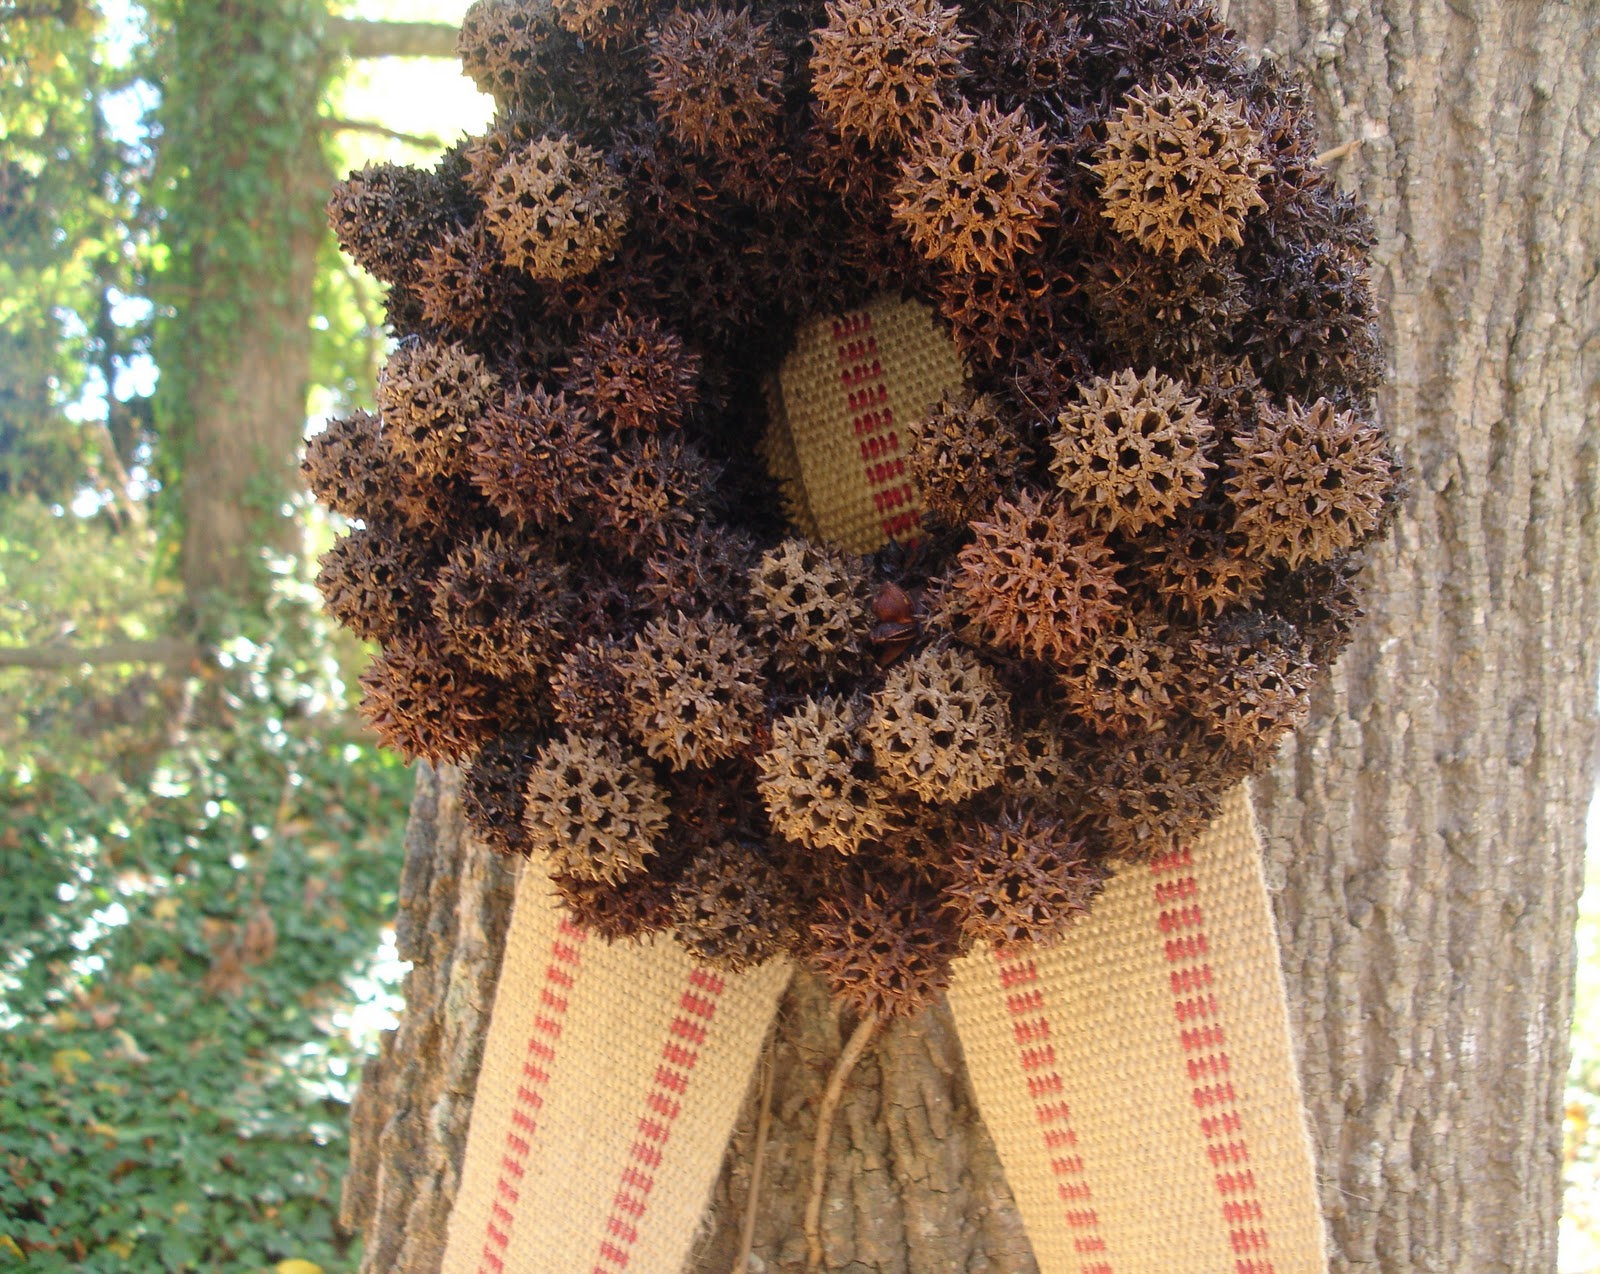
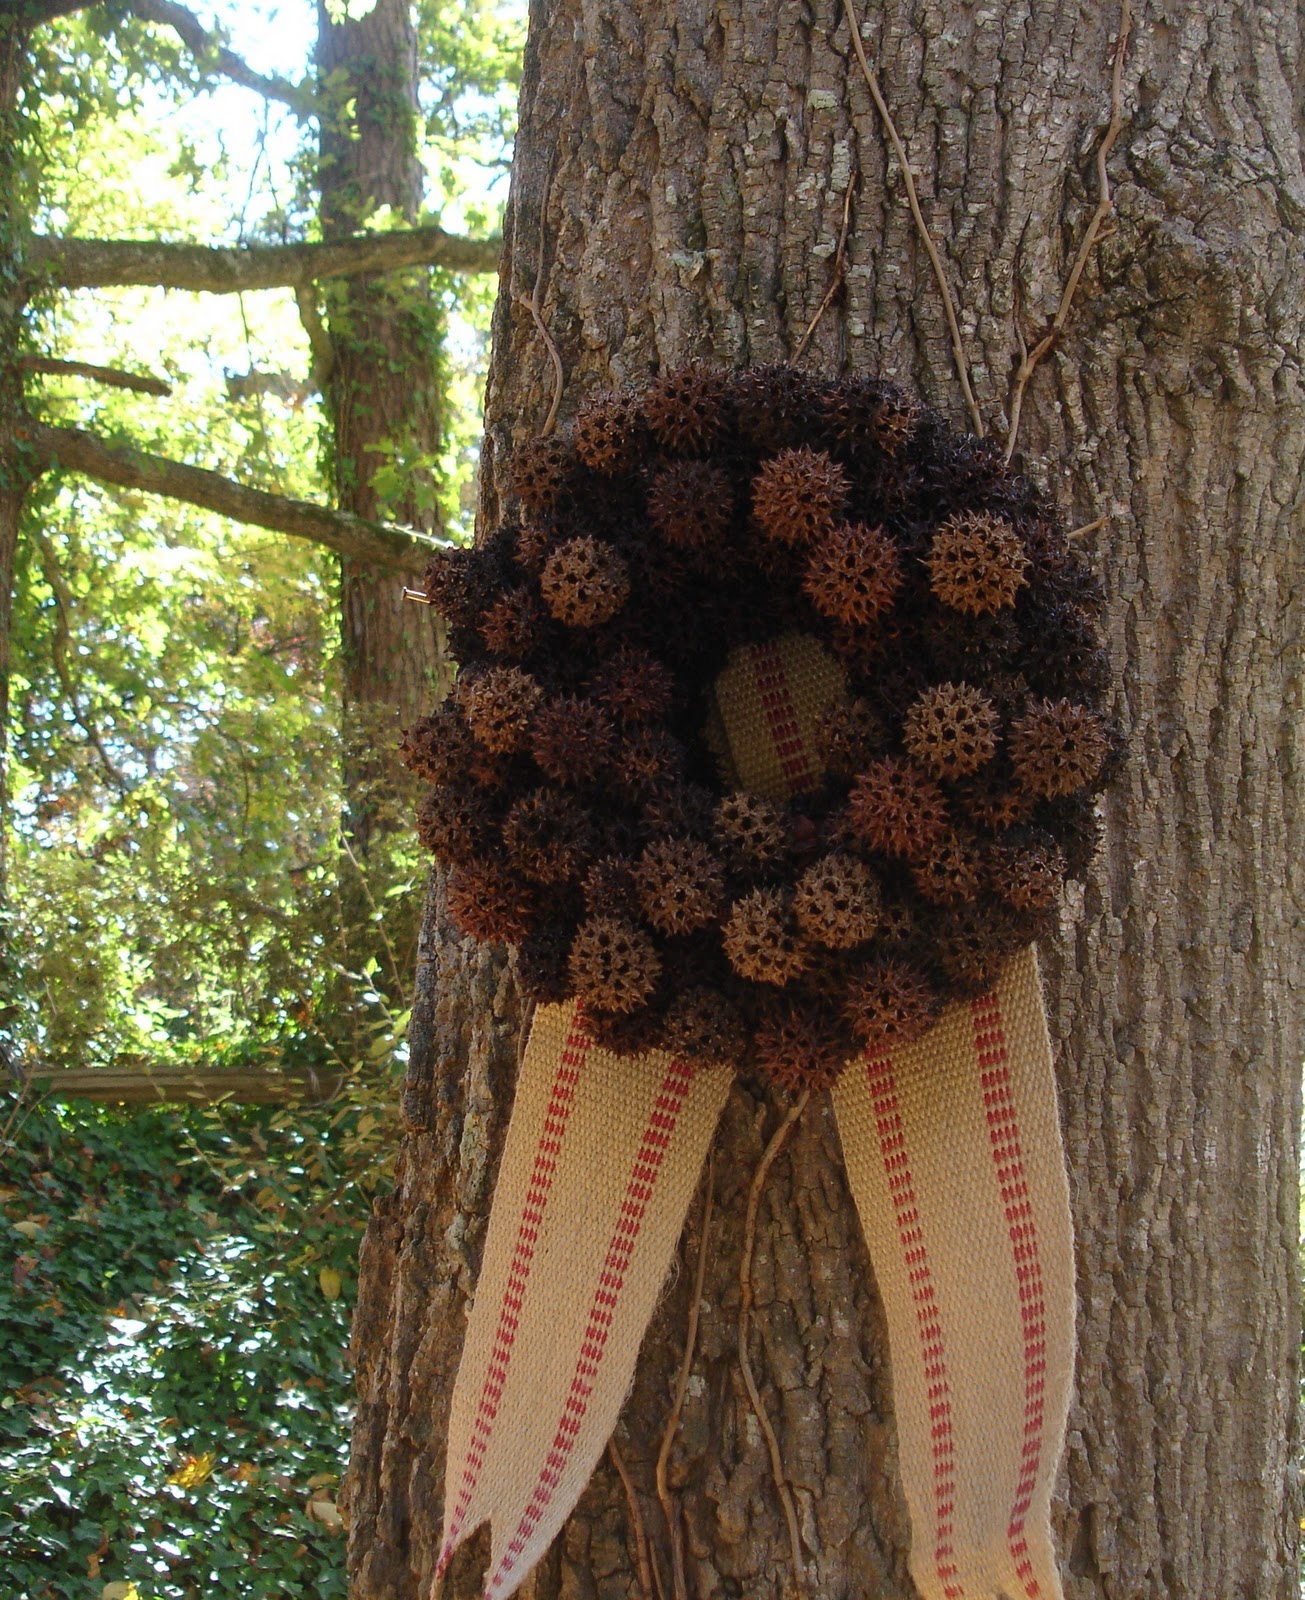
I like finding creative ways to incorporate natural elements into my home. Which is why I love Nike’s, “Rock-What-Ya-Got” approach to living and crafting.
Growing in my yard is a Sweet Gum tree. Sweet Gum trees produce these prickly little balls (“Sweet Gum fruit”). Those prickly little balls are everywhere in my yard! This week instead of raking them into a pile, I went outside and gathered a bag full to create a wreath.
To construct my wreath, I started with a simple wreath form purchased for a dollar.
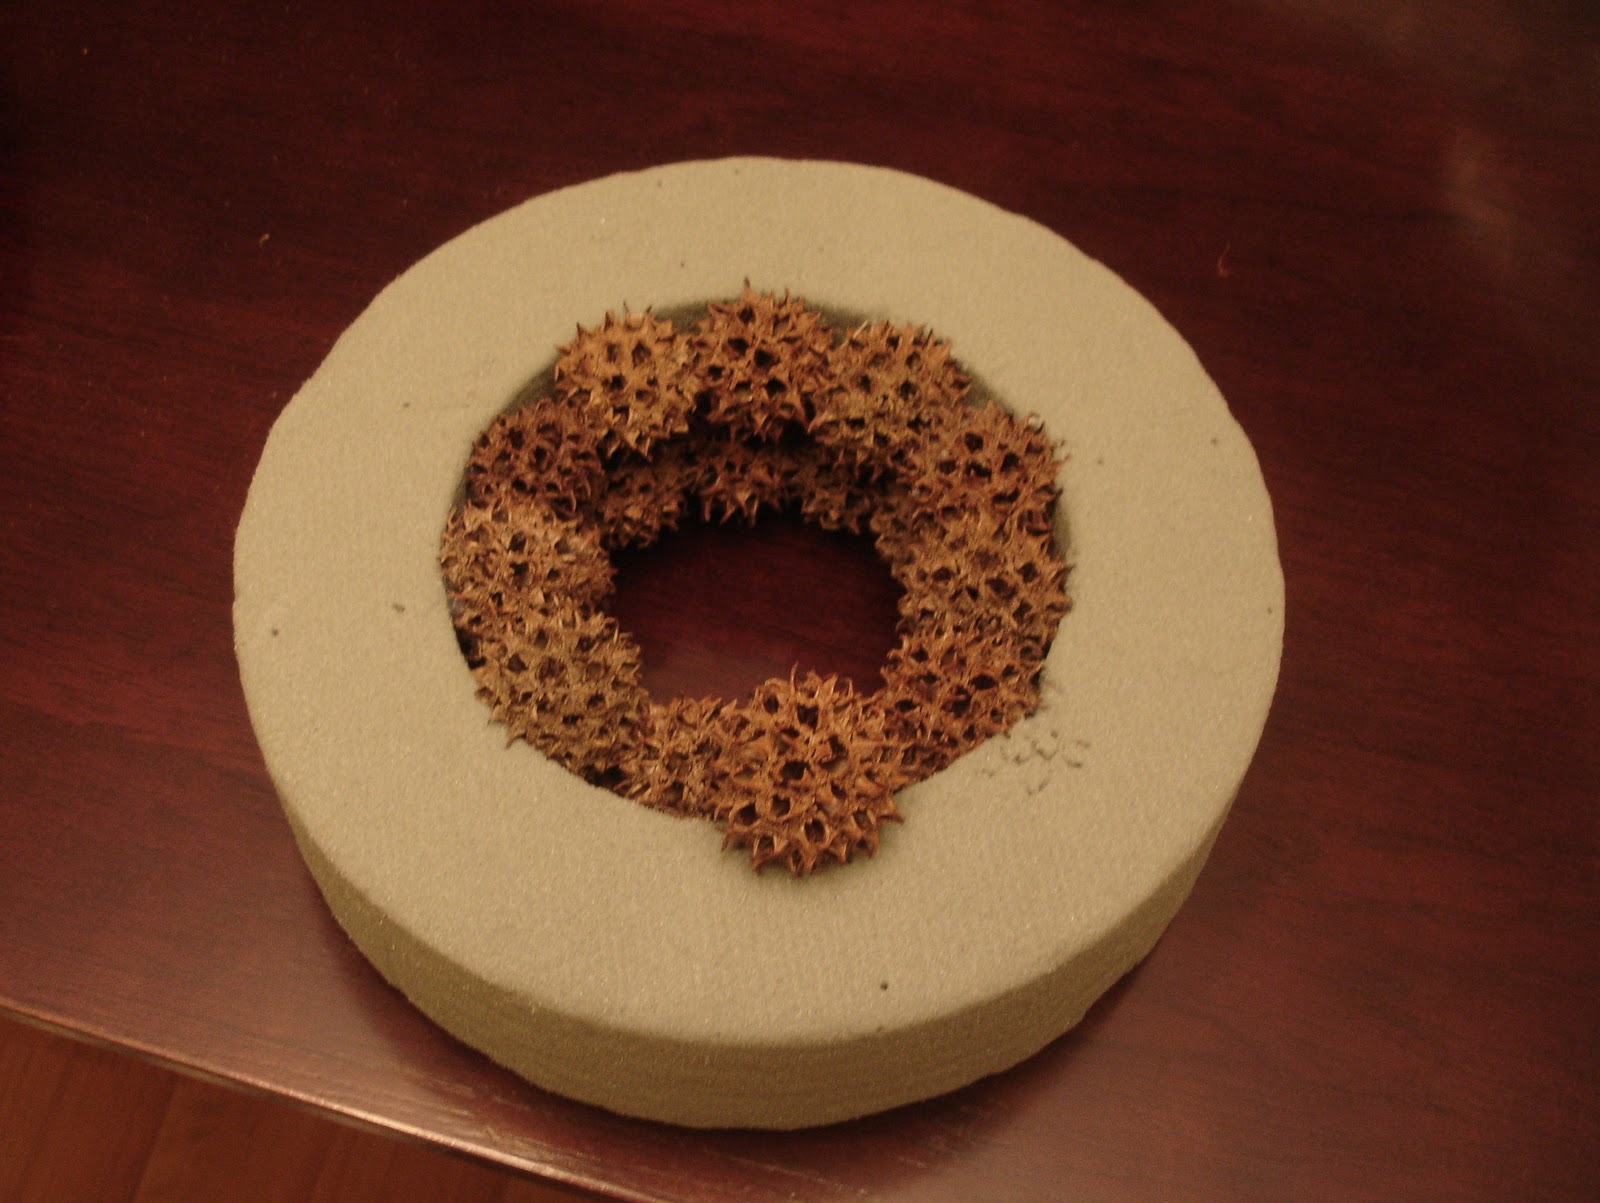
Then using my glue gun, I attached the prickly fruit to the wreath form starting from the inside and working my way out.
Once completed, I attached a saw tooth hanger to the backside, again using my glue gun.
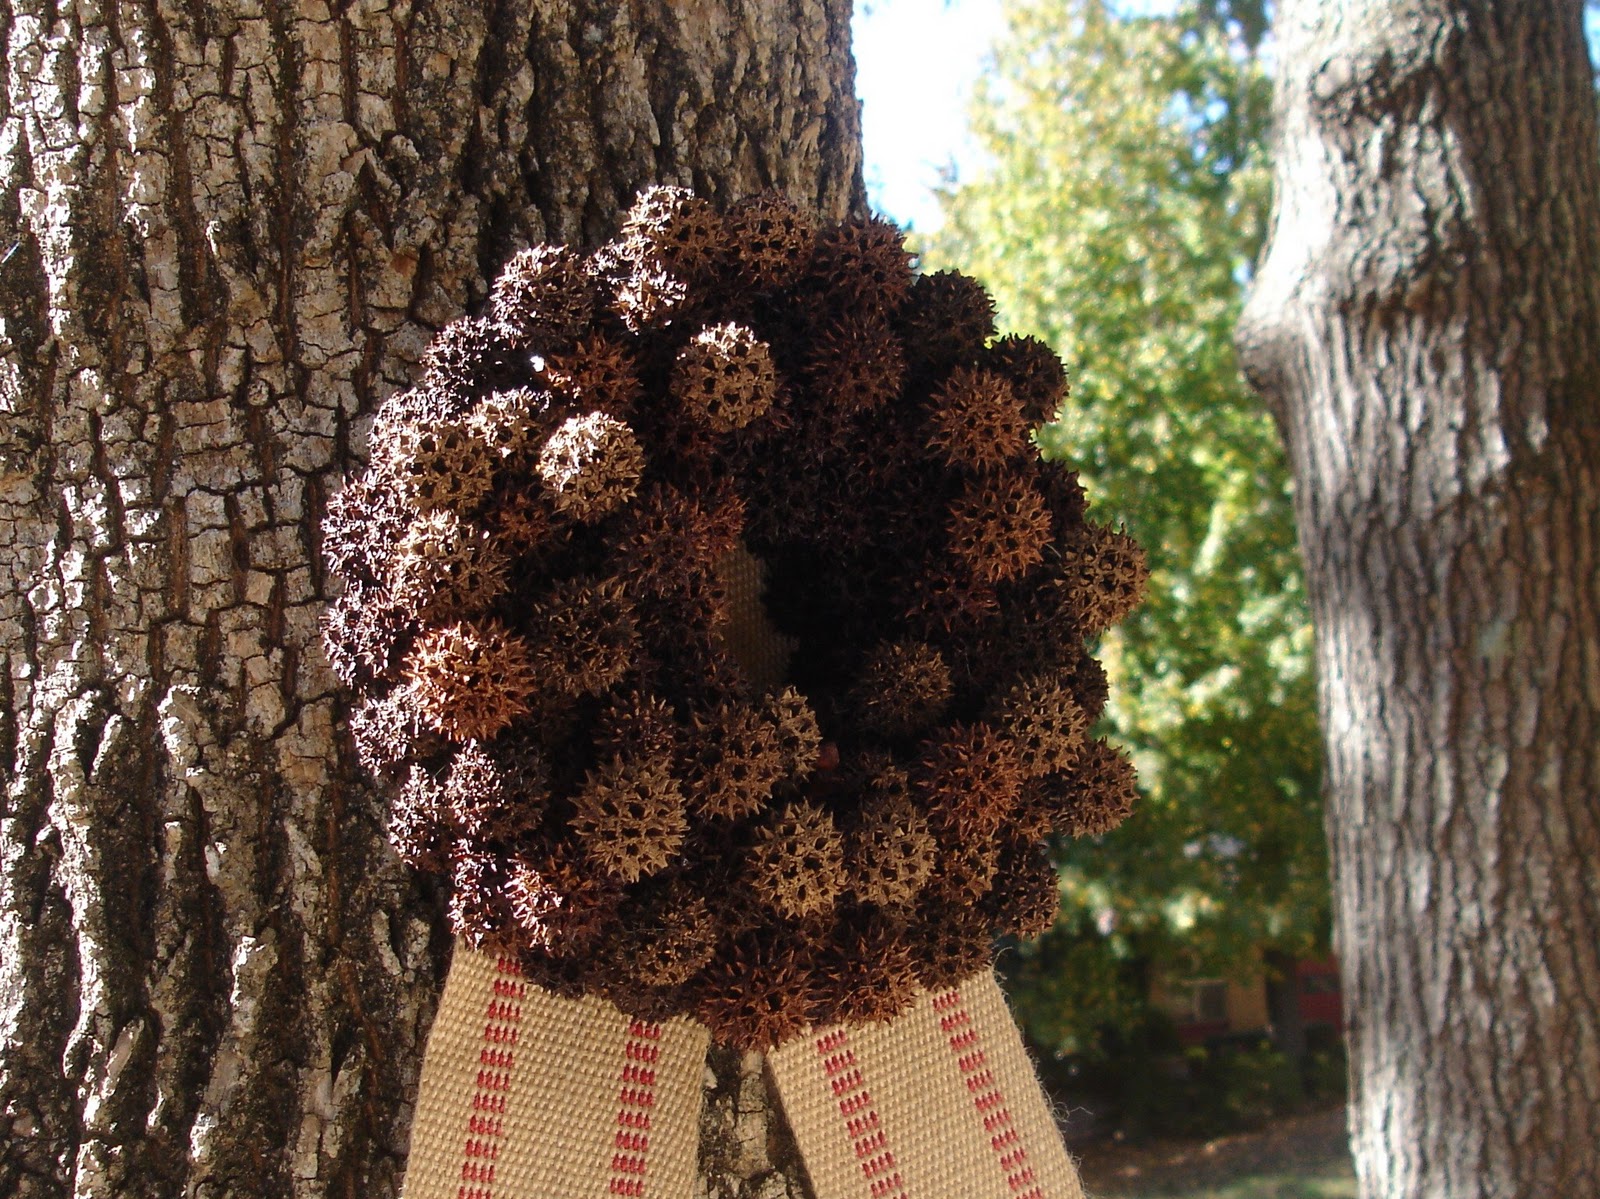
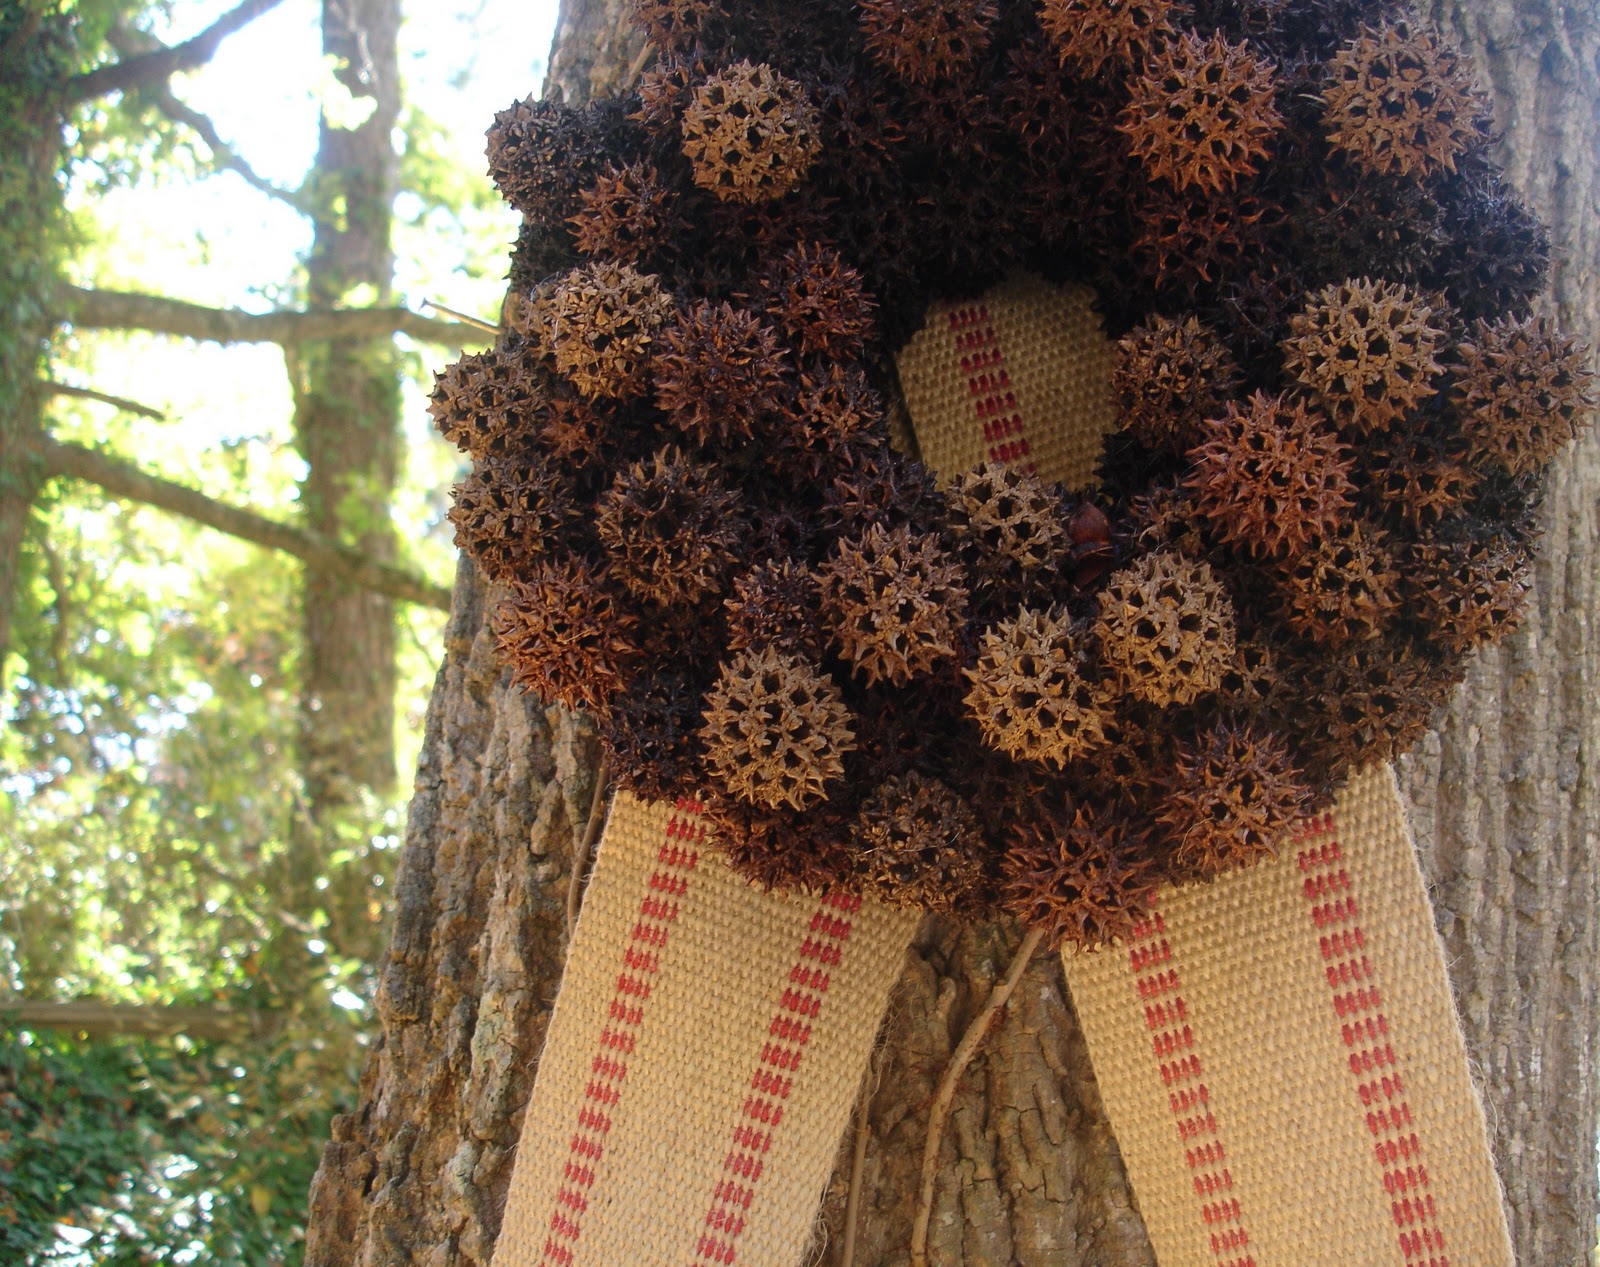
Here it is my friends!
I love the texture of the wreath.
I kept things simple to focus on the natural beauty of the Sweet Gum fruit.
“Study nature, love nature, stay close to nature. It will never fail you”. – Frank Lloyd Wright
I hope you enjoyed my tutorial! Happy Holidays everyone! Thanks so much Nike for having me over!!
************************
You’re so welcome, Brandi! I ADORE how you used natural items from your yard to create this beautiful wreath for the holidays. I’m so pinning this!
Many of you probably know Brandi from around blog land – she’s the wonderfully thoughtful blog visitor leaving heartfelt, genuine comments on some many projects out there. I am constantly encouraged by Brandi’s feedback here on THRIVE and am so not surprised when I see her doing the same for women crafters. And if you haven’t read about her inspiration for her blog title, you need to.
Oh, and did I mention Brandi’s mad crafting skills? No? Seriously … mad.crafting.skills.


