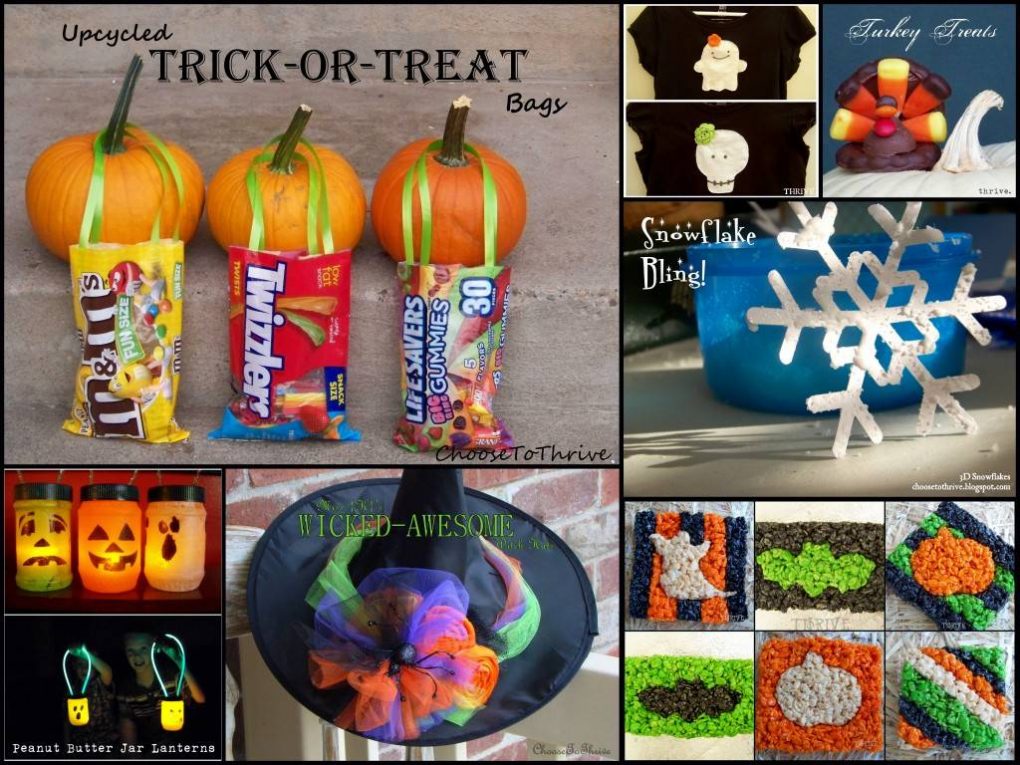
(Originally shared as a guest post on Ucreate Kids here.) Holy cow … Halloween is just around the corner. That means me and my six kiddos have been on the look out for everyday items to repurpose for Halloween. This weekend we hit the mother load … in the produce isle. Turns out with some paint and glue, you can turn an apple tray into something frightfully fun.
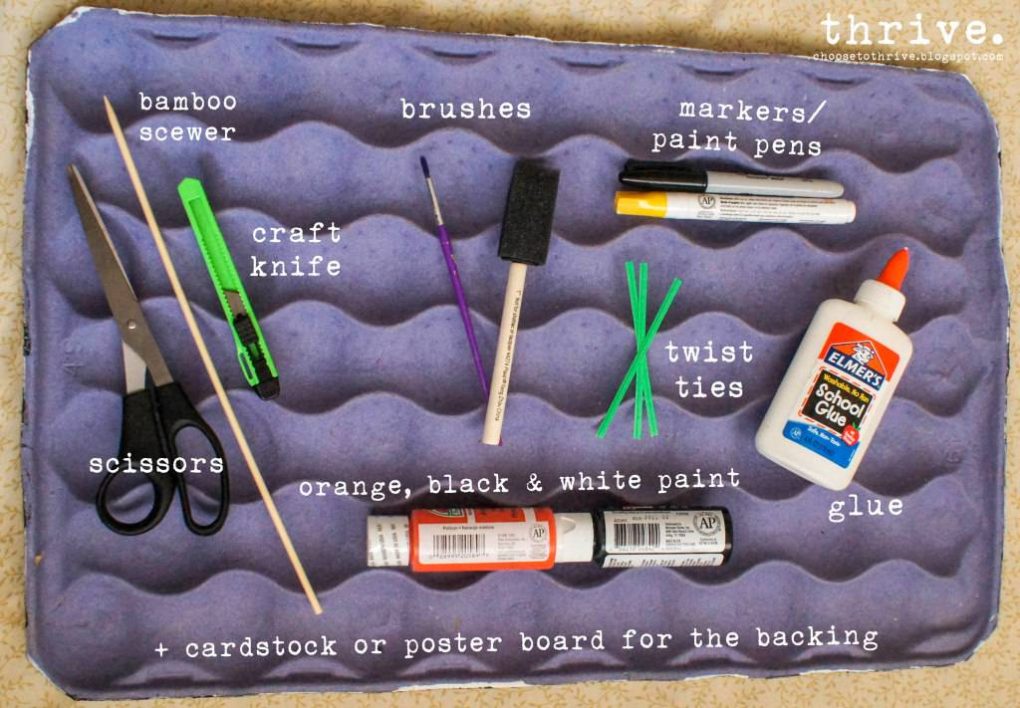
Frightfully fun for flat-out free! You can use this at home or in a classroom as just a calendar or filled with little treats to open each day. Want to make one with your kids, too? For this project you’ll need a cardboard apple tray from the produce section +
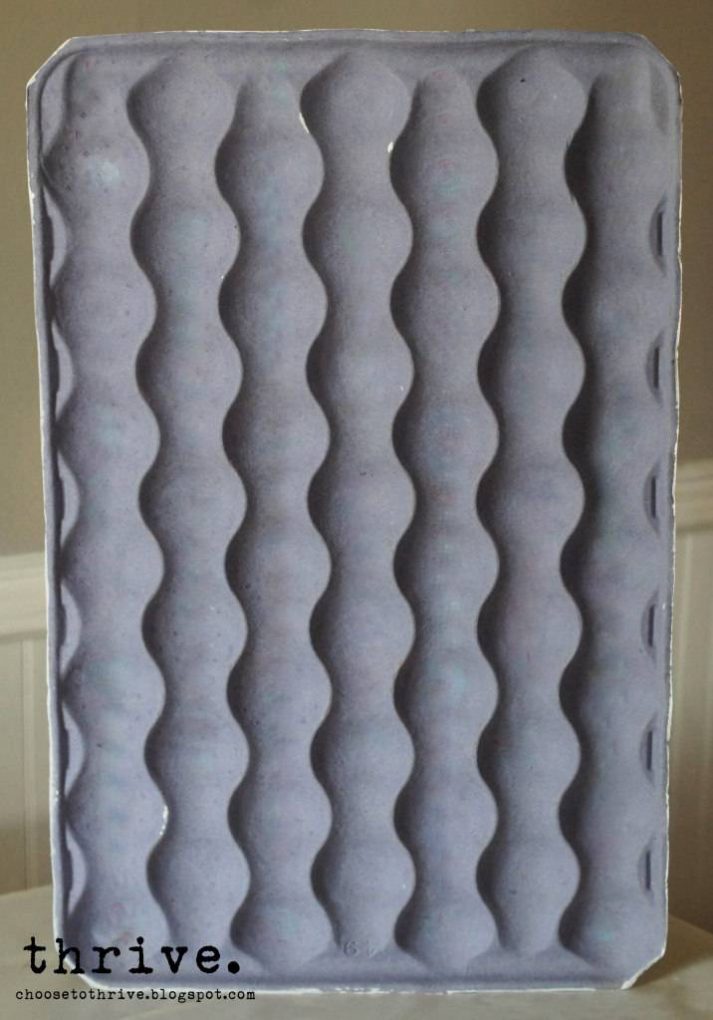
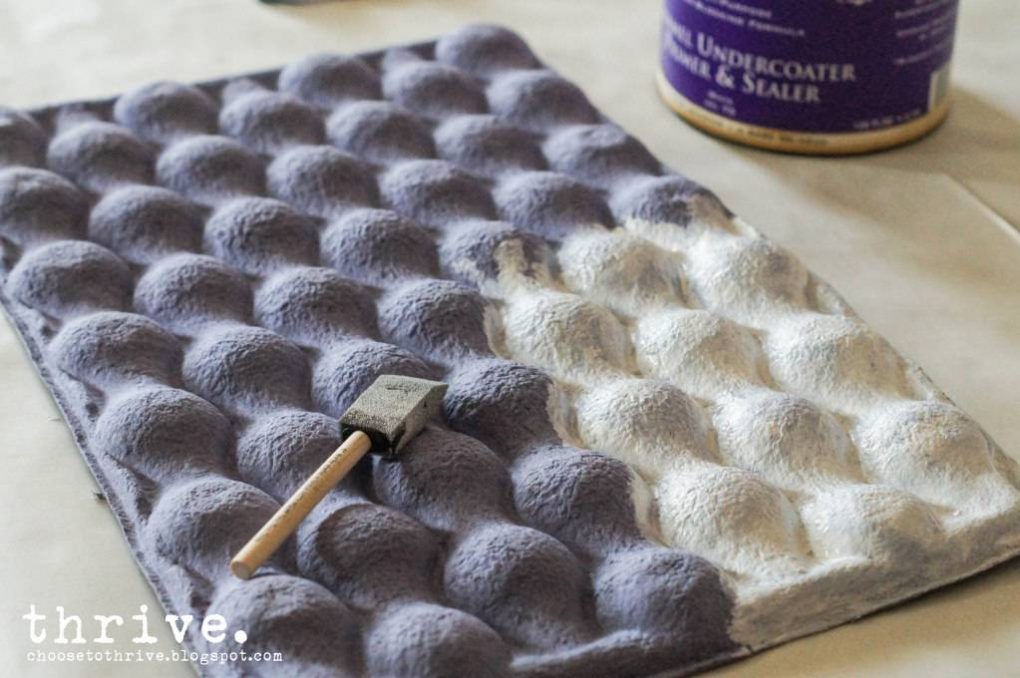
(Produce trays are usually free from your grocery store – just ask the produce guy to grab you one.) As always I hope you’ll rock-what-ya-got and adapt this project to whatever supplies you have on hand so that you can make this for free or dirt cheap. Prime the tray with a cheapy sponge brush and whatever white paint you have on hand: craft paint, house paint, plain ‘ol primer. Just skip the spray paint – the paper tray is crazy porous and sucks it all up.
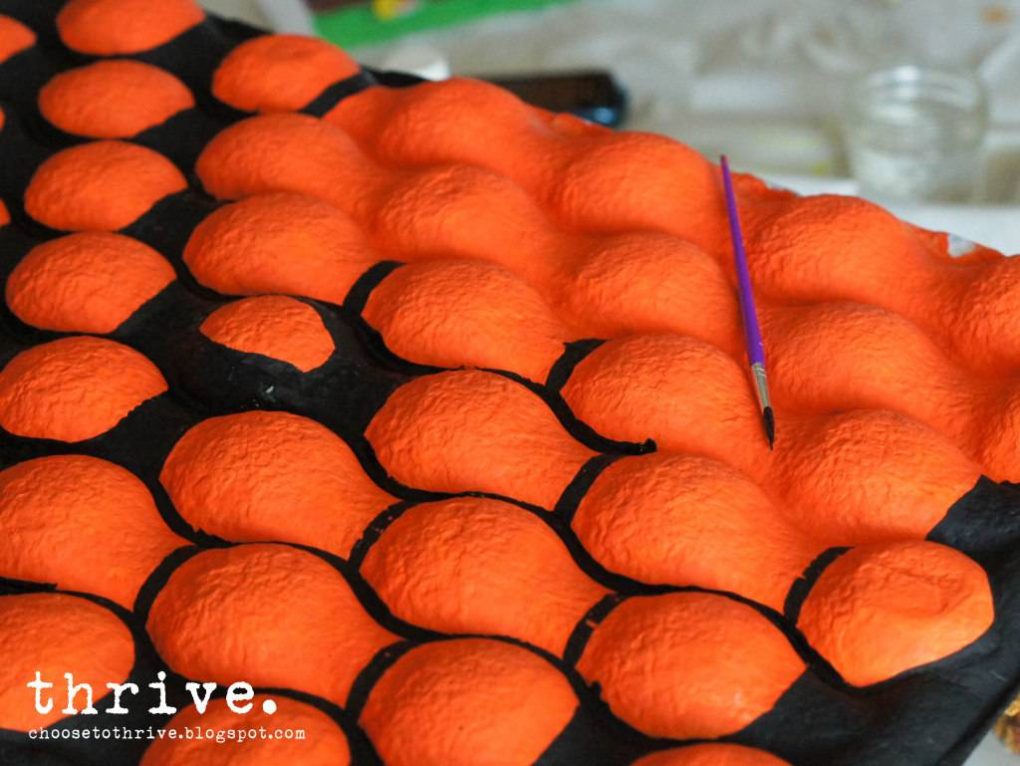
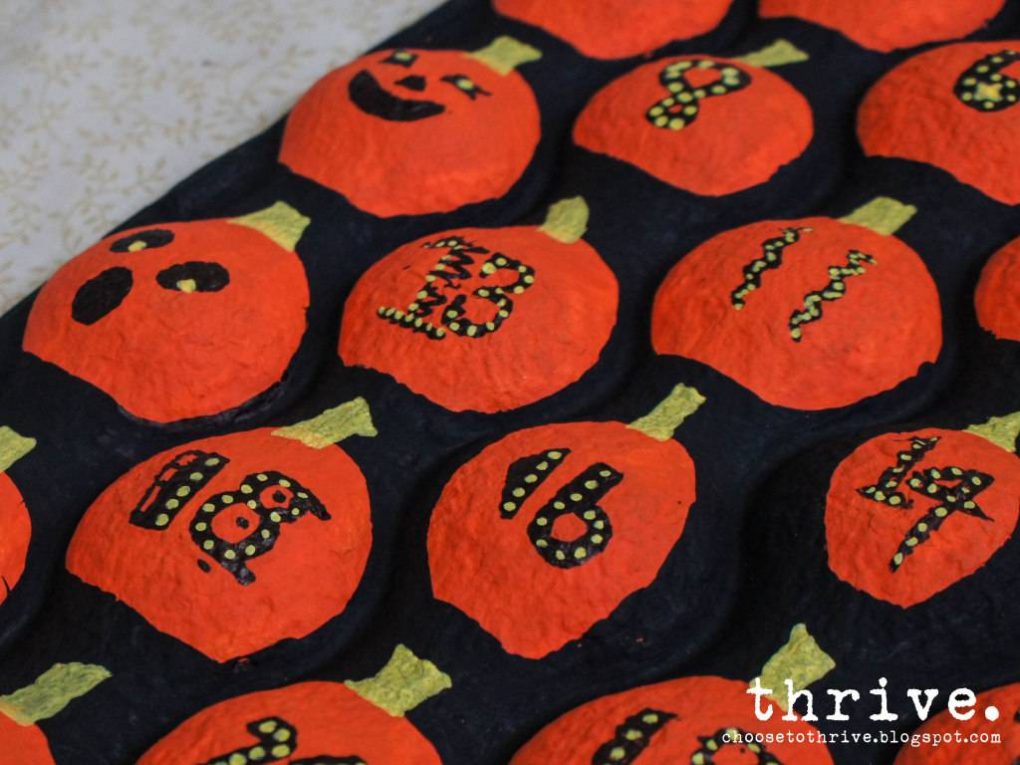
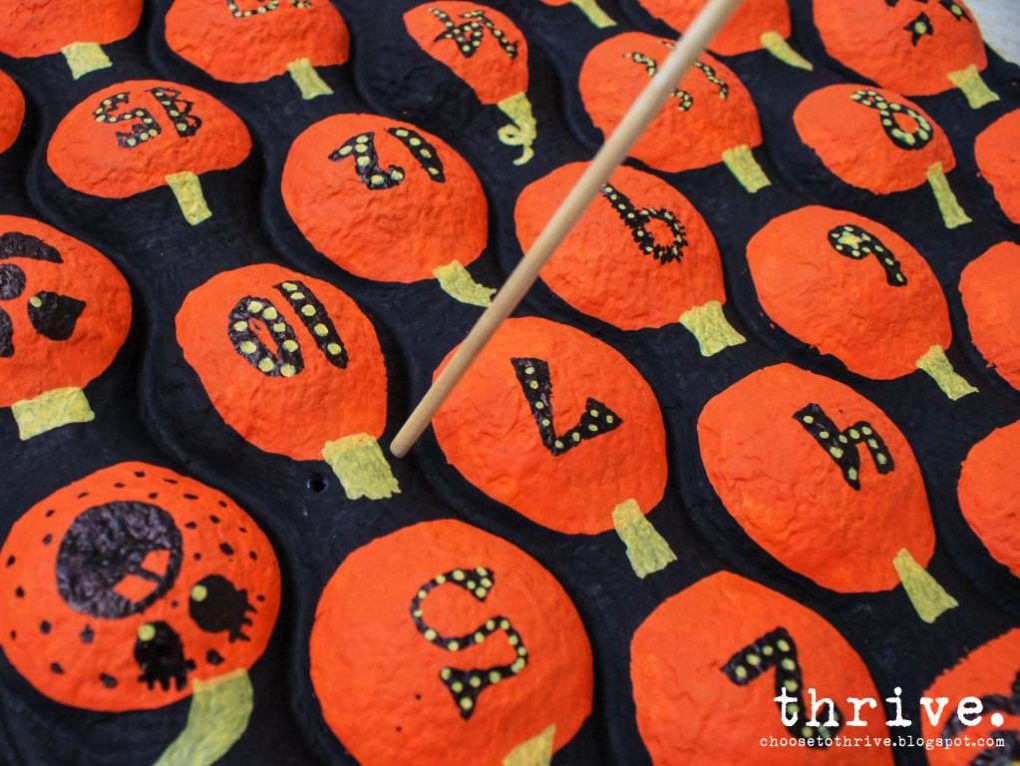
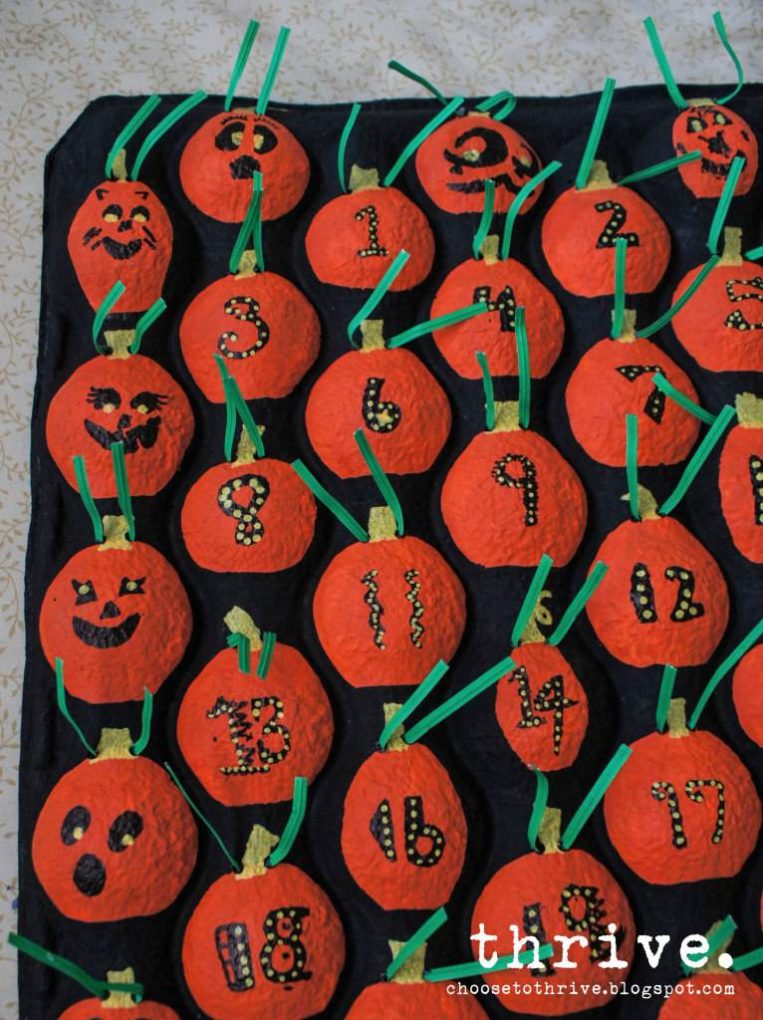
Add a coat of orange paint …
… and then carefully paint the edges and creases black with a small paint brush.
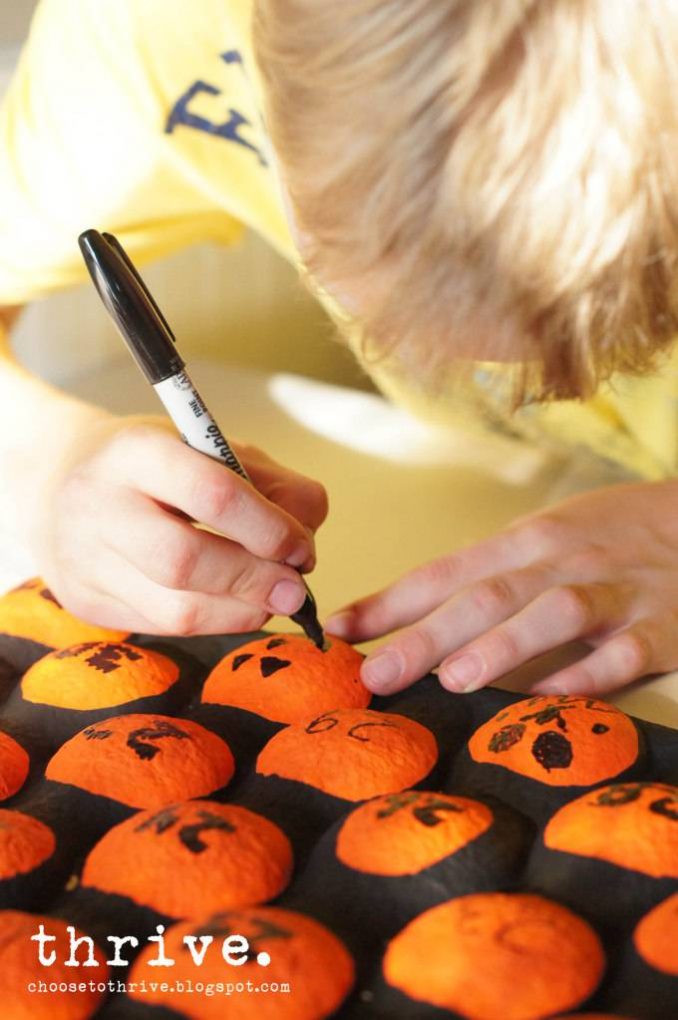
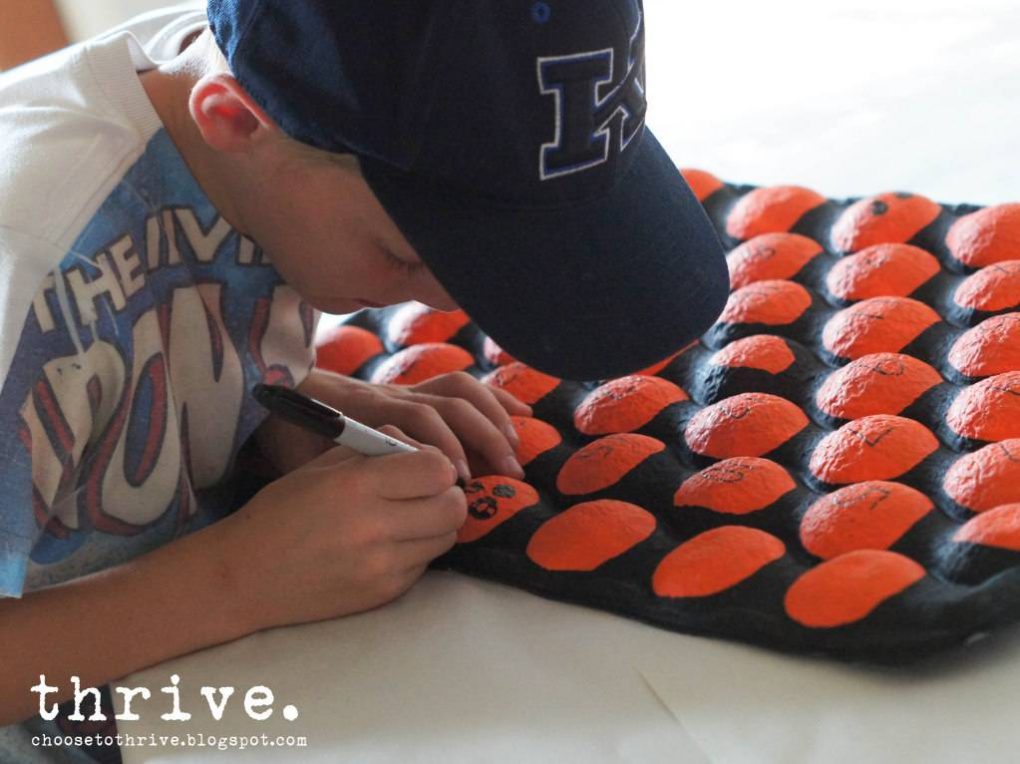
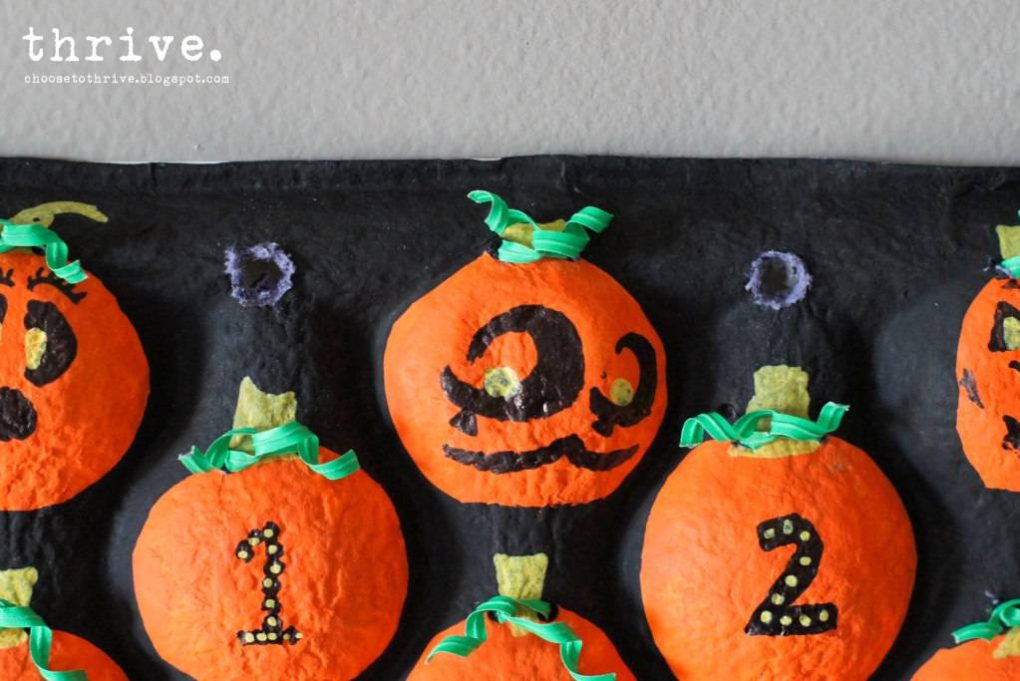
Add stems and calendar numbers with a Sharpie and paint marker.
(I marked the numbers first and let my kids do the decorating.)
The remaining pumpkins on the sides can be dressed up with jack-o-lantern faces or left plain.
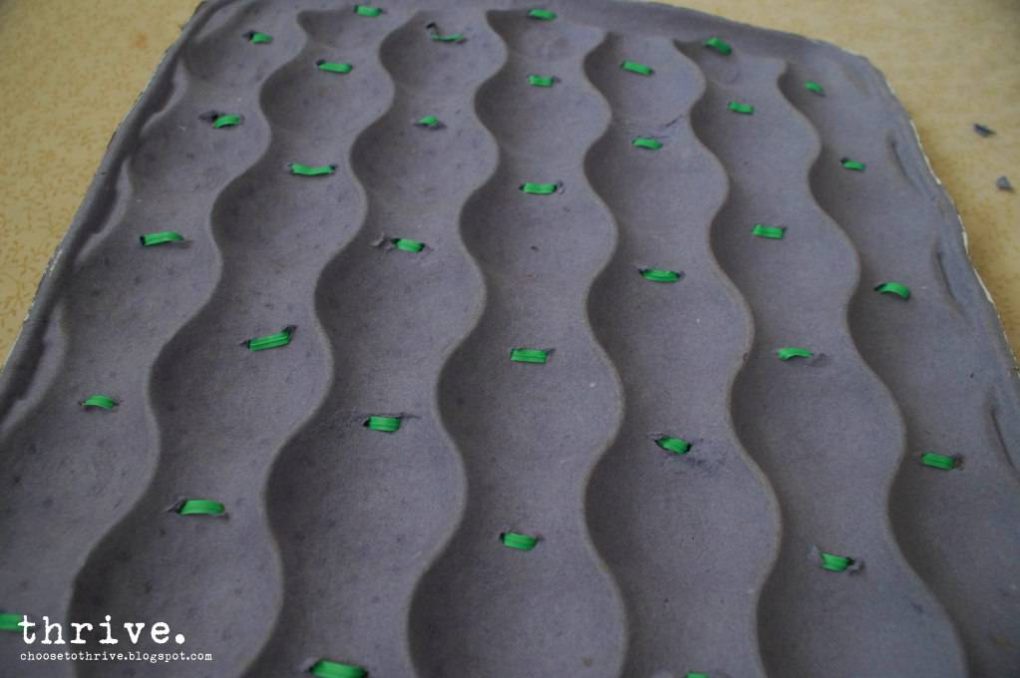
Have a grown up punch two small holes on each side of the stems with a bamboo skewer …
… and thread twisty ties from behind …
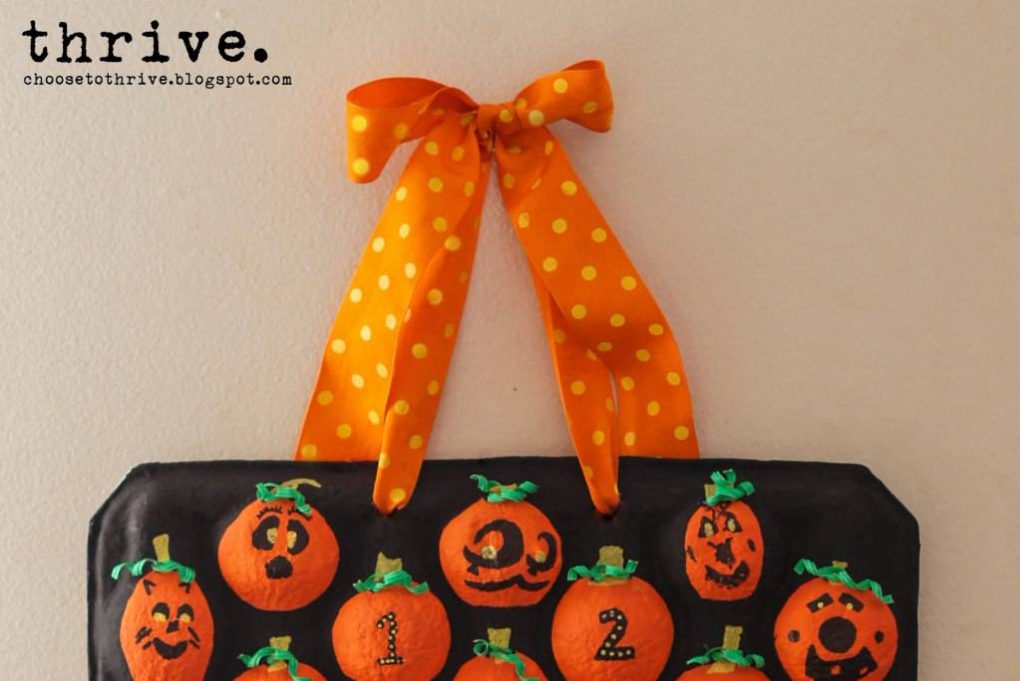
… so that your calendar looks a little something like this:
Tame those unruly twisty ties with a bamboo skewer or paint brush.
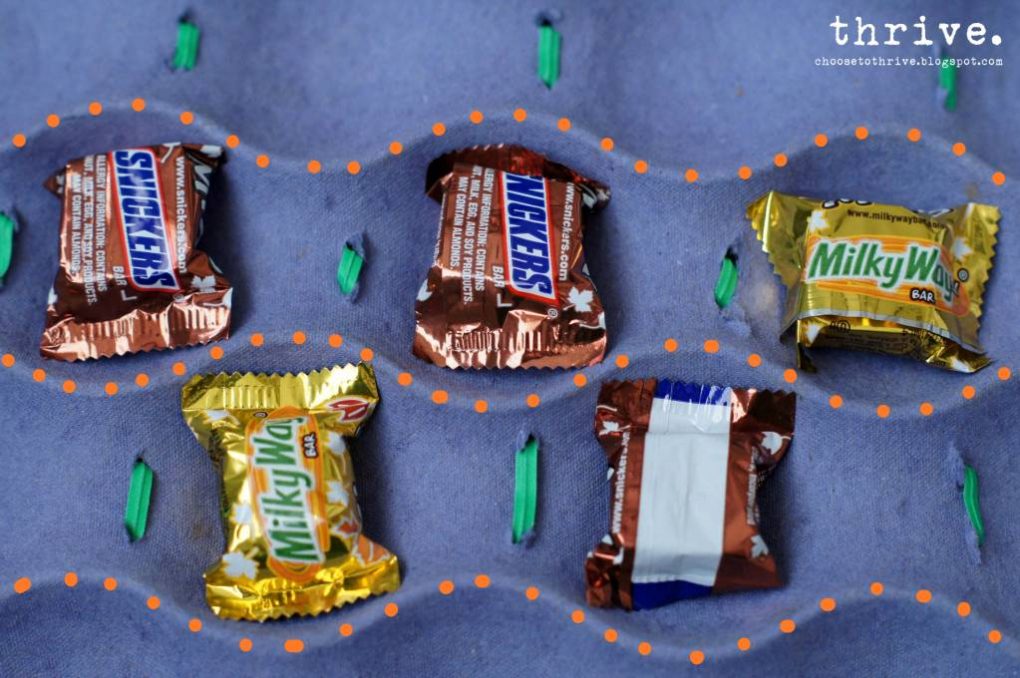
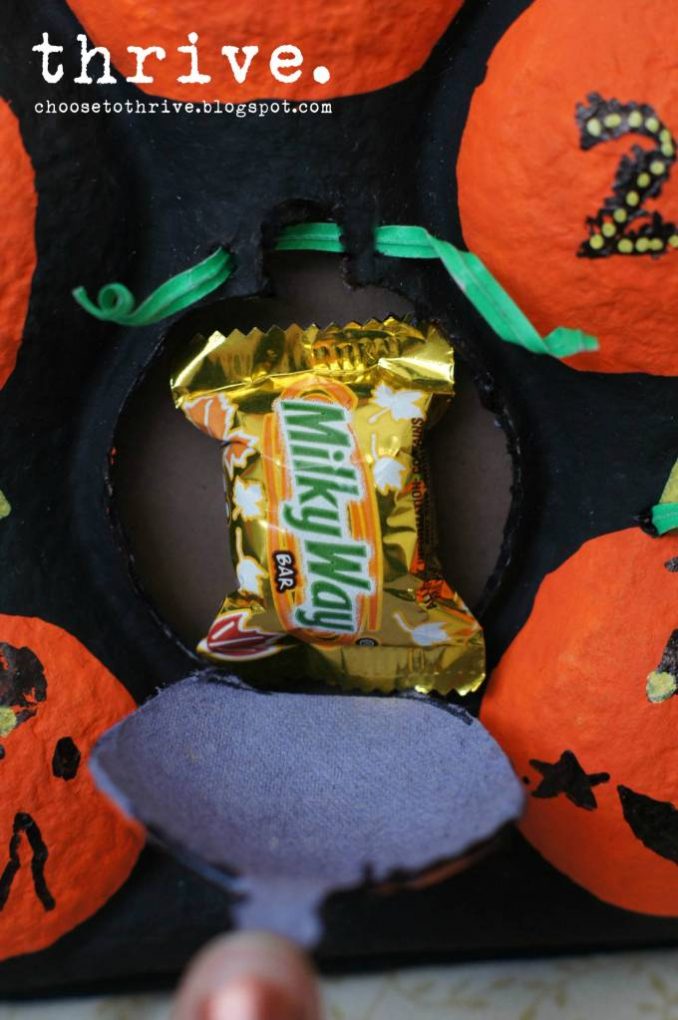
Time to add the treats! Flip the tray over and add some small treats, toys or stickers to each pumpkin back. Then carefully add school glue along the ridges (orange dots below) and sides of the tray …
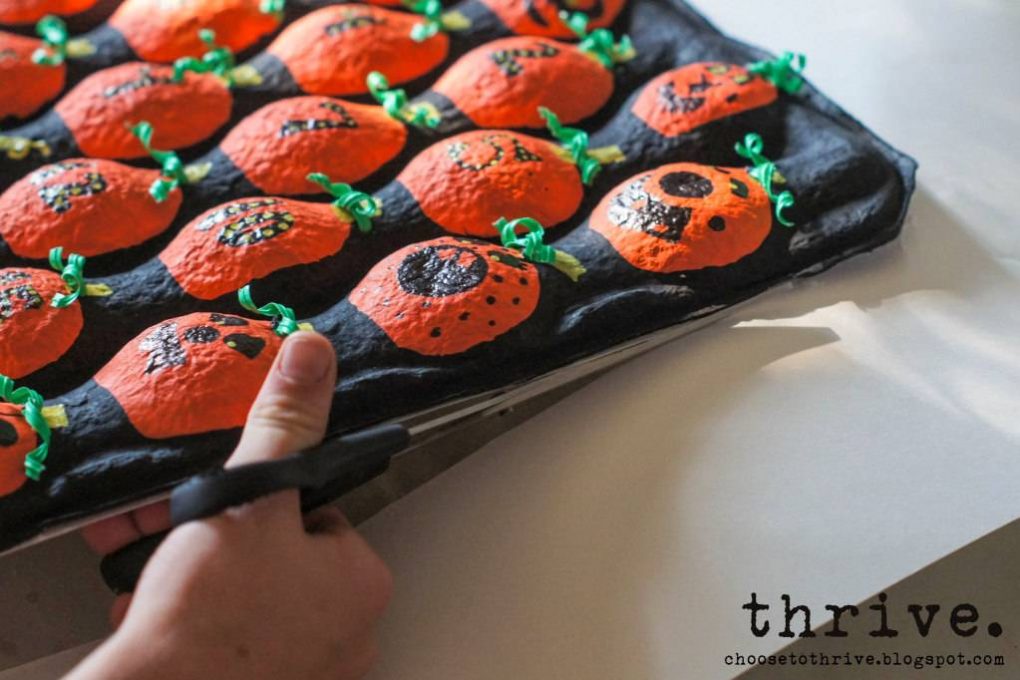
… lay the backing poster board or cardstock over top and gently weight the whole thing down for an hour. When dry, gently turn tray back over and cut away any extra paper or poster board from the back.
Punch two holes in the top with scissors and thread through some snazzy ribbon.
Yup, snazzy.
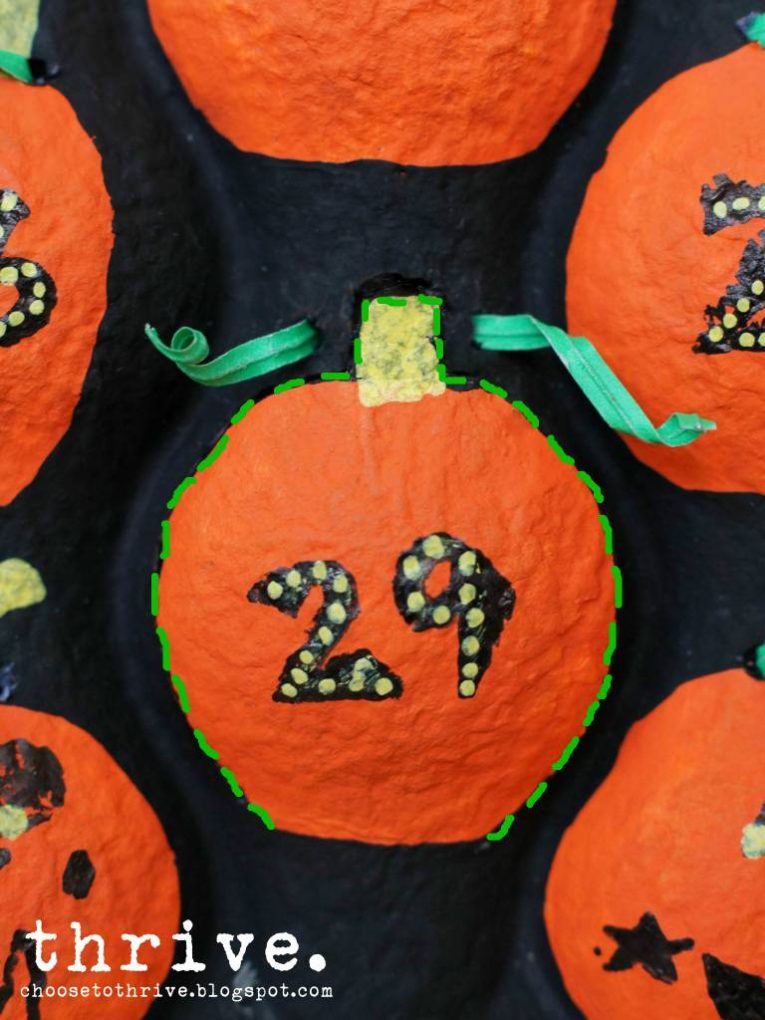
Your calendar is ready to be displayed! Starting on October 1st, you can “carve” each day’s pumpkin and enjoy a little treat one of two ways: 1) turn the calendar over and carefully remove the candy from behind — OR — 2) gently untie the twisty tie, carefully cut around the pumpkin and stem …
… open each pumpkin like a little clam shell and enjoy your yummy treats.
Retwist to close the pumpkin and you’re ready for the next day. (Of course you could cut all 31 pumpkin shapes ahead of time and just retie the little twisty ties, but I chose not to. I don’t trust my little ones to stay out of the treats. 🙂 So there you go – two ways to “carve” a Halloween Advent! And if you’re looking for more fun projects like the ones below, check out Thrive’s holiday tutorial page.
I feel very honored to be asked because Thrive is one of my favorite blogs. I love seeing Nike continually rock what she’s got in such a creative and classy way. I feel a special kinship to her because I, too, get a thrill of satisfaction from making something awesome from nothing, and I, too, have my own dirty half dozen. I know how difficult it is to fit blogging into an already over-full family life, so she amazes me even more!
Gushing introductions aside–I want to tell you a sad story that you may be able to relate to.
Every Christmas, I start out gift wrapping with a happy heart and put all my love into each carefully tied bow and crisply folded corner. HOWever, about halfway through wrapping my family’s gifts, with other holiday demands starting to heat up, my evil inner martyr mother comes out. The wrapping gets uglier along with my mood, and I have a Scarlett O’Hara-like moment where I say, “I will never be stuck spending hours wrapping Christmas presents again.”
My husband’s solution to this problem (in addition to helping me wrap a few as long as I stop verbally abusing him long enough to pass him the scotch tape 🙂 ) is to suggest that we just stick the presents under the tree in the shopping bags and shipping boxes they came in. He reasons that the kids will still have something to undo, and we won’t have to do a thing. Problem solved.
Except, that it would look ugly.
Really,really, ugly.
And I am just shallow/proud/perfectionistic enough that I mind putting super ugly presents under the tree like I’ve given up all pretense of a beautiful
holiday.
Luckily, there is a third option beyond becoming a wrapping paper martyr, and giving up on life. My very talented mother-in-law often gives gifts in personalized fabric gift bags. Also, a dear friend of mine wraps all her family’s gifts in fabric gift bags that an environmentally-conscious neighbor gave her as a gift many years ago.
Hmmm. I think re-useable, pretty, fabric gift bags are a good thing. And now finally, after years of meaning to make them, I have done it.
And, I am willing to give you all the benefit of my experience and wisdom with lots of lazy shortcuts and tips (you’re welcome 🙂 ).
To make your very own bags, you will need:
•a fabric stash to pilfer (oh, come on–you know you have one, too)
•and/or other fabric, such as pillowcases you don’t need, pillow covers, old sweaters, etc.
•ribbons, cords, old (clean!) shoelaces, etc.
•a sewing machine with thread
•scissors
•pins
That’s it. Probably all stuff you have lying around.
Now, I am not one to re-invent the wheel. There are some great tutorials for making a drawstring bag here and here and probably lots of other places on the web as well. If you don’t already know how to make one, I suggest brushing up on the basics.
Then, using those tutorials (or your own awesome innate drawstring bag wisdom) as a basis, here are the shortcuts I’ve devised for making your bags more quickly and simply:
Lazy Shortcut #1: Use pinking shears so you don’t have to zig-zag. These aren’t going to be used every day, so you don’t need to finish them perfectly, but you still don’t want your hard work to fray into un-useability.
Lazy Shortcut #2: Instead of making the casing for the bag and then feeding the ribbon or cording through, pin it into the casing when you fold the casing over (see above–my pins are holding both my ribbon and casing in place). Then sew your casing seam, taking care to keep a safe distance from your cording or ribbon. Then all you have to do is take out your pins, and Voila! You are ready to go!
Lazy Shortcut #3: Unless you really want a drawstring bag that has handles on either side, you can just leave the casing open on only one side of your bag and then tie it in a bow. It saves time and ribbon.
Lazy Shortcut #4: Another option is to make a buttonhole towards the top of your bag before you fold your casing over. Feed the ends of your ribbon through the buttonhole, then pin the rest into your casing. Sew the casing seam and unpin everything. You can close it by pulling on the ends of the
ribbon and tying it into a bow, or put the ribbon ends through a toggle or large bead–then you can just cinch it up.
Lazy Shortcut #5: You don’t have to make a casing at all. Just make your bag with an open top (like a pillowcase) and tack some ribbon near the top. Then all you have to do is bring the ends around to the front and tie it in a bow. Just like this one below with the double-ribbon tie. Easy peasy.
If you don’t have a fabric stash (and if that is true, I pity you 🙂 ), I’ll bet you still have access to other free/cheap sources of fabric.
For example,I made a gift bag out of a thrift-store throw pillow cover I wasn’t using anymore.
I unzipped the zipper on the side and removed the pillow to add a gift …
… then I just used a zig-zag stitch to tack the ribbon on one side of the pillow cover, put the present in,
zipped up the side zipper and tied the bow.
So simple!
I made this one out of an old pillowcase. It was cute and soft, but it had shrunk, and just ended up
looking skimpy on the pillow.
However, with a cute black grosgrain ribbon tacked to the back and tied into a jaunty bow on the front, Santa couldn’t do any better :).
You probably have some unused pillowcases in your linen closet, but if not, most thrift stores in my area sell them for about $1. That’s less than a new throw-away gift bag.
Some other options I didn’t try yet, but that would work really well:
An old/shrunk crewneck sweater.Cut off the arms (which could probably be used to make small, thin gift bags, by the way), turn it inside out. Sew straight across the top from shoulder to shoulder, and up each side from the waistband to the seam you just created (closing up the arm holes). Trim to a 1/
2″ seam allowance on each seam and zig-zag to prevent fraying. Turn right-side out and add a ribbon. That would be so cute, especially if you used a holiday-themed sweater.
Made cut-offs last summer? Use the bottom part of the jeans/pants that you cut off! You end up with kind of a tube when you make cut-offs, so you could just turn this tube upside down, and sew a seam where the knee used to be. Turn right-side out and add a ribbon and you’re in business.
Really, the sky’s the limit in terms of places you can find fabric for this project.
Good luck, and may adorable fabric stash gift bags keep your evil martyr mother at bay this holiday season!
Thank you so much Erin! I’ve made my first bag for my family, too, and am sooooo excited at the thought of NOT being up at 1 am on Christmas morning swearing complaining about wrapping presents.
Erin is another amazing e-friend that I’ve been lucky to find in blogland. We have living in Utah and Washington in common besides chasing around six kids – it makes you close. 🙂
I love reading Erin’s blog because she’s awesome at pretty much everything:
Thank you so much for all the love you showed my good friend Brandi. Reading how much she’s touched each of you made me float.
***
As I sit here tonight, Thanksgiving is two weeks away.
Tonight I’m sharing the first of four holiday posts as my family and friends are getting ready for Turkey Day: Being Grateful, Decorating Without Dollars, Dressed for the Occasion and Stuffed! (all about the food!).
This year in particular I’m making a deliberate decision to reclaim Thanksgiving as a holiday in it’s own right and not just the first day of Christmas. I want to linger on thankful, relish in blessings and openly rejoice for everything I have instead of what I think I need. When I’ve taken this approach in year’s past, I find I’m much less likely to be depressed by what we’re not spending on Christmas and recognize how rich and full my life is right now.
So to celebrate today’s theme of Being Grateful, I’m so excited to have another bloggy friend, Becky from Creatively Content, here from half way around the world to share a beautiful Thanksgiving tradition she enjoys with her family. She writes that her theme for this season of her life is to ‘use what we have’, and I can tell you that her blog is a beautiful testament to just that.
Becky is an American blog momma living with her husband and three beautiful children in western Turkey near the Greek border. I’m always inspired by Becky’s faith, grace and creativity as she builds a wonderfully unique life for her kids. I hope you’ll love the Thanksgiving Mailbox that she’s sharing today as much as I do.
The Thanksgiving Mailbox started because my girlies and me were sitting around making envelopes out of an old magazine and they played mail for a LONG time, sending sweet love notes to everyone in the family.
So I thought it would be fun to have a Thanksgiving mailbox where we wrote notes every morning starting 2 weeks before thanksgiving of things we are grateful for and put them in our mailbox. We used heavy duty cardboard for the bottom and the sides and a cereal box to shape the middle and back.
The stand came together using cardboard circles and toilet paper tubes.
And everything was held together using hot glue.
The kids tackled the decorating with strips of magazine pages + mod podge since my scrapbook paper supply is small and precious.
The envelopes are stored on the back of the mailbox in a little pouch with 5 little cards for each of us in the family to write what we are thankful for.
One special thing I added was that 5 envelopes have each of our families initials on it and so each of us will write (some with help) 😉 one thing we are grateful for about that person.
On Thanksgiving day we will open up all the 14 envelopes and remember what we were grateful for and each have our own envelope to open and see all the special things our family has to be grateful for about us. (The kids will love to get their own mail! We have one for Jesus, too.
Thanks Nike for including me in your Thanksgiving posts and hope you come and stop by Creatively Content.
You’re so welcome, Becky! I’m making one of your mailboxes for Family Home Evening with my Dirty Half Dozen.
I’ll hope you’ll stop by and say hi to Becky this week. Her corner of the world is literally thousands of miles from craft stores or fabric shops, yet she always finds amazing ways to use what she has and make do with what she doesn’t. Her blog is full of projects that celebrate the spirit of recognizing and being thankful for everything we do have in our lives.
Case in point:
No theatres to watch movies? Or too expensive to hit the theatre? No problem.
what are you GRATEFUL for right now as you get ready for THANKGIVING?
(Can’t wait to show you part 2 of the THRIVE Thanksgiving series on holiday outfits. Like I mentioned at the end of Brandi’s post, this has been the happiest little accident ever.)
I like finding creative ways to incorporate natural elements into my home. Which is why I love Nike’s, “Rock-What-Ya-Got” approach to living and crafting.
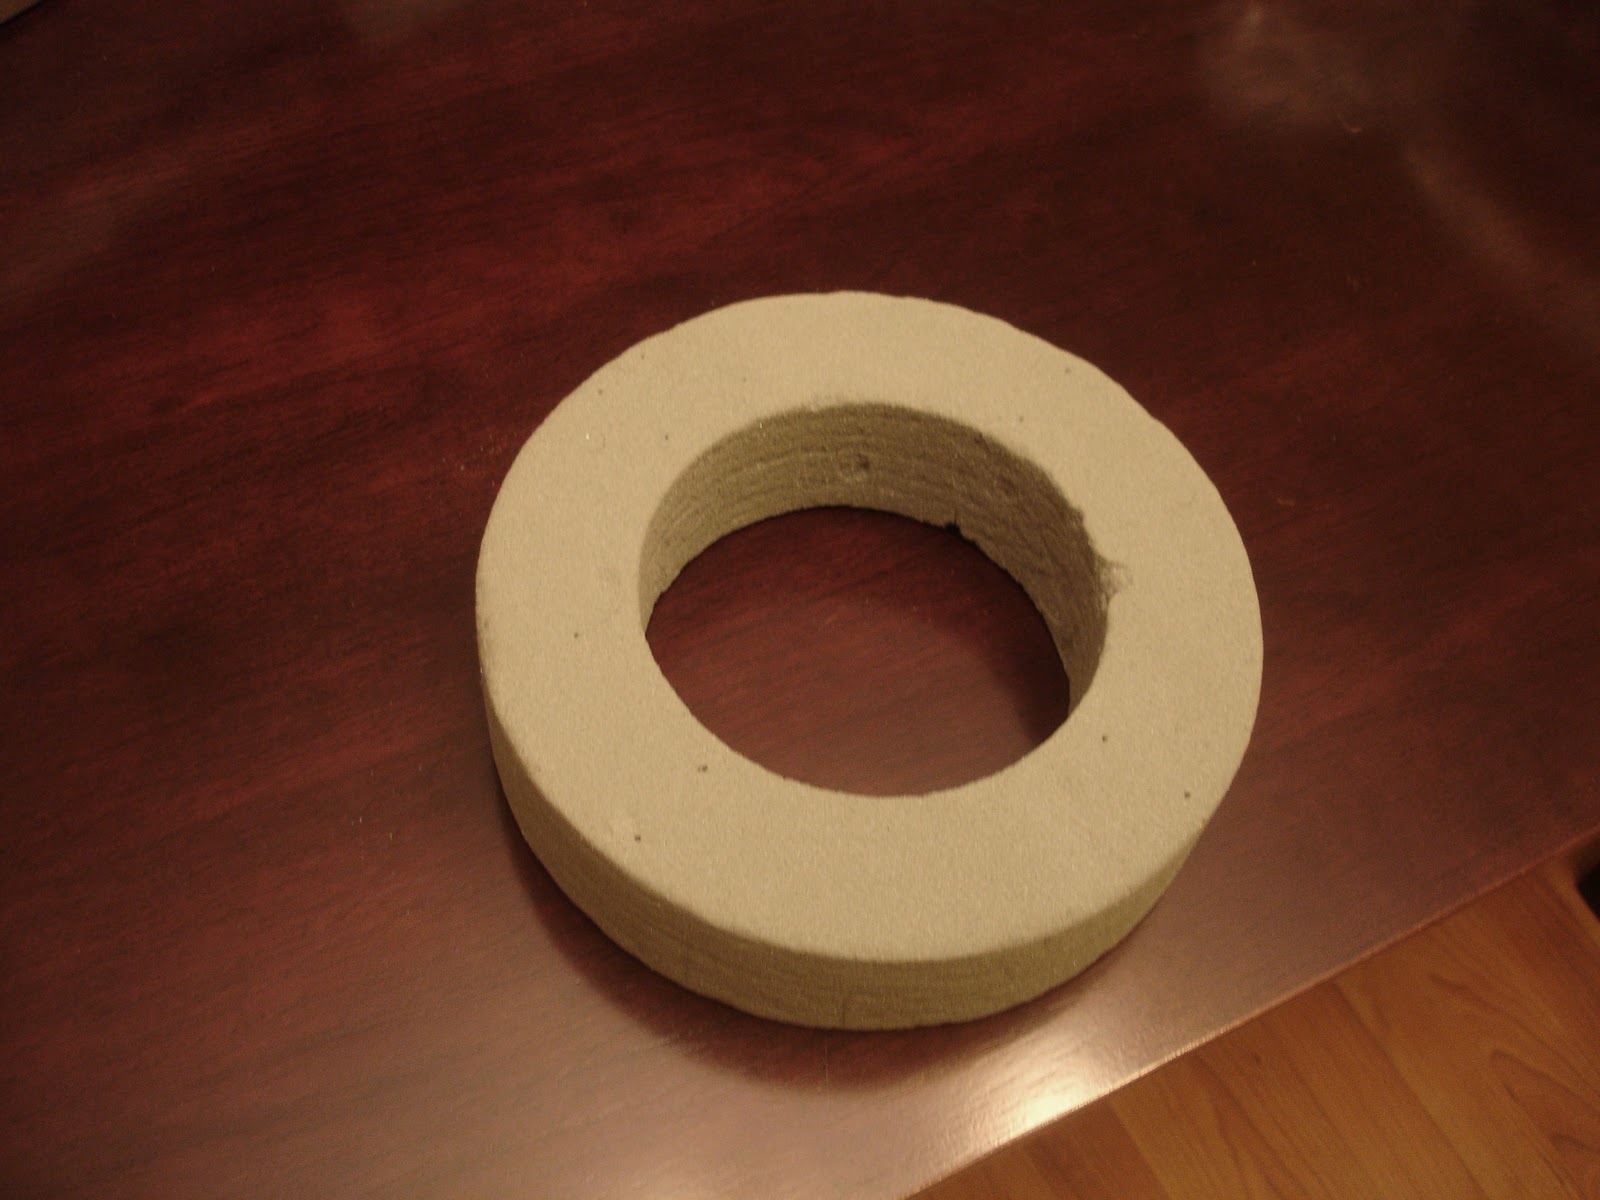
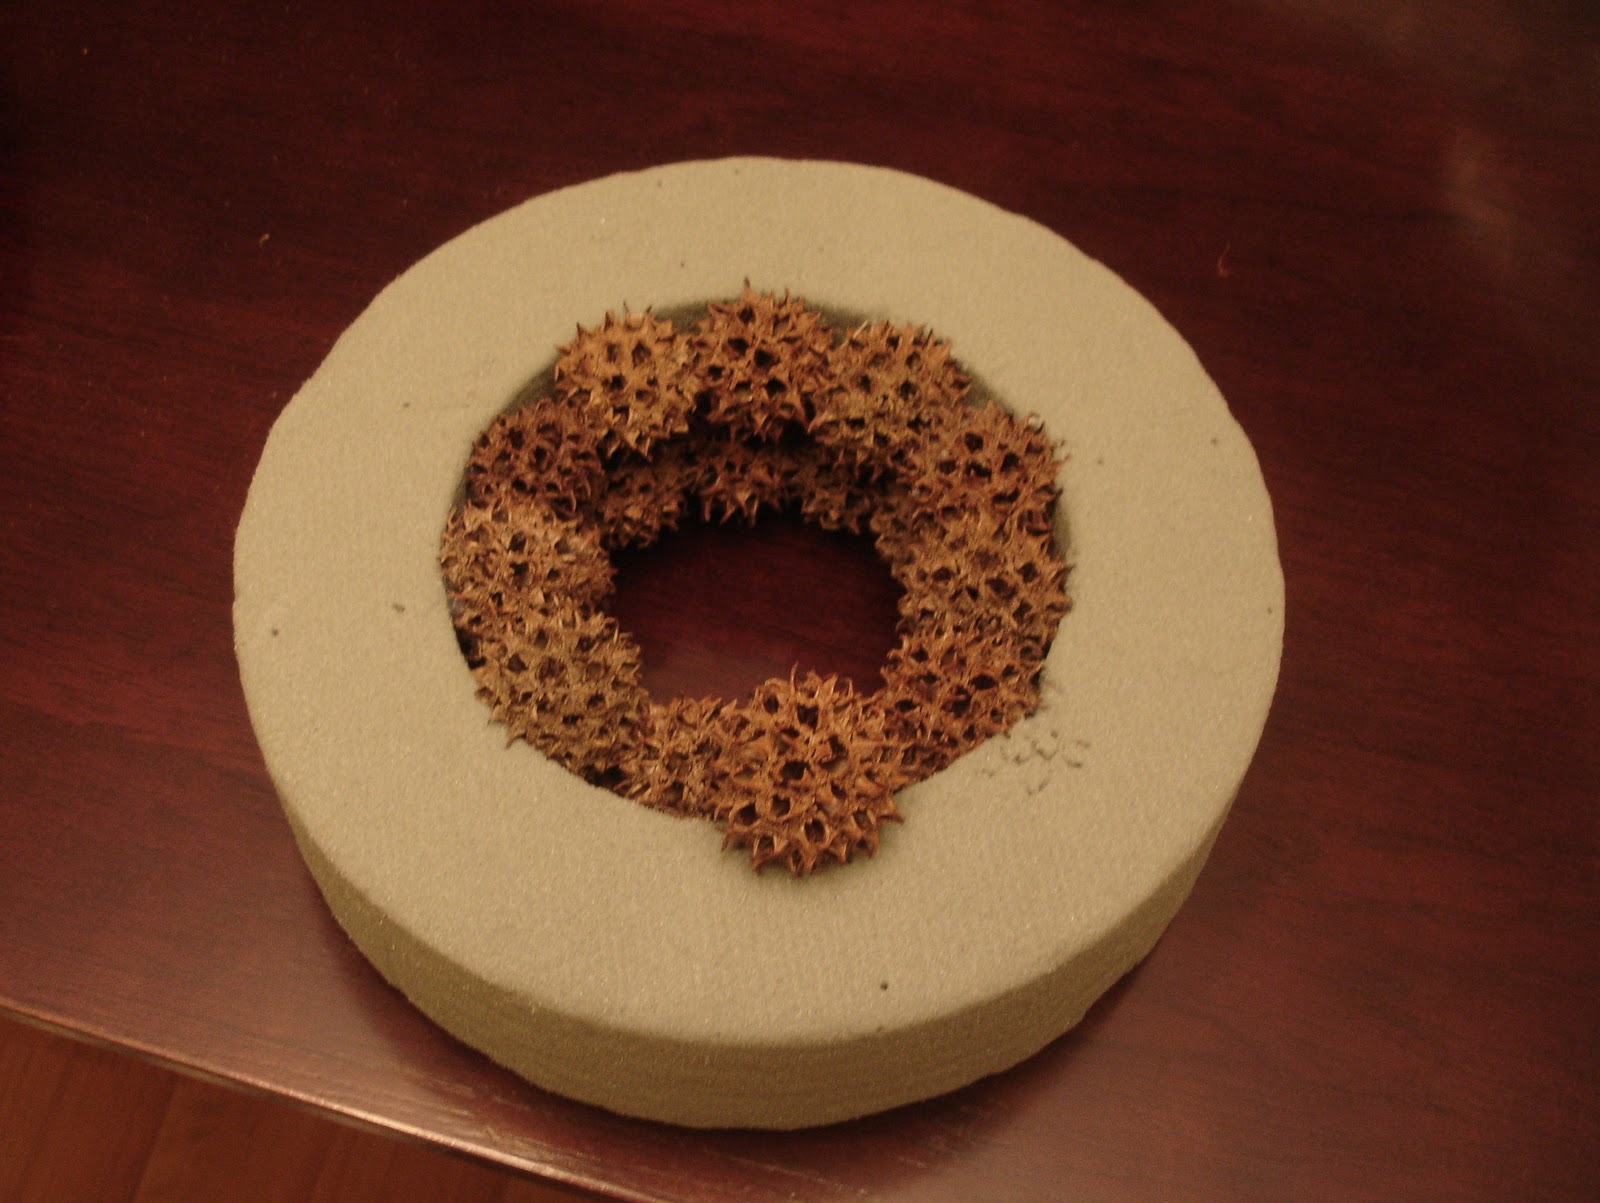
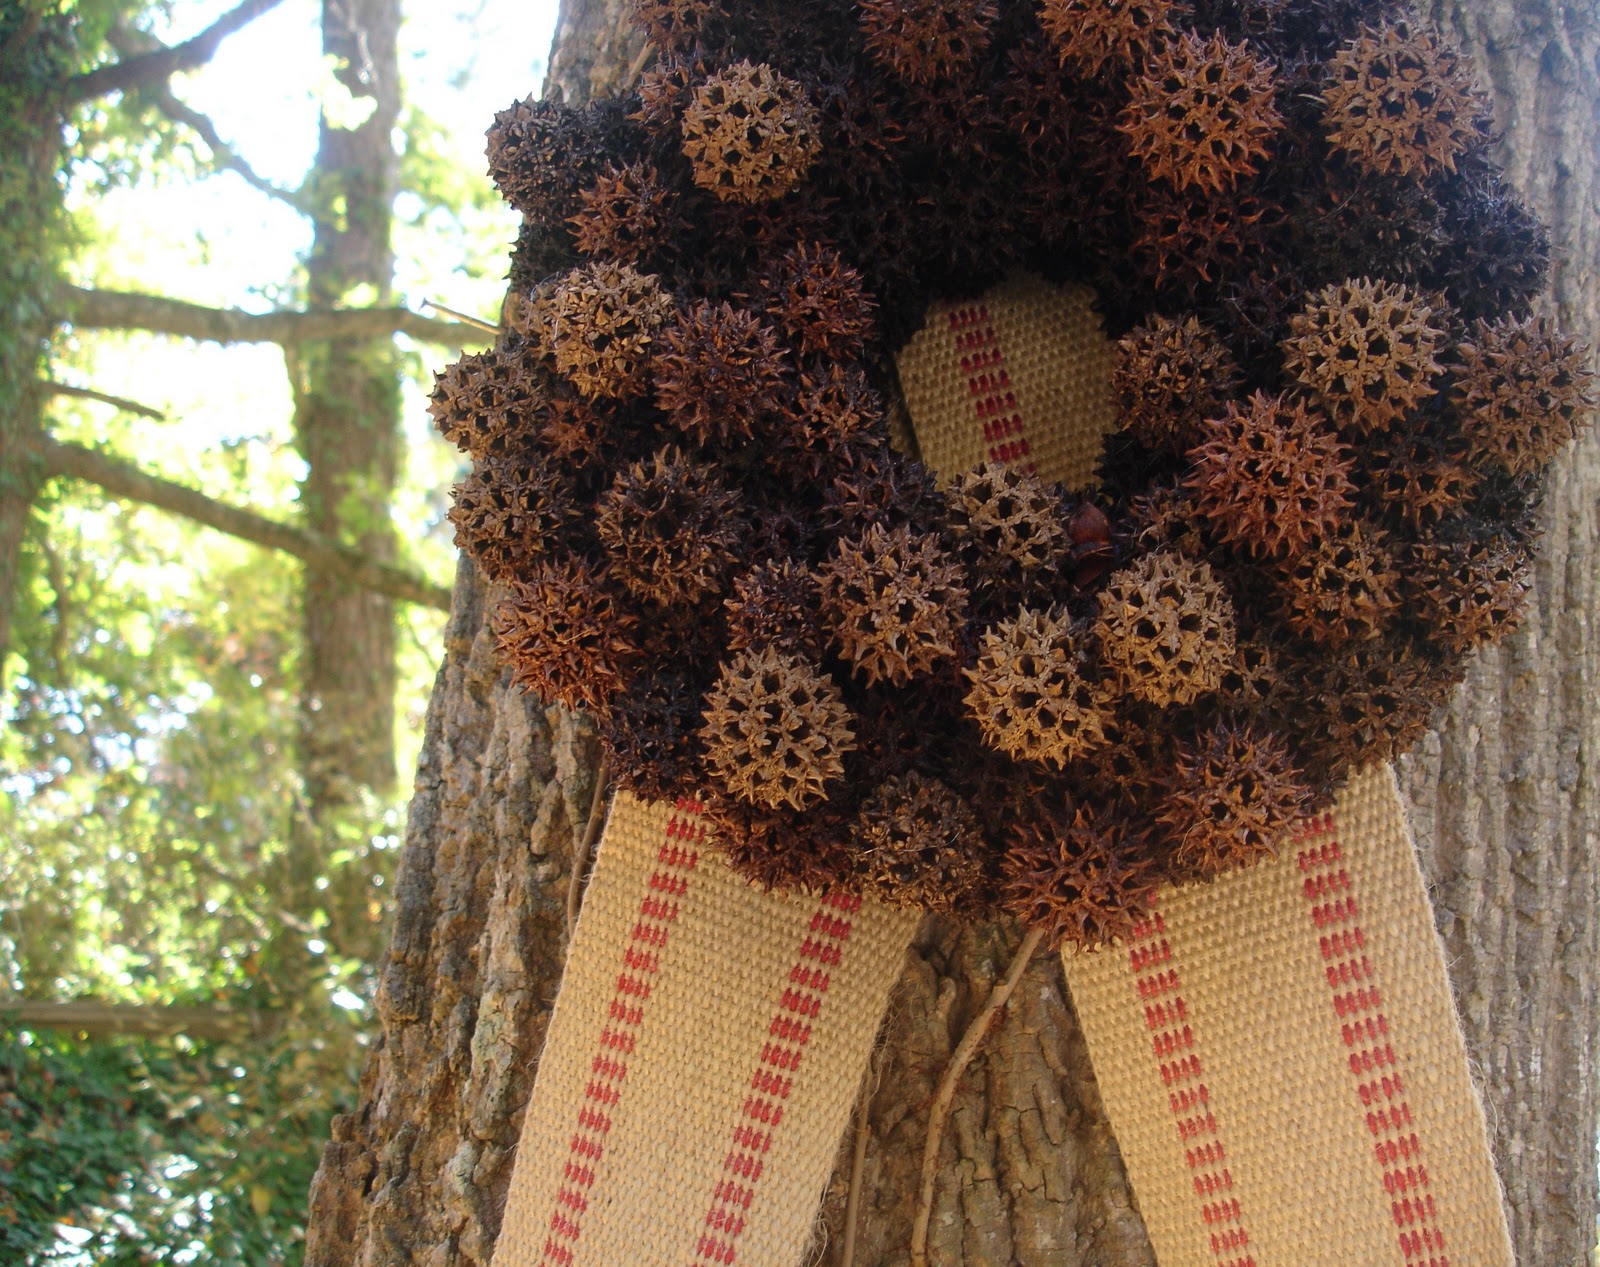
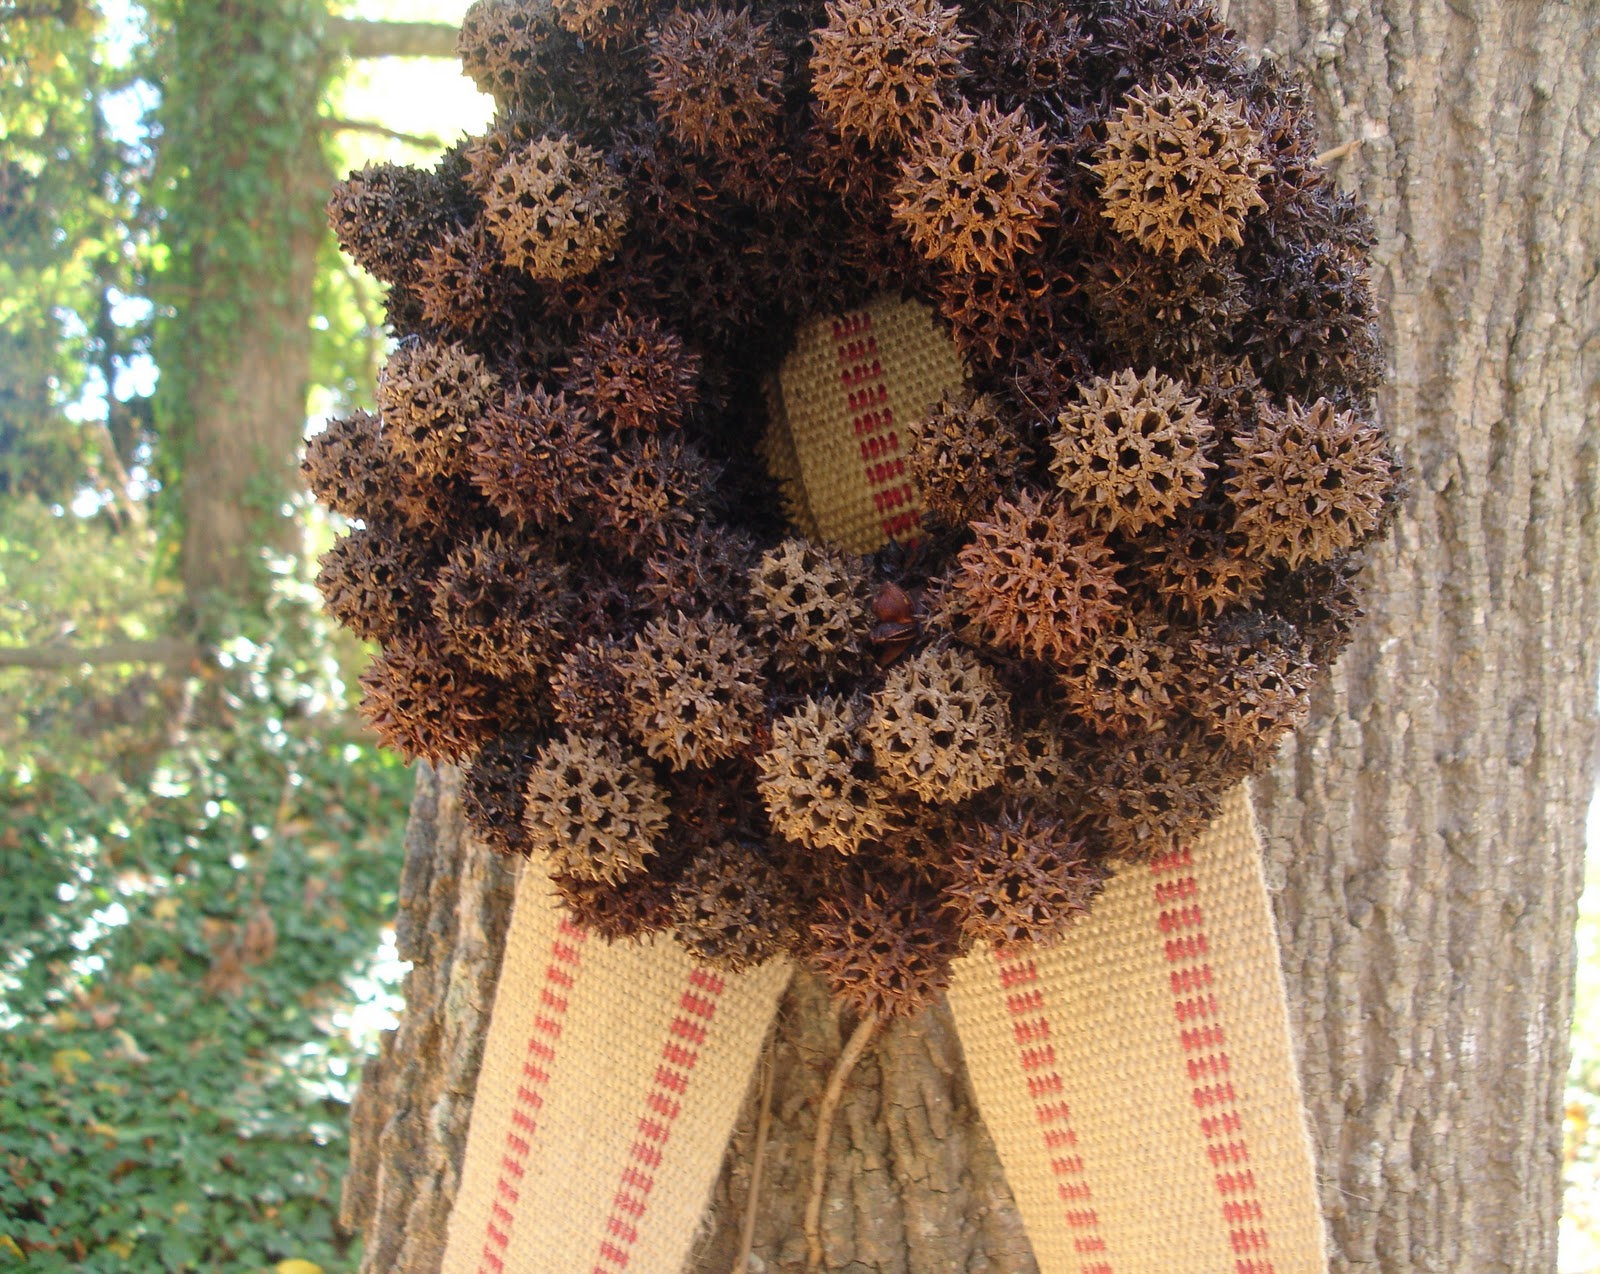
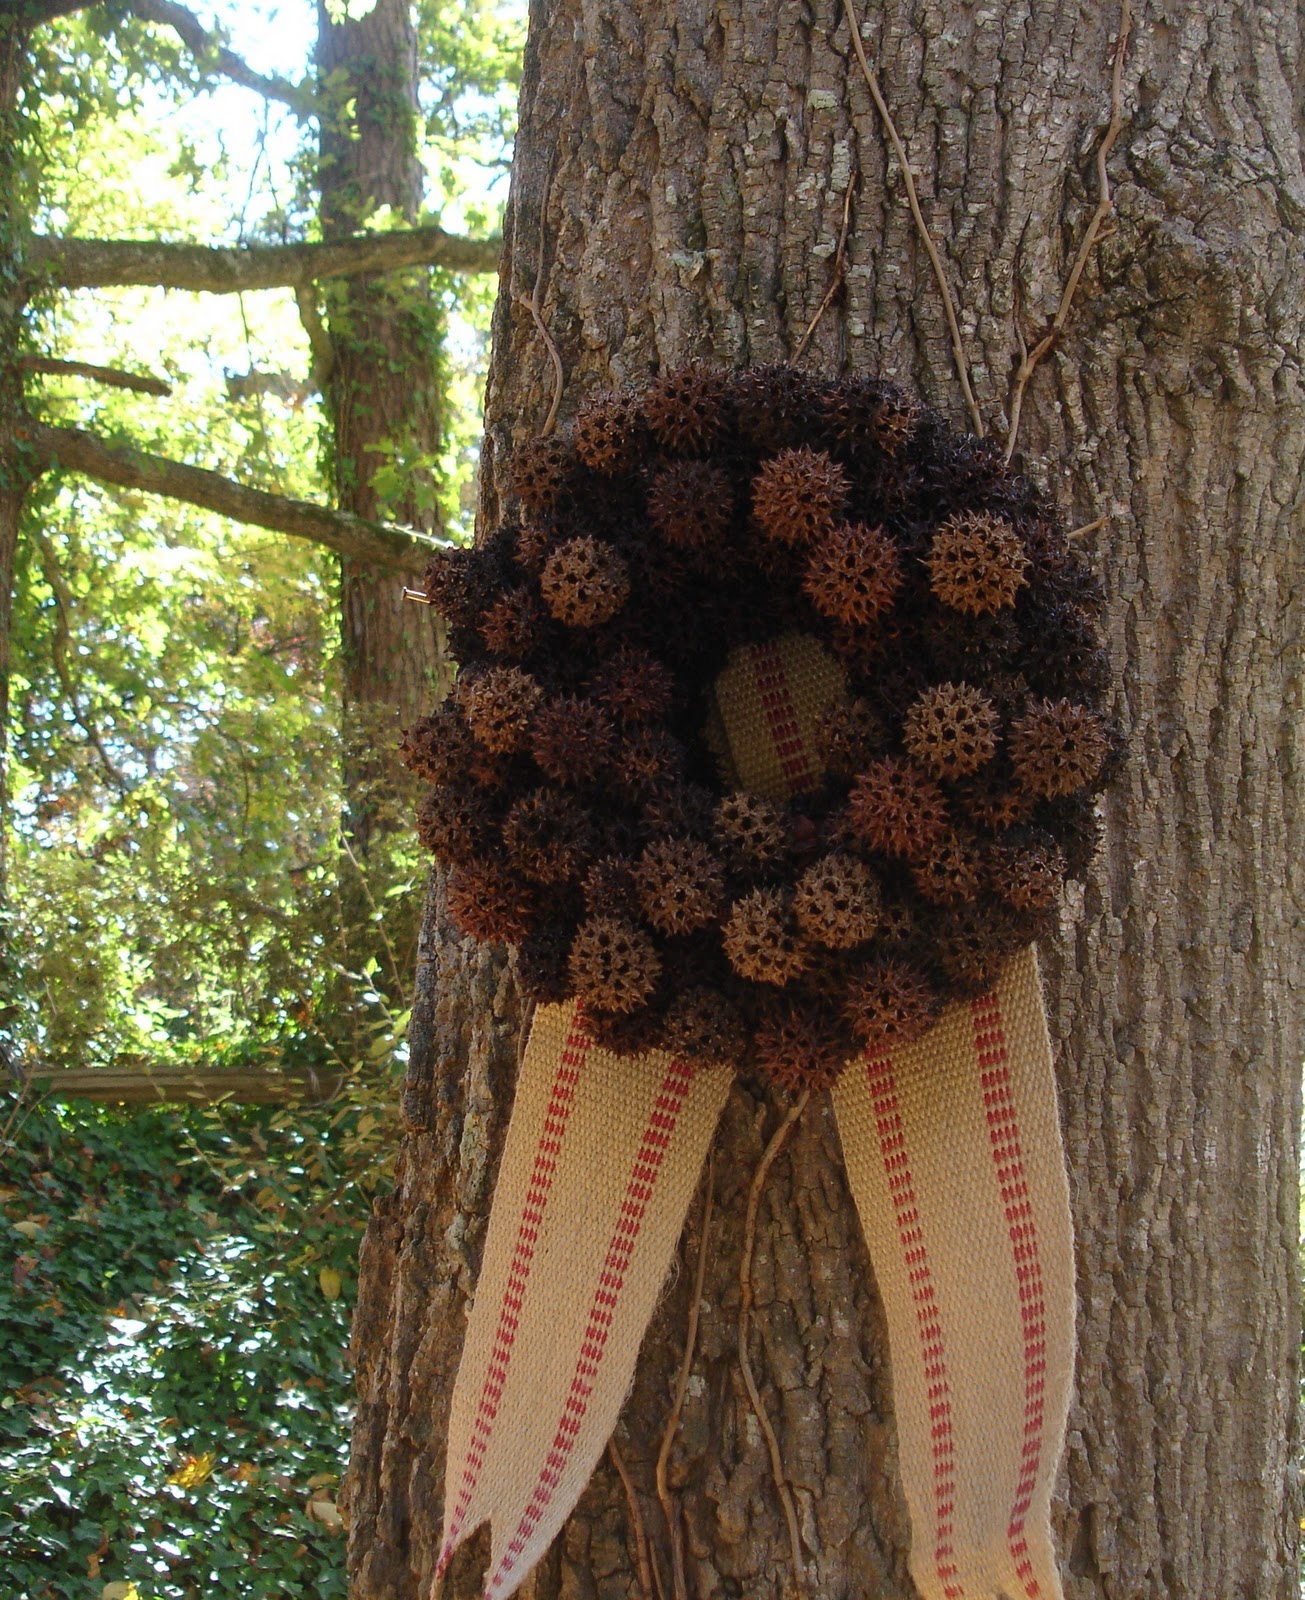
Growing in my yard is a Sweet Gum tree. Sweet Gum trees produce these prickly little balls (“Sweet Gum fruit”). Those prickly little balls are everywhere in my yard! This week instead of raking them into a pile, I went outside and gathered a bag full to create a wreath.
To construct my wreath, I started with a simple wreath form purchased for a dollar.
Then using my glue gun, I attached the prickly fruit to the wreath form starting from the inside and working my way out.
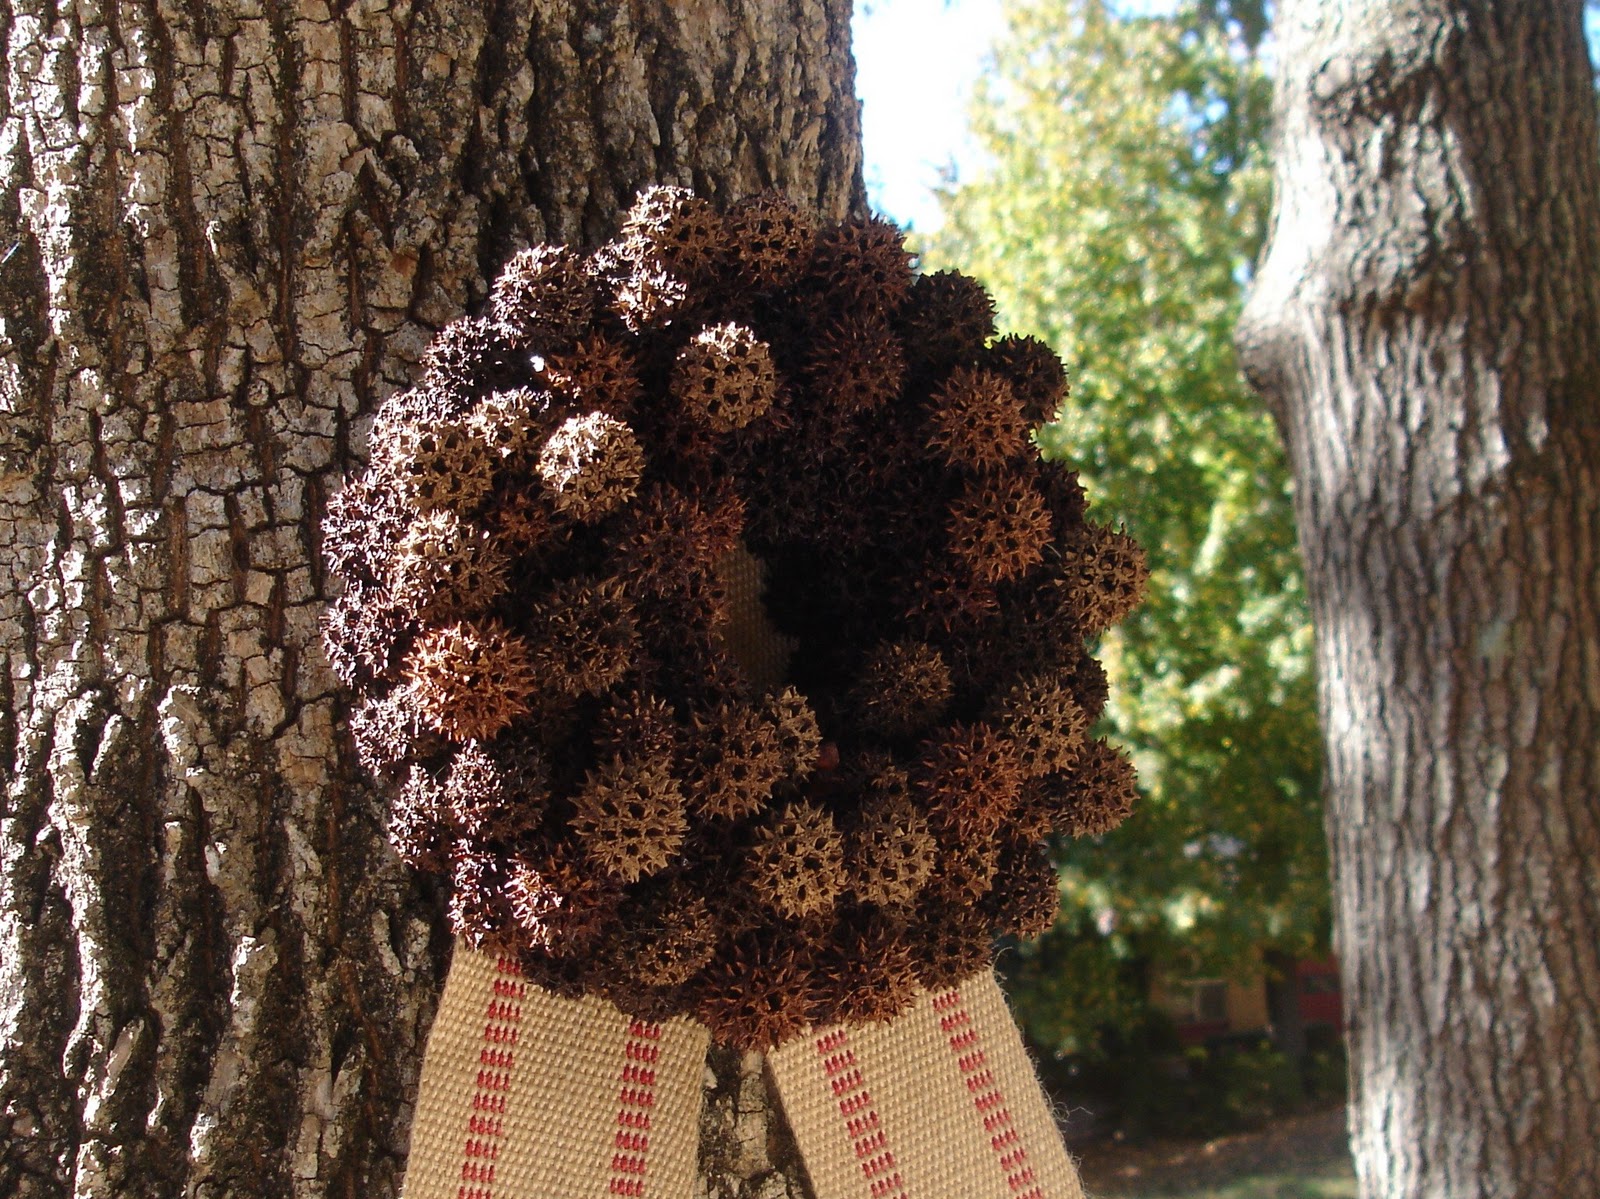
Once completed, I attached a saw tooth hanger to the backside, again using my glue gun.
Here it is my friends!
I love the texture of the wreath.
I kept things simple to focus on the natural beauty of the Sweet Gum fruit.
“Study nature, love nature, stay close to nature. It will never fail you”. – Frank Lloyd Wright
I hope you enjoyed my tutorial! Happy Holidays everyone! Thanks so much Nike for having me over!!
************************
You’re so welcome, Brandi! I ADORE how you used natural items from your yard to create this beautiful wreath for the holidays. I’m so pinning this!
Many of you probably know Brandi from around blog land – she’s the wonderfully thoughtful blog visitor leaving heartfelt, genuine comments on some many projects out there. I am constantly encouraged by Brandi’s feedback here on THRIVE and am so not surprised when I see her doing the same for women crafters. And if you haven’t read about her inspiration for her blog title, you need to.
Oh, and did I mention Brandi’s mad crafting skills? No? Seriously … mad.crafting.skills.
I’m thrilled to be here sharing back to school ideas this morning to help me and my six kiddos this year!
So here’s the deal:
I have a love/hate relationship with my kids’ lunches.
I hate shopping trips with my kids begging for all the pricey, pre-packaged lunch stuff that’s loaded with preservatives and wasteful packaging.
Sheesh that junk is expensive.
But the convenience? Oh how I love the convenience.
And there are times of the year when our schedule is so crazy that I cave and load up the cart with lunchables, little bags of crackers and jello packs just so that we can pull a lunch or snack together in two seconds flat.
But no more!
I’m here today to share my plan to eat healthier, save money and still enjoy the convenience that me and my kids crave. And I hope you’ll tweak the ideas below to fit your family’s budget and nutritional preferences.
#1 – The Lunchable
Why?
Reusing the store bought tray and packing your own lunch meat, real cheese, crackers and a little treat will save you 40% — $0.60 for homemade vs. $1.00 for the store bought one. Plus the homemade version boasts real cheese, extra calcium and fewer preservatives.
A quick layer of Glad press ‘n’ seal or aluminum foil keep everything in place just like the original.
Don’t have a left-over lunchable tray? Or want a bigger tray to up the serving size for older kids?
No problem. You make your own dividers like I did for this dollar store container using an empty milk jug.
And that extra space means you can supplement that lunchable with some fruits and veggies without spending more than the store bought version.
Which $1 lunch would you rather send with your kids?
Yum … yeah. Me, too.
For a drink my kids prefer the juice pouch …
… while I’m more in favor of the reusable water bottle which make lunch $1.20 the first day and $0.98 every day after.
So we’ll do both: water most of the week and juice boxes on Friday for a little bit of a treat.
Either way these lunches come in significantly less than our $1.60 school lunch and WAY CHEAPER than the big-drink-included-lunchables at the store:
Really?
$3.00 for a $1.00 lunchable and $2.00 juice pouch? Um, no thanks.
#2 – The Pudding & Jello Packs
Why?
Reusing those little cups (or the small tupperware containers with lids) and making your own will keep the cost and preservatives way down.
Same thing for the gelatin cups:
Making just this switch alone will save you a truck load. Six cents a cup vs. $0.56 for Jell-o brand? You could easily cover back-to-school paper supplies, back packs and shoes with just that little switch.
#3 – The Fruit Cups
The reduction in packaging, costs and preservatives make these easy switches.
#4 – The Mini Cracker Bags
You can enjoy the name brand crackers and still save almost 40% when you prepackage them yourself using $0.01 snack size sandwich bags. Just check out the cost per serving:
If you don’t mind generic, you can reduce those costs another 50+ percent.
And it’s just as convenient to grab a home-packed bag as the store packaged variety. The only difference is the price.
A few more THRIVE tips:
1. The ideas above are only guidelines.Each family will have their own nutrition and budget preferences. The idea is that by getting creative with recycled/reusable packaging, you can still enjoy the convenience of off-the-shelf while controlling costs and ingredients. So feel free to make your own tweaks with whole grain crackers, organic produce and nitrate-free meat. Or try packing a lunchable with mini tuna or PB&J sandwiches. Have fun!
2. Make your kids help with the prep work! They’re the ones asking for the “cool” packaging so they can help. It’s also a great way to teach basic food prep and math skills like measuring ingredients and dividing portions.
3.Have your kids help you shop! Don’t laugh — I’m serious. This is a fantastic chance to practice real life math skills as they determine price per unit, ounce or pound. There’s also lots of fun ways to to teach math, spelling and budgeting with kids during shopping trips here.
3. Have cheese for sandwiches or lunchables pre-sliced at the deli. I buy the economy loaves and have them sliced right there at the store for no extra charge. It saves so much time and keeps the portions equal.
4. Rock What Ya Got! If your kids are like mine and want the meat for their homemade lunchables to be round like the store bought variety, trying using the lid of a spice jar. (My cookie cutters aren’t the right size). Stack the meat in three layers and cut away. The lids from my 2/$1 Walmart spices worked perfectly.
And don’t toss those scraps! I save mine in a ziploc bag in the frig to use in omelets and salads.
5. Incorporate fresh produce from the garden! Now is a great time to up the nutrition with yummy, home ground fruits and veggies. I love it when I can ditch the high fructose corn syrup fruit snacks and send my kids with the homemade variety.
They have a soft, chewy texture like other dried fruits and are only $0.01 per serving vs. $0.20 for the cheapest store bought variety! You check out the recipe here.
Yum!
… and finally …
6. Pennies add up! I know some of you may look at $0.25 or $0.50 savings a day and think it’s not worth it. But trust me – it so is! My kids have been back to school for a month now (year round school) and I’ve kept track of what we would have spent to buy the prepackage stuff vs. packing our own. So far our averaging savings is around $8 a week.
If our family takes out the money saved each week and transfers it into savings (or puts it in an envelope Dave Ramsey style), that $8/week times 25 weeks of school should work out to $200 by the end of the year. And $200 divided between my four school-aged kids equals $50 a piece, or enough to buy a new pair of shoes, back pack and classroom supplies for each of them.
Eating healthier, using less packaging, teaching my kids about cooking-meal planning-math-budgetting AND financing back-to-school shopping for next year? That’s so worth it to me!
Hope you and your kids have fun shopping for your own creative ways to make smarter lunch choices!
My mission to live and craft without spending a dime carried over into my yard this week as me and my kids geared up for the holiday weekend. Because who wouldn’t love to enjoy the 4th in an amazing outdoor space?
But as it turns out, I’m fresh out of amazing outdoor spaces.
The back yard is being reseeded, spending any money on decorating is a no-no right now and my front yard looks like this:
average 1970’s split-level, average landscaping, average trees, average grass.
Yawn, right?
I thought so, too, until I started rummaging around the kitchen and junk drawer.
So in true rock what ya got style, I’m here to show you how I used items from around the house to FAKE two great outdoor spaces (and how you can, too!)
Space No. 1:Date Night In The Driveway
Here’s a look at my boring suburban driveway.
But with a little imagination … and some rearranging …
… and some Christmas lights and twisty ties …
that driveway becomes something else entirely:
a driveway bistro get-away perfect for a stay-at-home date night dinner.
And as soon as dinner’s done, the drive-in theatre comes to you with movie night on the fence. All it takes is a queen size white sheet, a borrowed projector and a $0.99 movie rental.
And you can bet that my driveway is going to look just like this again tonight as Mr. Thrive and I remember when we met 15 years ago at a 4th of July display … and how we went and saw Independence Day the next day for our first date … and shared popcorn and Hot Tamales … and how 1 house, 2 layoffs and 6 kids later we wouldn’t change a thing.
Space No. 2: Under The Tree
Here’s another look at my front yard:
Again, nothing to write home about.
But with a little digging around the kitchen and craft room …
… I figured some make-shift floating lanterns could help that boring tree and spotty grass become something magic.
Lanterns can be made from anything: canning jars, empty peanut butter jars, whatever.
Lantern handles come together by wrapping wire around the lip of each jar a few times and then back over the top.
Tea lights (battery or open-flame) work best if they’re set in a little bit of sand.
No sand on hand? Me neither. Salt works just fine and can even be tinted with a few drops of food coloring for the looked of colored sand.
You can leave the lanterns plain or dress them up with some beads, ribbon or garland.
Hanging is a snap using whatever you have on hand—yarn, twine, ribbon, shoe laces, whatever. Rock what ya got.
And as the sun starts to set, those lanterns get tied in place …
… and candles lit …
… and little bodies in jammies with story books find their way outside to lay under the stars …
… and curl up with their favorite blankets under a canopy of lights …
… telling ghost stories way, way past their bedtime.
And seeing my ho-hum front yard transformed with some jars and string, and hearing the laughter and excitement of my kiddos waft through the warm summer night reminded me of my favorite children’s poem ever:
So go take another look at those outdoor spaces around your house or apartment and see what kind of magic you can make yourself.