Easy, Festive Glitter Nail Designs for Any Bold Occasion
7 min read ·
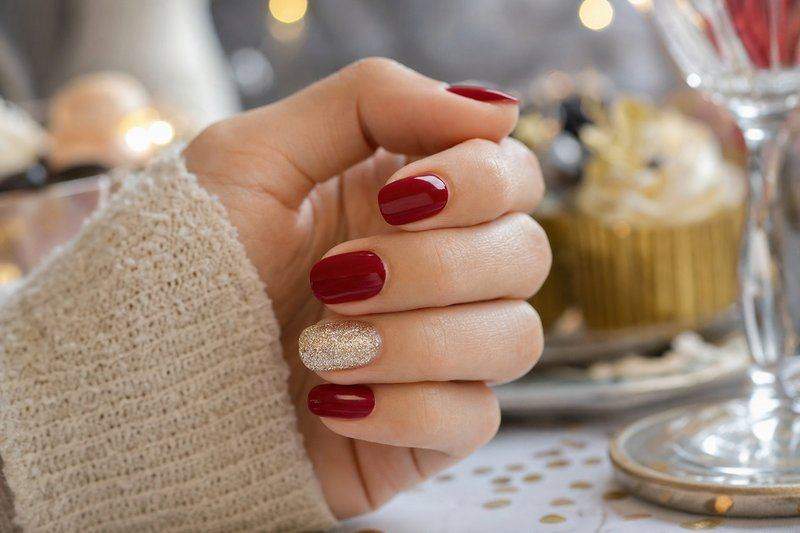
Glitter nail designs are one of the fastest ways to turn a plain manicure into something festive without any real skill required, most of the work is just applying polish, not painting fine detail. This covers the easiest ways to apply glitter cleanly, a handful of bold looks worth trying, and the removal trick that saves you from scrubbing glitter off your skin for twenty minutes afterward.
The Easiest Way to Apply Glitter Polish
Glitter polish behaves differently than a regular cream polish, and a couple of small adjustments make it much easier to apply evenly:
- Apply a base coat and one coat of a solid color first (glitter alone often looks sparse without color underneath)
- Dab, don’t drag, the glitter polish onto the nail: a dragging motion tends to leave streaky gaps where glitter didn’t distribute evenly
- Apply a second thin coat if the first looks patchy, letting it dry slightly between coats
- Finish with a thick topcoat to smooth over the texture, since glitter particles sit slightly raised above the nail surface
Dabbing instead of dragging is the single biggest technique difference between a clean glitter application and a streaky one.
Easy Single-Accent-Nail Glitter Looks
The fastest way to get a festive look without committing to glitter on all ten nails is a single accent nail, usually the ring finger. Paint the rest of the set in a solid, simple color, then apply glitter to just that one nail. This is an easy option for anyone who wants a bold moment without the extra time (or removal effort) of a full glitter set, and it works for almost any occasion from a holiday party to a birthday.
Bold Full-Glitter Sets for Holidays and Parties
For a fully festive look, glitter across every nail creates a much bolder effect than a single accent:
- Gold or silver glitter over a black or deep red base, a classic bold holiday-party combination
- Multicolor chunky glitter, larger glitter pieces in mixed colors, festive for New Year’s or a birthday celebration
- Glitter ombre, glitter concentrated at the tip, fading to plain color at the base, a slightly softer take on a full-glitter set
Chunky, mixed-size glitter tends to read as bolder and more festive than fine, uniform glitter, which photographs more like a subtle shimmer than an obvious sparkle.

Glitter Gradient and Tip Designs
A glitter gradient, heavy glitter at the tip, fading to bare or lightly-glittered near the cuticle, is an easy middle ground between a subtle accent and a full glitter set. Apply glitter polish more heavily near the tip and use a light dabbing motion (or a makeup sponge, similar to a color ombre) to taper it off toward the cuticle. This design works especially well over a French-tip base, replacing the white tip line with glitter instead.

Choosing Glitter Size and Density for the Look You Want
Not all glitter polishes are built the same, and picking the right one makes a bigger difference than the application technique itself. Fine, dense micro-glitter gives a smooth, almost solid shimmer that reads as elegant from a distance, a good choice for a festive but still fairly understated look. Larger chunky glitter, or a mix of different-sized pieces in one bottle, creates visible individual sparkles where fine glitter gives a blended shimmer, which is bolder and reads clearly as a “glitter moment” even in photos taken from a distance. Some bottles combine both, fine glitter as a base layer of shimmer with a few larger pieces mixed in for accent, which is often the easiest way to get a design that looks intentionally layered and not one-note.
Glitter Placement Ideas Beyond the Basic Accent Nail
A single accent nail is the easiest starting point, but there are other simple placement options that don’t require full-set commitment either:
- A glitter half-moon at the base of the nail near the cuticle, leaving the rest of the nail a plain solid color
- A glitter tip instead of a full accent nail, essentially replacing a french tip’s white line with glitter polish
- Glitter on just the pinky and ring finger across the whole set, a slightly bolder middle ground between one accent nail and a full glitter manicure
Each of these takes roughly the same effort as a single accent nail but changes where the eye lands, which is worth experimenting with depending on whether you want the glitter to feel like a subtle detail or the main event.
The Foil Trick for Easy Glitter Polish Removal
Glitter polish is notoriously hard to remove with a normal cotton pad, since dry particles just move around on the nail and never dissolve. The foil-wrap method solves this:
- Soak a small cotton pad in acetone-based remover
- Press it directly onto the nail and wrap a small piece of aluminum foil around the fingertip to hold it in place
- Leave it wrapped for 8-10 minutes, longer than you’d need for regular polish
- Slide the pad off (don’t scrub), most of the glitter should come away with the pad and not stay stuck to the nail
This takes a bit more patience than removing a regular manicure, but it’s dramatically easier than trying to scrub glitter off with a standard cotton ball.
Storing Glitter Polish So It Doesn’t Separate
Glitter polish tends to separate faster than regular cream polish, with the heavier glitter particles settling toward the bottom of the bottle between uses. Rolling the bottle between your palms, never shaking it, redistributes the glitter without introducing air bubbles that can show up as tiny flecks in the finished manicure. Storing glitter polish upright also slows down how quickly the glitter resettles once it’s been mixed, which matters if there’s likely to be a gap of several weeks between one festive occasion and the next time that same bottle gets used.
Common Mistakes That Ruin an Otherwise Good Glitter Manicure
A few habits show up again and again in glitter manicures that don’t hold up. Skipping the base coat is one of the most common: glitter polish on bare nail not only looks patchy since there’s no color to fill the gaps between particles, it can also leave a faint stain on the nail plate that takes weeks to grow out. Rushing the topcoat is another frequent issue. Glitter particles sit proud of the nail surface, and a single thin coat often leaves a rough, catchy texture well short of the smooth finish a good glitter manicure should have. Building up two or three thin topcoat layers, letting each one set before adding the next, buries the texture far more effectively than one heavy coat applied all at once, which tends to pool around the particles instead of covering them evenly. Chunky glitter in particular benefits from this layered approach, since larger pieces need more topcoat volume to fully submerge than fine glitter does.
Glitter Nail Designs for Different Occasions
The same glitter techniques stretch across a wider range of occasions than the word “festive” might suggest. A single fine-glitter accent nail works fine for a regular workday when you want a small bit of sparkle without anything loud. A full chunky-glitter set is better suited to an evening event or a holiday party, where the boldness of the look matches the occasion and doesn’t stand out awkwardly against a quieter setting. A glitter gradient sits in between the two, subtle enough for daytime wear but with enough shimmer to still feel a little special, which makes it a reasonable default when you’re not sure how bold to go.
Whichever placement and glitter size you go with, dabbing patiently and finishing with a proper topcoat are the two habits that separate a clean glitter manicure from a messy one.