Category

Home and DIY Projects

Category

fail

Thanks for your kind comments on my door painting fail – so glad I’m not the only one who’s screwed up a DIY project.

And I’ll give a quick disclaimer right now: painting your floors can look AWESOME and is a great solution for a cheap face lift until you can replace flooring outright.

However … however, if you rush this project, you’ll screw it up royally and probably wish you had taken help from a professional house painter. Guess which route I took?

Yeah.


After horribly trashing the floor around the door with not one, but two spray painting fiascos, I couldn’t take it anymore and wisely plunged into tackling the floor. I mean, come on … really? How long could you greet friends at the door with a floor that looked like that?

100_3744-1

But at the same time … finish one project, woman, and then move on.

The entry floor was covered with the same peel-n-stick vinyl tiles that we have in the kitchen.  The original linoleum was a dark, heavy 70’s brown, so the white vinyl was a big improvement. But just like the kitchen floor, these tiles were 10 years old and seriously showing their wear.  This is freshly scrubbed.

DSC03401

See? It never looks clean. And that was before several layers of spray paint over spray.

So after a quick wipe down, that floor got two coats of oil based primer.

100_8262

Seriously, oil based primer is the greatest stuff ever. I was giddy with how much better it all ready looked.  I let that dry for a couple days and then rolled on a coat of white semi-gloss paint (what I had on hand).

And then …yup,  you guessed it … I went stupid again.

Instead of letting that paint dry for 2-3 days minimum before taping over it, I waited a mere 18 24 hours until it felt dry and started taping away. Laying out the grid was easy …

100_8266

… I just followed the lines of the vinyl tiles.

100_8267

Then I rollered on a second coat of white semi-gloss paint over the entire floor to help seal the tape edges  so that the  next layer of brown paint wouldn’t seep under the tape.  Again, only waited a day and then charged ahead with the brown. I rolled on two coats using the same paint I used on the front door.  I waited a day, and then started carefully pulling up the tape. And at first, it looked wicked awesome.

DSC00162-1

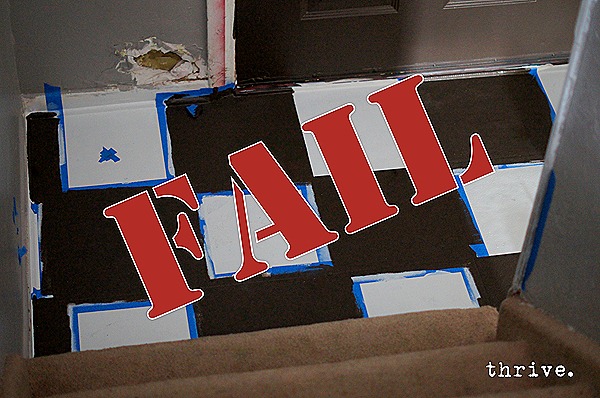
But on the second square something really, really bad started to happen: the paint under the tape started coming up. Everywhere. In huge pieces.

DSC03829

Oh, snap.

I wanted to cry … really, really cry.

But I didn’t, because Mr. Thrive wasn’t thrilled about the huge door mess that had created the floor mess that was now a painted floor mess. And I was determined to save this project and actually finish a project for once. So I lightly sanded down the worst of the edges and and carefully started touching up the peeled off areas in each square. (Thankfully just the white semi-gloss lifted and not the primer underneath.) And while not perfect, I was relieved to see that with some patience, it was completely fixable.

Phew.

But … but … after finishing my touch ups, I left the paint tray on the stairs and went upstairs for a minute … and my three year old daughter saw the very full paint tray just sitting there and wanted to help momma with the painting … and she tried to pick it up to go down the stairs and paint … and dropped the heavy tray … and watched all of that white paint land on the carpeted stairs and splatter across the newly painted floor … and then probably panicked that momma would be mad and promptly ran back up the stairs, tracking big paint foot prints on all the steps that hadn’t been covered by the paint to start.

And anytime you have a 1/3 of a gallon land on your floor, you know there’s not a snowballs chance that it’s coming out.

DSC01146

That’s when I cried.

For a full five minutes I lost it and cried like a baby.

But then I took a deep breath … and hugged my baby girl and apologized to her for yelling and being mad when I was the one who left the paint out … and I put my big girl pants on and started to hustle.

Because it was two o’clock in the afternoon … and Mr. Thrive was going to be home at seven … and I didn’t want him to have to walk into that kind of mess … or stress over how on earth we’d pay not only for new flooring in the entryway, but also for the stairs.  So I scraped as much of the paint out of the carpet as I could … and wiped all the excess paint off the floor … and took a few quick, crappy pictures to blackmail my children with as my mind raced as to how on earth I was going to fix this mess. (Edited to add: yes, yes I was having flashbacks to this moment.)

DSC01142

Oh, and did I mention that we had company coming in from out a state in just two weeks?

The floor I knew could be repainted. Again.

But the stairs? The only thing I could think off was to rip the carpet off the bottom tread and hurry down to Lowe’s and see if  could match it. I knew I couldn’t get it installed before Mr. Thrive got home, but I was hoping that having the replacement stuff already ordered would soften the blow. So I grabbed a hammer and a pair of pliers and started yanking.

DSC01209

Holy cow. We vacuum and sweep twice a day and that’s how much dirt was under the carpet and pad. It’s probably ten years worth … but still. Ewwww.

I was completely grossed out … and even more worried about what to do … but the reality was that I couldn’t afford new carpet—even a small amount of replacement carpet – so the choice was to live with the huge paint stains on the carpet plus one naked tread at the bottom –or- figure out a way to rock-what-ya-got.

And so I took a deep breath … and then another … and then made an executive decision. And I started yanking and pulling and ripping until all of the carpet going upstairs was gone and I was left with this:

floor

And suddenly I had not only an unfinished door and an unfinished floor, but was now waist deep in a stair project.

And that’s where things got interesting. Back in a bit.

How many of you have wound up with one of those freakishly large calculators or remotes from the dollar store? Kid #2 proudly came home with the calculator version and it lasted all of a day before it cracked in half on the first drop.

100_7929

Time to toss that bad boy, huh?

Wait! Don’t toss that!

The outer shell may be toast, but the buttons can live on.


100_7931

A few left-over peel-n-stick magnet strips and scissors later …

DSC03470

… we wound up with some fun, practically free frig magnets.

DSC03474

And man have the kids had fun doing math problems on the frig this week.

DSC03505

And while petty and childish, I’ll admit that it was fun last night to skunk my snarky nine-year-old who declared that he “pretty much knows everything about math, mom” with a simple problem using negative numbers.

DSC03500

Um, Kid … –25 + 54 does not equal 1, nor is the square root of anything involved.

And so that no one’s left out, anyone without a freakishly large calculator could just buy a new one for $1 and cannibalize it to make their own, cheap magnets. A small screw driver is all you need to open it up to get the numbers out, unless of course you’d like to just drop kick it a few times instead.

Anywho …

Overly Large Gimmicky Calculator or Remote?

April 2012 BLOG1

It’s What Not To Toss This Weekend!

And hey, what else could you do with calculator, remote or even keyboard keys?

Make push pins? Embellish cards? Art? Let me know.

door.2

And…. we’re back.

It’s so nice to dust off the ‘ol blog and get back to crafting, creating and remodeling. Or rather, it’s nice to attempt to do that.


Sheesh. Where do I even start?

In the midst of taking a break from blogging to deal with an interesting start to the year, work on the house has been plodding along slowly.

Our entry way is miserably small and has always bugged me. So coming up with a punch list of projects was easy: 1) repaint the front door; 2) fix the giant hole in the drywall from the kids’ infamous sledding-down-the-stairs-in-sleeping bags-and-crashing-into-the-wall-repeatedly stunt; and 3) do something with the floor.

The first step seemed easy enough – repaint the door.

Here’s what we started with before we started painting the upstairs grey—boring, scuffed up white.

100_3425

But then I was stupid.

Somewhere, someplace, someone told me that spray painting a door was much easier than using a roller. So I primed the door with spray-on primer and made a huge mess everywhere.

100_3743

Oh, and it stunk like crazy since spray painting inside—even with good ventilation—is always a bad idea. At the time I didn’t care since I had big, big plans for the floor and thankfully the kids weren’t home to be around the fumes.  But man was it a mess … and my trigger control was a little iffy so the primer ran in places … and it left a weird grainy texture which meant extra sanding to even everything out. Yup-much easier.

For the actual color, I had seen this grey/red combo on the paint swatch card we had for the living room wall paint and loved it. Plus, I think I was still missing my red walls a little.

DSC03418

I watched the local paint recycling center for a few weeks hoping red paint would show up, but no deal. So when I found the perfect color in a spray can …

DSC03405

… I was stupid again …  and rationalized that spending money on spray paint wasn’t as bad as buying a gallon of house paint … and told myself that I would just be ‘more careful’ with the trigger control this time … and drastically underestimated just how far spray paint can travel in a confined space … and made an even bigger mess. Plus the irony of using a paint+primer or a primer nightmare did not escape me.

Stupid woman.

I loved the color, but it never looked great.  The coverage was splotchy and after four coats and three full cans, I gave up. I’m sure you spray paint ninjas out there could have nailed this, but the door looked terrible—so terrible that I apparently never took pictures. Oops. Let’s just pretend it looked like this, okay?

100_7542-2

Actually, that’s fairly close.

At this point I could have just admitted that I’d screwed up,  gone back to the store, figured out a way to buy some red paint to roll over top and everything would have been fine. But I realized that I really didn’t like the red after all … and worse still, I didn’t have a clue what color I did want instead. And there was no way that I was going to cheat and spend/waste money on paint again until I knew exactly what I was doing.

And so I just left my hot mess of a front door like that for six months. Mr. Thrive was so happy.

I finally decided that brown was the winner after looking at pictures of curtains for the living room. Come February, we set aside a little tax money for repairs around the house  and I was so excited to actually be able to go buy paint that was in a color I got to choose and finally finish the front door. So I marched down to Lowe’s and grabbed some brown paint and couldn’t roller the new color on fast enough.  It was sad people, but I did an honest-to-goodness fist pump at the register as the clerk rang up more than just tape and glue.

Two coats later + lots of sanding/taping/painting the trim …

100_7542-1

… I have a front door that I LOVE + plenty of left over paint for some other projects in the kitchen.

DSC03445

(I’m thinking I need to get rid of those ugly brass nobs like I did here. Maybe in a brushed nickel or platinum finish …?)

And because I’m a Silhouette nerd with an affinity for vinyl, I couldn’t wait to put one of my favorite sayings on the inside of the door, too.

DSC03421

Ahhhhh. Much better.

So, what have we learned?

Do not – I repeat – do not use spray paint for interior doors that are still hanging.

Unless you’re a spray paint ninja.

But then only a really high, top-level spray paint ninja at that.

Smooth, foam rollers are much, much easier to use and will save you a ton of headaches and time.

Anyway, one entry way project down, two to go.

And do you see that little bit of check board goodness on the floor peeking through?

Yeah … that’s been a peach of a project. Stay tuned.

So here you go … the final entry in my front door choices.

c.hearts

Super simple vinyl hearts + lettering to match my favorite Valentine’s Candy.


And since I liked the minimalist candy look, I skipped adding any kind of wreath or other embellishment.

100_7422

Simple candy heart goodness.

I simply cut four 5×5.5” hearts in different colors on my Silhouette and then added the lipstick pink letters over top.

No Silhouette?

No problem. This design would be a cinch to hand cut  out of vinyl or contact paper and add scrapbook or crafting stickers for the text.

100_7419

This would also be fun on a board for inside the house so you could reuse it.

100_7417

So, now it’s your turn.

Let me know which of my four designs should be on the door through Valentine’s Day: 1 – Neutral; 2 – Red; 3 – Primitive; or 4 – Conversation Hearts.

I’ll randomly pick on of the commenters to receive a Valentine’s day good pack from THRIVE. Voting closed tomorrow, January 31st at 8 pm MST so that I can hurry and get the prize in the mail.  Edited to add:

Congratulations Nydia!

RANDOM.ORG - True Random Number Service - Mozilla Firefox 212012 15541 PM

(Leave a comment with your email if you’d like a free copy of the Silhouette file.)

Here’s the latest entry in the unofficial please-help-me-figure-out-what-the-heck-to-put-on-my-door quest.

hearts.8-1

And for the record, I’m really into the simple, fast projects as of late and this was no different.

I think the start to finish was under thirty minutes with minimal mess.

Want to make your own?


For this project you’ll need:

100_7110

See? I told you this was simple.

And always I hope you Rock What Ya Got and come up with your own version using whatever you have on hand.

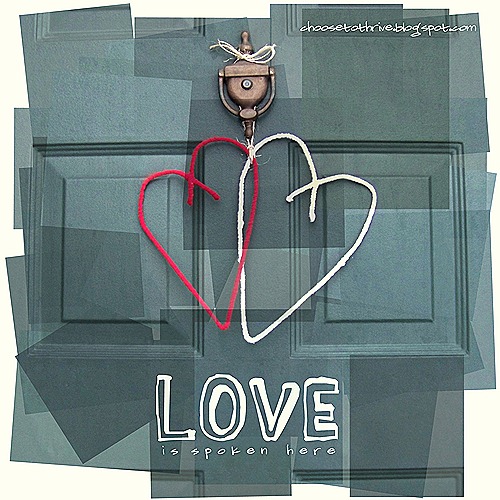
Snip off the heavily curved/bent ends of the hanger and shape it into a primitive heart …

100_7134

… securing the ends with a few pieces of tape.

100_7130

You’ll need one hanger for each heart you plan on making.

Then wrap heart (or hearts) with either rag ribbon made from old t-shirts or yarn.

Jan 2012 BLOG-1(Need help making your own t-shirt yarn? Check out this awesome tutorial here.)

Connect hearts with a little hot glue …

100_7150

… and hang with some jute, ribbon, yarn, or whatever you have lying around.

hearts.2

There you go: easy, simple, DONE.

And while I don’t mind the simple, un-fussy look of just the hearts, I’m thinking a little vinyl could punch the look up just a bit.

hearts

What if I cut out letters that looked like this?

hearts.3

Or this?

hearts.4

Maybe something simple like this?

hearts.5

Or softer like this?

hearts.8

What phrase or word would you use?

One of the above, something better or just leave it plain?

Let me know.

It’s been a crazy start for our family and I’d hoped to have my first couple projects up by now along with letting you know about some fun changes to THRIVE this year. But since this post is out much later than I’d hoped, I’ll save all that stuff for another post later this month and just skip to the good stuff.

I spent the last week happily sketching Valentine’s ideas for our front door to go up as soon as our New Year’s get up was ready to be retired.

Right now I’m crushing on neutrals, pastel Conversation Heart candy everything and vintage ephemera. But as it turns out, these go together as well as oil and water. It’s probably how I wound up with several fun, but totally different ideas.

Seriously, I couldn’t pick just one.

So I decided to make a bunch of them and have you help me pick the one that will greet our neighbors until mid February. And to say thanks for your help, I’ll toss in a prize for fun.  And for those runner up projects, I may just end up with the most festive bath and laundry rooms out there.

So here’s option one: Neutrals

LOVE.1

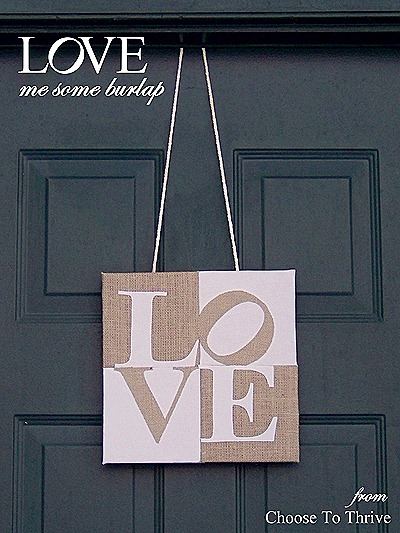
BURLAP and an old POLO SHIRT for a neutral, texture-y Valentine’s Day look similar in feel to the one I sported on my door last year.


Simple neutral loveliness kids.

100_7046

Of course, red letters would look pretty sweet, too.

100_7036

Yup. Me like-y.

(All you smarty pants out there have probably already pointed out that this option is technically 1-a and 1-b, but I’m gonna run with it.)

And because I’m on a mission to make cardboard the new black, there’s plenty of box love to spread around in this super-fast door hanging.

What to make your own?

You’ll need:

100_7001

— and —

100_7014

And as always I hope you’ll rock what ya got and adapt this little number using whatever you have on hand.

This is so simple: 

cover squares using hot glue …

100_7018

… attach squares with tape …

100_7023-1

… glue 11’’ x 11’’ on the back to cover the tape and add stability.

100_7031

(Yup, I’m busted. I totally used a {clean} pizza box lid for this project. Who says ‘Rock What Ya Got’ can’t be cheap and tasty?)

For the letters, print out your letters from the template here.

Iron some Heat ‘n’ Bond or Wonder Under (any weight) on your fabric before cutting out the letters.

100_6997

This will keep the burlap from fraying and allow you to iron the letters straight to the base without extra glue.

Position letters and iron in place without steam.

100_7035

Add some ribbon, string, robe, or whatever to the back with a little tape and you’re ready to show your front door some LOVE.

So there you go:

the first option(s) for my door.

Jan 2012 BLOG

Quick, easy and Valentines-y cute without the sugar rush of the regular red/pink/purple thing.

Although don’t worry you sugar rush lovers – I’ve got something for you, too.

And  hey … let me know if you’d go with the red or white felt for the letters, okay?

(And if you’ve emailed me questions while I was on break, I should be caught up by week’s end. Thanks so much for your patience!)

Finding Christmas outfits for my girls continues.

Having several yards of brand new, adorable, FREE fabric was so much fun to play with, but reality has set back in and we’re in full Rock-What-Ya-Got mode again. And since I’ve been doing a lot of sewing, I was hoping to find some existing outfits to just tweak a bit for the holidays.

Guess what I had to work with?

Yup.

November 2011 BLOG1-11

Hand-me-down EASTER dresses.

Welcome to Pastel City. Population: 2


But if the picked-over isles at Walmart can teach us anything, it’s that every color is a Christmas color.

November 2011 BLOG1-10

And that means with a little work, every solid colored dress can pull double duty as a Christmas special.

What?!

Even those pastel numbers?

100_6281

Especially those pastel numbers. See?

And all I had to work with was ric-rac and a bunch of old poinsettia blooms. But it was enough. Those of you with more stash stuff and Christmas decorations could really go nuts.

I started on Kid #3’s pink dress and twisted some red and white ric-rac together to make my own Candy Cane trim.

100_6146

You can twist any colors together to make lots of fun looks. Make sure your iron it really well after you twist it together to help it lay flat.

And I went the total cheaters route and simply hot glued my candy cane ric-rac right along the bottom hem. If you wanted a temporary fix, just stitch in place with clear thread.

November 2011 BLOG1-9

(And yes, you can totally wash clothing with hot glued trim in cold water on the delicate cycle with a cool dryer. Works fine.)

To dress up the collar I removed the bow and glued my trim over the existing pink stuff, then pinned on a single poinsettia using a few safety pins.

November 2011 BLOG2-3

Five minutes later I had a completely different look.

November 2011 BLOG1-6

 Done and done.

Kid #6’s dress was even easier to dress up … as in I spent three minutes on hers instead of five.

The worn out bow came off with a quick snip …

November 2011 BLOG1-7

… and the flower I pulled off the fake poinsettia plant got safety pinned in place.

Add some sparkle shoes, another bloom for the hair and an already-in-the-closet sweater and voila!

November 2011 BLOG1-12

Baby Girl just decked the halls.

100_6291

So take a look in your girls’ closet.

And pull out those boxed-up spring and summer clothes.

Go dig through your ornaments, ribbons and bows.

November 2011 BLOG2-4

 Bet you have the makings of a little Christmas outfit magic, too.

Happy Easter Merry Christmas!

Linking up to:

Skip To My LouCraft-O-ManiacC.R.A.F.T. *  Stories of AtoZ, Tip JunkieSugar BeeToday’s Creative BlogSassy SitesMy Uncommon Slice of Suburbia * Someday CraftsLil LunaWe Are That FamilyBlue Cricket DesignsThe Thrifty Home, * House of Hepworths, *Tidy MomWhipperberryKojo DesignsChic On A Shoestring, Momma’s Kinda Crafty, *Tatertots & Jello, Be Different Act Normal * I Heart NaptimeUnder The Table and Dreaming

It’s the weekend before Thanksgiving so I’m getting my grocery shopping list together for all my holiday favorites. Here’s what’s on our menus for Thursday.

#1 Edible Decorations: The Cookie Bunting

banner.27

The cuteness of a pennant banner + the yumminess of sugar cookies. This banner does double duty as holiday decorations and after dinner treat. You can find the tutorial here.

#2 Treats for the table / Place card holders

tt

There will be rioting in the streets if my kids don’t get to make up a bunch of these turkeys to use as place holders. There’s so many ways to dress these little guys up and it keeps little hands busy. You can check out the details here.

 #3 Sides: The Turkey Veggie Tray

turkeyveggieplatter

I found this ridiculously cute turkey veggie platter from Eating With Food Allergies. I’m excited to add this fun platter to the regular stuffing and potatoes, and know this will probably steal the show.

#4 Main Course: CREAM BAKED TURKEY

You heard me: Cream. Baked. Turkey.

Ohgoodheavens.

You may never go back to making a traditional bird again. We haven’t.

November 2011 BLOG-8

And despite the lousy blogging-at-midnight pictures, you can see how easy this is to make.

1. Dice your turkey in 1” cubes (white meat, dark meat, both – you can even use chicken.)

2. Mix equal parts flour + seasoning (seasoning salt/garlic powder) and dredge the chicken.

3. Brown quickly in a skillet with a little butter or oil and drain on paper towels. You DO NOT want the turkey cooked all the way through – just browned on all sides. Fill a glass baking dish 2/3 full with turkey pieces.

4. Cover turkey with heavy cream or half-and-half. Cover and bake for 45 minutes at 375 degrees. Remove foil and bake for 15 more minutes.

And then … holy cow.

I wish I had a picture for you but it gets inhaled within seconds of it being placed on the table. The end result is turkey that has absorbed all that cream and is fall-apart tender. It’s practically an emotional experience. Try it – you’re going to love it!

#5 Dessert: PUMPKIN LUST PIE

pumpkin.lust

I can’t wait to try this Pumpkin Lust Pie from Sweet Treats & More! The recipe calls for a box of Jell-O Pumpkin Spice pudding. If you can’t find it (I couldn’t here in Utah), mix 1/2 c. pumpkin puree and 1 tsp. pumpkin pie spice into a batch of instant butterscotch pudding. I know it sounds weird, but trust me … it’s the next best thing and soooooo yummy.

Dang it. I’m so hungry now.

That’s what’s on my menu.

What special recipes are you guys serving for your Thanksgiving?

I wanted to show you what my girls will be wearing for Thanksgiving this year and the funny, awesome way it all came together.

November 2011 BLOG-6

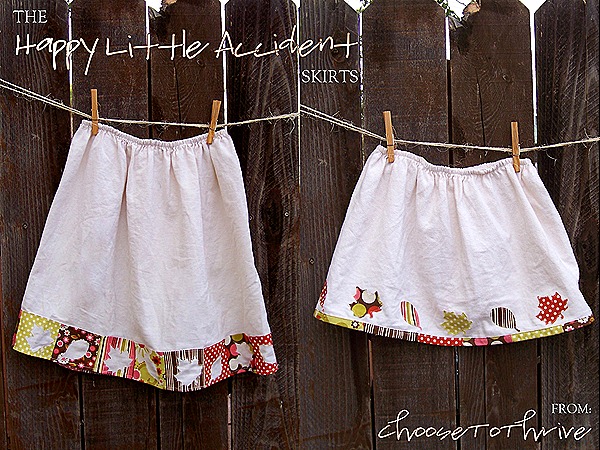
Happiest little accident ever.

And total tender mercy.

I was digging through my stash looking for inspiration when I pulled out this torn, king size fitted sheet. We had this on our bed  for years before it finally wore a hole in the center. This sheet was huge (and because it was fitted), never really fit well on my shelf. Since I was drawing a blank on the Thanksgiving outfits,  I decided I’d at least clean up the stash a bit and cut the sheet  into smaller pieces so that it would store better. I grabbed my scissors, cut the sheet into quarters, and then went to cut off the elastic that ran around the entire thing.
100_5070

And I stopped dead in my tracks … and just started at the elastic … and wondered if it was a mistake to cut it all off … what if I needed that elastic later ….?

While I was thinking, my daughter the genius picked up one of the ragged pieces and said, “Look Mom! It’s just like a skirt!”

November 2011 BLOG-7

Light bulb.

And from that happy little (divine) accident, I wound up with skirts for my girls in less than ten minutes.

Want to know how?

100_5086

Seriously … it was that simple.

And if you use bias tape or some type of binding on the bottom, you can skip the hemming part all together – score!

So since I didn’t spend all that time prewashing, trimming, measuring, sewing, adding elastic, etc., I had lots of time to work on the details.

**And quick picture disclaimer —  my girls kept bugging me to wear their new skirts so I let them play around while I finished up projects. Consequently, these don’t look freshly pressed anymore. Sorry for the wrinkles. **

100_5553

You could so do ANYTHING with this basic skirt, but I figured the best thing to add to a happy little accident was a happy little tree … or at least the happy little leaves from the happy little trees.

{Sorry – I can’t stop thinking of these as “The Bob Ross Skirts” and smile every time I see them.}

I grabbed the fat quarter bundle I won a few months ago …

100_3630

… and cut a bunch of 3.5” x 3.5” blocks with leafs cut out of the centers.  I cut my blocks and shapes using my Silhouette, but this is easy-peasy to trace and cut using sewing shears or a craft knife.  The blocks were sewn together with a 1/4” seam allowance …

November 2011 BLOG-5

… and the top and bottom edges were pressed under for a clean finish. The whole strip was sewn to the bottom edge of the skirt.

100_5568

I hand-cranked my sewing machine around each leaf cutout, but you could sew this by hand, too.

I love the creamy flannel poking through the cut-outs. Yummy.

And don’t think the leaf shapes and scraps went to waste. I just made another skirt.

100_5573

I stitched the scraps together to make a long, 1” wide strip. Then I ironed the strip in half and then in half again to make my own faux bias tape to finish the bottom edge. The leaves were stitched in place with a lot of hand-cranking as well.

100_5576

Not bad for a fitted sheet and some fabric scraps, huh?

100_5549

It’s all in the details:

peek-a-boo cut-outs

100_5556 

or sweet appliqué with a simple border.

100_5555         

And how fun would it be to dress up this skirt for Christmas?

Mitten appliqués? Little trees with button ornaments? Ric Rak candy canes? Reindeer?

Or  for Valentine’s Day? Or any day?

How much fun could you have with an old fitted sheet?

100_5578

Thrilled to be featured on:

ucreatefeatured TJ_IveBeenFeatured_125

Linking up to:

Skip To My LouCraft-O-ManiacC.R.A.F.T. *  Stories of AtoZ, Tip JunkieSugar BeeToday’s Creative BlogSassy SitesMy Uncommon Slice of Suburbia * Someday CraftsLil LunaWe Are That FamilyBlue Cricket DesignsThe Thrifty Home, * House of Hepworths, *Tidy MomWhipperberryKojo DesignsChic On A Shoestring, Momma’s Kinda Crafty, *Tatertots & Jello, Be Different Act NormalFunky Junk Interiors * I Heart NaptimeUnder The Table and Dreaming

100_5473

Where were we?

Oh that’s right … the naked wall under my Chevron wreath.

100_5381

My favorite, favorite quote/phrase/scripture for Thanksgiving is the 100 Psalm and I knew I wanted to have that displayed somewhere in my home. The words are so beautiful:

Make a joyful noise unto the Lord, all ye lands.

Serve the Lord with gladness: come before his presence with singing.

Know ye that the Lord he is God: it is he that hath made us, and not we ourselves;

we are his people, and the sheep of his pasture. Enter into his gates with thanksgiving, and into his courts with praise:

be thankful unto him, and bless his name.

For the Lord is good; his mercy is everlasting; and his truth endureth to all generations.

I thought about making a plaque with wording, but decided to apply the vinyl right to the wall since it won’t damage the paint and can easily be changed for Christmas. I planned on using all white vinyl, but my awesome neighbor had this beautiful copper/bronzy vinyl that she hooked me up with that I am smitten with.

Here’s how it turned out:

100_5464

I love how the colors work together with the Chevron Wreath and the way the copper vinyl glows as the sun streams into the room.

100_5462

(Love the still unfinished trim work in the living room, eh?)

Have you ever tried using two shades of vinyl on your projects?

I hadn’t.

I cut the whole scripture in white vinyl first and then removed the letters I wanted to display in copper.

100_5387

The I recut a few of the words from the copper scrap …

100_5384

… and carefully applied them to the wall.

100_5477

100_5474

100_5480

And just like that, one of my favorite scriptures came to life on my wall.

And as I sit here typing this, I can’t help smile at my view:

100_5392

Now I realize that a lot of you don’t have Silhouettes so having a bunch of these projects can get frustrating. So … to make this project assessable to everyone and keep a Rock What Ya Got vibe, I’ve created several versions of this scripture in different formats so you can pick the one that works for you.

Option A: FREE COPIES

(yeah FREE!)

Silhouette users: email me at choosetothriveblog at gmail dot com and I’ll send you the file to cut your own. This should save you a couple hours of formatting and/or paying for a designs for the Silhouette store. A little tip here: weed slowly.

Silhouette Studio thanksgiving.studio 1142011 102619 AM.bmp

Non-Silhouette users: below are printable 8”x10” and 5”x7” versions that you can easily print out and pop into a frame you already have for a similar look.

8” x 10” Printable: Download HERE

thanksgiving.printable.pdf - Adobe Reader 1142011 114211 AM.bmp

5”x7” version: download HERE

5x7.thanksgiving.printable.pdf - Adobe Reader 1142011 114203 AM.bmp

Option B: Order Choices – SOLD OUT

1) If you need vinyl, my neighbor has kits for enough white and copper vinyl for this 12”x24” design for dirt cheap: $5. That way you don’t have to order a full role for a color like copper that you may only want a little piece of.

2) If you’d like to purchase a ready-made 12” x 24” version, I will cut a small number of these for $15 since they take quite awhile to feed and prep for application on a wall or board.

Again, email me if you’re interested.

100_5418

So there you go …

lots of options for a beautiful reminder of this season of thanksgiving.

Linking up to:

Skip To My LouCraft-O-ManiacC.R.A.F.T. *  Stories of AtoZ, Tip JunkieSugar BeeToday’s Creative BlogSassy SitesMy Uncommon Slice of Suburbia * Someday CraftsLil LunaWe Are That FamilyBlue Cricket DesignsThe Thrifty Home, * House of Hepworths, *Tidy MomWhipperberryKojo DesignsChic On A Shoestring, Momma’s Kinda Crafty, *Tatertots & Jello, Be Different Act NormalFunky Junk Interiors * I Heart NaptimeUnder The Table and Dreaming