It’s the weekend before Thanksgiving so I’m getting my grocery shopping list together for all my holiday favorites. Here’s what’s on our menus for Thursday.
#1 Edible Decorations: The Cookie Bunting
The cuteness of a pennant banner + the yumminess of sugar cookies. This banner does double duty as holiday decorations and after dinner treat. You can find the tutorial here.
#2 Treats for the table / Place card holders
There will be rioting in the streets if my kids don’t get to make up a bunch of these turkeys to use as place holders. There’s so many ways to dress these little guys up and it keeps little hands busy. You can check out the details here.
#3 Sides: The Turkey Veggie Tray
I found this ridiculously cute turkey veggie platter from Eating With Food Allergies. I’m excited to add this fun platter to the regular stuffing and potatoes, and know this will probably steal the show.
#4 Main Course: CREAM BAKED TURKEY
You heard me: Cream. Baked. Turkey.
Ohgoodheavens.
You may never go back to making a traditional bird again. We haven’t.
And despite the lousy blogging-at-midnight pictures, you can see how easy this is to make.
1. Dice your turkey in 1” cubes (white meat, dark meat, both – you can even use chicken.)
2. Mix equal parts flour + seasoning (seasoning salt/garlic powder) and dredge the chicken.
3. Brown quickly in a skillet with a little butter or oil and drain on paper towels. You DO NOT want the turkey cooked all the way through – just browned on all sides. Fill a glass baking dish 2/3 full with turkey pieces.
4. Cover turkey with heavy cream or half-and-half. Cover and bake for 45 minutes at 375 degrees. Remove foil and bake for 15 more minutes.
And then … holy cow.
I wish I had a picture for you but it gets inhaled within seconds of it being placed on the table. The end result is turkey that has absorbed all that cream and is fall-apart tender. It’s practically an emotional experience. Try it – you’re going to love it!
#5 Dessert: PUMPKIN LUST PIE
I can’t wait to try this Pumpkin Lust Pie from Sweet Treats & More! The recipe calls for a box of Jell-O Pumpkin Spice pudding. If you can’t find it (I couldn’t here in Utah), mix 1/2 c. pumpkin puree and 1 tsp. pumpkin pie spice into a batch of instant butterscotch pudding. I know it sounds weird, but trust me … it’s the next best thing and soooooo yummy.
Dang it. I’m so hungry now.
That’s what’s on my menu.
What special recipes are you guys serving for your Thanksgiving?
How many of you are stocking up on Halloween candy?
It’s the usual drill of buying bags, emptying treats into a bowl by the front door and then recycling the empty bags, right?
Wait! Don’t Toss That!
Those bags got the candy to your house just fine – why not put them to use to round up candy from the neighbors, too?
Just cut handles from whatever you’ve got on hand — fabric scraps, ribbon, VHS tape, curling ribbon, whatever – and tape them in place with duct or packing tape.
And that’s it. No buying treat bags. No bulky plastic pumpkins to store.
And when this little princess is done with her treats, everything gets recycled or reused—no waste, no extra cost.
I’m thrilled to be here sharing back to school ideas this morning to help me and my six kiddos this year!
So here’s the deal:
I have a love/hate relationship with my kids’ lunches.
I hate shopping trips with my kids begging for all the pricey, pre-packaged lunch stuff that’s loaded with preservatives and wasteful packaging.
Sheesh that junk is expensive.
But the convenience? Oh how I love the convenience.
And there are times of the year when our schedule is so crazy that I cave and load up the cart with lunchables, little bags of crackers and jello packs just so that we can pull a lunch or snack together in two seconds flat.
But no more!
I’m here today to share my plan to eat healthier, save money and still enjoy the convenience that me and my kids crave. And I hope you’ll tweak the ideas below to fit your family’s budget and nutritional preferences.
#1 – The Lunchable
Why?
Reusing the store bought tray and packing your own lunch meat, real cheese, crackers and a little treat will save you 40% — $0.60 for homemade vs. $1.00 for the store bought one. Plus the homemade version boasts real cheese, extra calcium and fewer preservatives.
A quick layer of Glad press ‘n’ seal or aluminum foil keep everything in place just like the original.
Don’t have a left-over lunchable tray? Or want a bigger tray to up the serving size for older kids?
No problem. You make your own dividers like I did for this dollar store container using an empty milk jug.
And that extra space means you can supplement that lunchable with some fruits and veggies without spending more than the store bought version.
Which $1 lunch would you rather send with your kids?
Yum … yeah. Me, too.
For a drink my kids prefer the juice pouch …
… while I’m more in favor of the reusable water bottle which make lunch $1.20 the first day and $0.98 every day after.
So we’ll do both: water most of the week and juice boxes on Friday for a little bit of a treat.
Either way these lunches come in significantly less than our $1.60 school lunch and WAY CHEAPER than the big-drink-included-lunchables at the store:
Really?
$3.00 for a $1.00 lunchable and $2.00 juice pouch? Um, no thanks.
#2 – The Pudding & Jello Packs
Why?
Reusing those little cups (or the small tupperware containers with lids) and making your own will keep the cost and preservatives way down.
Same thing for the gelatin cups:
Making just this switch alone will save you a truck load. Six cents a cup vs. $0.56 for Jell-o brand? You could easily cover back-to-school paper supplies, back packs and shoes with just that little switch.
#3 – The Fruit Cups
The reduction in packaging, costs and preservatives make these easy switches.
#4 – The Mini Cracker Bags
You can enjoy the name brand crackers and still save almost 40% when you prepackage them yourself using $0.01 snack size sandwich bags. Just check out the cost per serving:
If you don’t mind generic, you can reduce those costs another 50+ percent.
And it’s just as convenient to grab a home-packed bag as the store packaged variety. The only difference is the price.
A few more THRIVE tips:
1. The ideas above are only guidelines.Each family will have their own nutrition and budget preferences. The idea is that by getting creative with recycled/reusable packaging, you can still enjoy the convenience of off-the-shelf while controlling costs and ingredients. So feel free to make your own tweaks with whole grain crackers, organic produce and nitrate-free meat. Or try packing a lunchable with mini tuna or PB&J sandwiches. Have fun!
2. Make your kids help with the prep work! They’re the ones asking for the “cool” packaging so they can help. It’s also a great way to teach basic food prep and math skills like measuring ingredients and dividing portions.
3.Have your kids help you shop! Don’t laugh — I’m serious. This is a fantastic chance to practice real life math skills as they determine price per unit, ounce or pound. There’s also lots of fun ways to to teach math, spelling and budgeting with kids during shopping trips here.
3. Have cheese for sandwiches or lunchables pre-sliced at the deli. I buy the economy loaves and have them sliced right there at the store for no extra charge. It saves so much time and keeps the portions equal.
4. Rock What Ya Got! If your kids are like mine and want the meat for their homemade lunchables to be round like the store bought variety, trying using the lid of a spice jar. (My cookie cutters aren’t the right size). Stack the meat in three layers and cut away. The lids from my 2/$1 Walmart spices worked perfectly.
And don’t toss those scraps! I save mine in a ziploc bag in the frig to use in omelets and salads.
5. Incorporate fresh produce from the garden! Now is a great time to up the nutrition with yummy, home ground fruits and veggies. I love it when I can ditch the high fructose corn syrup fruit snacks and send my kids with the homemade variety.
They have a soft, chewy texture like other dried fruits and are only $0.01 per serving vs. $0.20 for the cheapest store bought variety! You check out the recipe here.
Yum!
… and finally …
6. Pennies add up! I know some of you may look at $0.25 or $0.50 savings a day and think it’s not worth it. But trust me – it so is! My kids have been back to school for a month now (year round school) and I’ve kept track of what we would have spent to buy the prepackage stuff vs. packing our own. So far our averaging savings is around $8 a week.
If our family takes out the money saved each week and transfers it into savings (or puts it in an envelope Dave Ramsey style), that $8/week times 25 weeks of school should work out to $200 by the end of the year. And $200 divided between my four school-aged kids equals $50 a piece, or enough to buy a new pair of shoes, back pack and classroom supplies for each of them.
Eating healthier, using less packaging, teaching my kids about cooking-meal planning-math-budgetting AND financing back-to-school shopping for next year? That’s so worth it to me!
Hope you and your kids have fun shopping for your own creative ways to make smarter lunch choices!
I can’t wait for warm weather to arrive so I can bust out my extensive collection of retired Old Navy flag t-shirts and plaster the back of my suburban with every God Bless America / Don’t Mess With Texas / These Colors Don’t Run / Land of the FREE because of the BRAVE bumper sticker I can find.
Because I love it all:the red-white-and-blue everything … the patriotic music … the hometown parades with a million little flags waving … watching veterans of all ages march behind a color guard … the sense of community as friends and neighbors light fireworks in driveways or gather for a big display … and that extra lump in my throat every time I see a soldier in uniform or hear the roar of fighters overhead.
And this year those feelings are hitting me twice as hard because those soldiers our family pray for each night now have a familiar face among their ranks—my amazing sister who returns home to her family on Saturday after months away training.
So in honor of her return, those flags for the front of the house are coming out now, baby … the kids are all getting {new} flag t-shirts … extra sparklers are going into that shopping cart … and I’m plotting how to turn all of my favorite summer desserts-salads-pastas-sandwiches-bbq-drinks into platefuls of patriotic deliciousness.
So I proudly present the first recipe to get into the holiday spirit:
Star-Spangled S’mores
done four ways of course to keep my picky half dozen happy.
And before you start—I know, I know, I know.
S’mores are the perfect summer dessert and don’t need any tweaking.
But if you happen to have some left over white candy melts … and food coloring … and designer marshmallows … and an afternoon to kill with a certain I’ve-only-been-out-of-school-for-two-weeks-and-am-already-bored-ten-year-old, you start playing around.
No. 1: Graham crackers + Hershey bars + Kraft Jet-Puffed Star Marshmallows
Behold the open-faced goodness. Perfect for rocking S’mores Indoors.
Or c’mon–how cute are these marshmallow kabobs?
Yum.
No. 2: Short bread cookies + tinted candy melts + regular marshmallows
No need to add any extra chocolate to these lovelies.
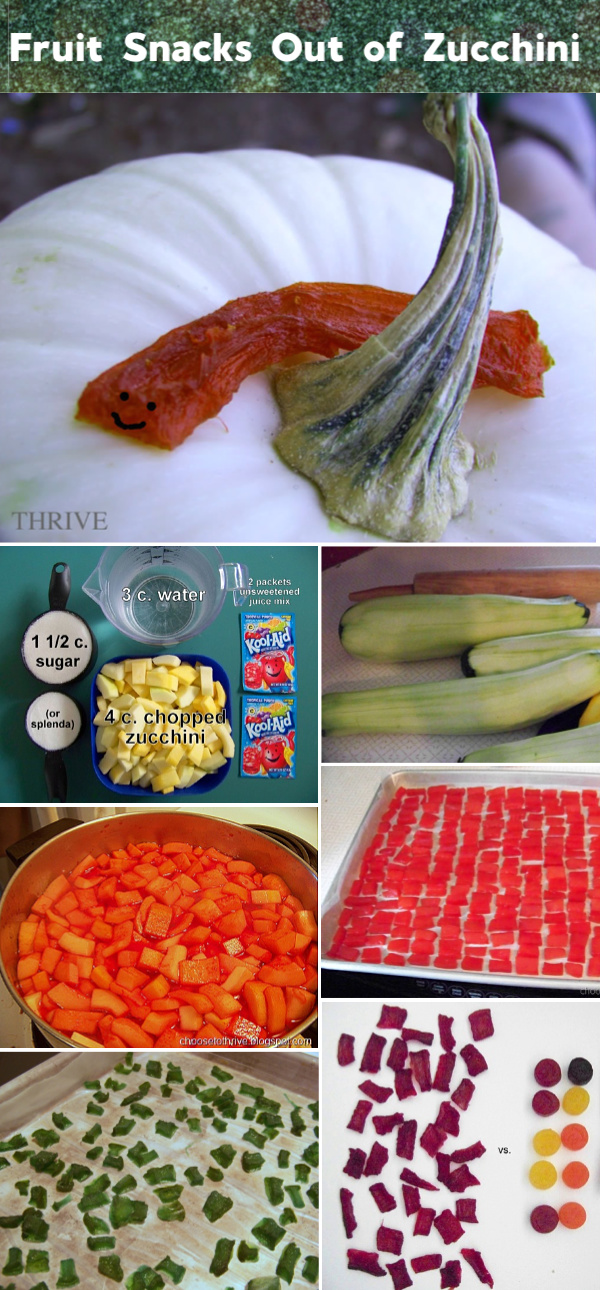
Okay … I didn’t actually use a paper clip. I got a little too MacGyver on the title. But, I did make honest-to-goodness homemade fruit snacks out of zucchini and kool-aid. And you can do it without a dehydrator, too.
And that kind of know-how would so impress MacGyver.
Curious?
It’s super easy, cheap and way better for the kiddos than the high fructose corn syrup / modified corn starch numbers at the store.
There’s a few different versions of this recipe floating around the web, but this is my own recipes that, in my humble opinion, tastes even better, uses much less sugar and can actually work in the oven if you don’t have a dehydrator. I have made several batches over the last few days and hope my trial and error process helps someone out.
Homemade Fruit Snacks
Or the: Your Kids Will The Entire Batch In Two Minutes and You Finally Have Something To Do With All That Zucchini Besides Bread and Muffins Recipe
For this recipe you’ll need:
Wash, peel and halve your zucchini, even if you’re using small, tender squash.
You want to get all of the peel removed so that the zucchini meat dehydrates properly and looks in no way healthy. This is critical for the kids to buy into the idea. Halve your zucchini if you’re using baseball-sized ones like I did. It makes them much easier to work with.
Remove the seeds and pulp from the inside with a spoon, making sure the meat has a nice, even thickness.
When you’re done the zucchini should look like this:
peel-free and a fairly even thickness.
Cut the zucchini in long strips about 1/4” – 3/8” thick.
Don’t worry about being precise, just eyeball it. Wider strips will work fine, too—just allow for extra drying time.
Cut the strips into 1 inch pieces.
These will shrink up by half in the dehydrator giving you a bite sized piece.
Heat water, sugar and drink mix over high heat.
Add the zucchini as soon as the sugar is dissolved and bring to a full boil. Reduce heat and simmer covered for 30 minutes.
Drain thoroughly reserving cooking liquid and allow to cool in the strainer for ten minutes.
Dump zucchini out onto dehydrator trays or plastic wrap lined cookie sheets and let dehydrate.
Store in ziplock bags until they’re eaten up.
** Then lather, rinse, repeat. **
The next batch of zucchini can be cooked in the left-over cooking liquid with the same favor and texture.
Dry snacks for about a day, being sure to rotate trays. Snacks are done with they’re still soft and pliable, but dry to the touch with a matte finish.
Drying In The Oven:
Line sheets with plastic wrap, but do not spray with cooking spray.(I used wax paper in this picture and it stuck horribly and discolored during the drying. Plastic wrap has worked beautifully on all of the batches since then).
You can either spread it around loosely with a spatula …
… or go the Martha Stewart route and line them all nice and neat.
The Martha way looks pretty, but it takes forever to do. And both ways cooks just as well so there’s not an advantage either way.
As you can see, the pieces will shrink by about half and darken in color during their drying time.
Set your oven between 140 – 170 degrees. (My oven’s lowest setting was WARM – 170 degrees). If your oven won’t go below 200 degrees, prop the door open with a hand towel and keep the temperature down a bit.
The drying time in the oven, as well as with the dehydrator, will vary depending on the piece sizes and humidity. I placed the batch below in the middle rack of the oven at 170 degrees right after lunch. I turned the oven off around 11 pm when I went to bed and kept the door closed all night.
In the morning they were almost done, so I scraped all the pieces together with a spatula to move them around, spread them back out and finished them in the oven at 170 degrees for about another 40 minutes. Again, drying times will vary.
(Again, use plastic wrap to line your pans. I used wax paper here and although the flavor and texture were fine, the paper discolored and didn’t look very appetizing.)
When they were done, the 1 inch long pieces ended up at 1/2” inch bites and the 1/2” inch pieces ended up the size of mini M&Ms and were chewier.
The smaller length pieces were also tough to use in the dehydrator because they kept falling through the cracks on the tray. They also dried out much faster than the bigger pieces. That made them much harder and chewy like jerky. My kids liked the soft, bigger pieces much better.
These snacks won’t win any beauty contests, but I’d rather give my kids 0.9 oz. of yummy homemade fruit snacks with all of the extra vitamins from the garden than the 0.9 oz. of the store bought variety with all the fillers and junk.
Oh, and these were supper cheap.
The store brand single serve packs work out to be about .20 each. The homemade variety ran me .06 each when I bought sugar (and used the cooking liquid for two batches) and .02 a serving when I used sugar on hand.
Edited to add:
We have achieved SOUR homemade fruit snacks!
Oh yeah.
These are sooooo good!
Mix 4 c. zucchini, 3 c. water, 1 c. sugar or splenda and 10 orange Kool-aid packs.
(Yes, you really do need 10 packs.)
Bring to a boil and then simmer for 15-20 minutes until soft. Let cool for 10 minutes before transferring to trays.
Then dehydrate as usual.
You can go the bite-sized route with this snacks, but my kids prefer leaving them 3-4 inches long.
Why?
They make the cutest little sour gummie worms. Yum.