Tag

Fall

Browsing

100_4305-1

Another holiday, another chance to blow $5 on Halloween t-shirts at Old Navy or Target or Walmart or whatever.

But you know me—that’s $30 bucks I’d rather not shell out. Plus, I love the idea of making my own designs and using up my never-ending fabric stash.


Besides, how could you not want to make your own when you have ridiculously cute crocheted flowers like these to work with?

shirt.2

I scored these beauties a few weeks ago at a bloggers meet-up from the awesome ladies at Riley Blake Designs. As soon as I saw them I knew they’d be perfect for Halloween sewing.

You’ll love how easy it is to make your own tees inspired by favorite prints, fabrics or clothes already in the closet—a perfectly coordinated outfit that comes together in 15 minutes flat.

Want to make your own?

To make this project you’ll need:

100_4209

As for the actual shirt designs, I looked no further than the RBD catalog and fell in love with this fun Halloween print.

riley blake

I loved the ghost and skeleton and made up a pattern to match. (Although I can’t wait to make the owl, spider and bat next!) And if I wasn’t in the middle of my THRIVE challenge, I would so be making matching skirts out of this fabric for both my girls.

*Swoon*

I used plain ‘ol shirts as the base, cut my Halloween shapes out of scrap t-shirt material and just straight stitched around the edge.

Sept 2011 BLOG3-1

And the best part is that you can use shirts that have existing designs. I just pinned right over top of this bird and stitched away—no interfacing, no fusible webbing, no ripping out a bunch of embroidery.

Sept 2011 BLOG3

I wanted the little faces to match the fabric as much as possible so I cut out the eyes and mouth with an craft knife, traced the design with my nicest glue BIC pen …

100_4261

… and then carefully painted over the pen marks using the only black paint I had on hand: interior latex satin paint.

100_4264(Yeah, wasn’t actually kidding about using house paint peeps. Rock What Ya Got., huh? 🙂

Flowers were hand switched in place after the paint was dry.

Sept 2011 BLOG3-3

L*O*V*E*

100_4362100_4360

Kid #3 loves hers and is already plotting which homemade tights to wear with her new Halloween digs tomorrow.

Sept 2011 BLOG3-5(Want to make your own tights? Click here.)

Right now she’s leaning towards skull/green flower shirt + black skirt + Dr. Gru tights + Wizard of Oz shoes.  Oh boy.

So there you go! Have fun making your own Halloween tees to match your favorite skirts, pants or fabric prints!

shirt.3

Linking up to:

Skip To My LouCraft-O-ManiacC.R.A.F.T*  Stories of AtoZ, Tip JunkieSugar BeeToday’s Creative BlogSassy SitesMy Uncommon Slice of Suburbia * Someday CraftsLil LunaWe Are That FamilyBlue Cricket DesignsThe Thrifty Home, * House of Hepworths, *Tidy MomWhipperberryKojo DesignsChic On A Shoestring, Momma’s Kinda Crafty, *Tatertots & Jello, Be Different Act Normal * I Heart NaptimeUnder The Table and Dreaming

100_3957

It dropped another five degrees today which means another chance to use around-the-house items to add some fall lovin’  to our newly painted upstairs (more on that later this week.)

100_3959

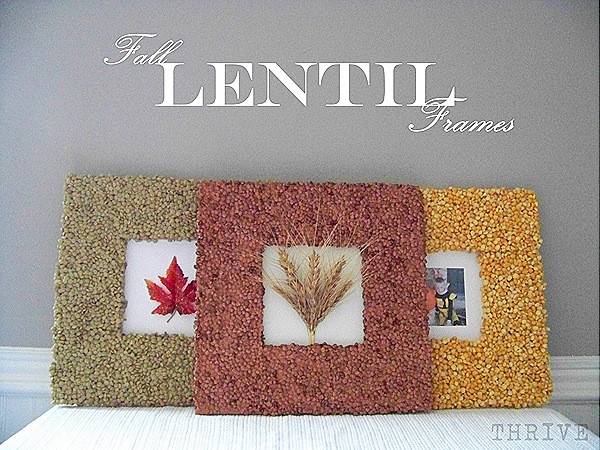
The end result was three, texture-licious frames in yummy fall colors straight from the pantry and recycling bin.

100_3944

100_3900

100_3925

Want to make your own?

To make these frames you’ll need:

100_3784

(Edited to add: I’ve gotten a few emails about lentils. You can find them next to the rice or in the bulk food section of your grocery store. They run $0.60 – $1.25 / lb.)

As always I hope you’ll rock what ya got and make this look work for you without a trip to the store.

I made simple, three-layer frames from {unused} pizza boxes and wood glue …

100_3789

… and covered the raw edges with paper scraps for a nice, clean edge.

100_3793

Frames got a quick coat of paint in the closest color I had to my lentils using my nicest fountain drink palette and a foam brush …

100_3802

… just to make sure none of that cardboard showed through.

Craft wire was wrapped around the frames to make a simple hanging loop for the back.

100_3805

Frames were propped up on some cans and a thick coat of white school glue was applied with a cheapie foam brush.  More is more here, people. Don’t skimp. Lentils were gently poured on in a thick layer and pressed carefully in place.  Do NOT shake off the extra until the glue has dried several hours.

100_3821

The sides of the frame were covered the same way after the top had thoroughly dried.  Pictures and mats were taped in place. Easy. Quick. Done.

Love the texture, but not the color?

No biggie.

I loved—LOVED—the orange lentil frame, but hated it with my living room wall color.  Boo. {Maybe I’ll have to make another one for Halloween.}

Sept 2011 BLOG1

So I just painted over it.  A little copper craft paint and the problem was solved.

100_3965

Much better match up against those grey walls.

Love.

100_3967

A few THRIVE tips to save you some headaches:

1. If you’re painting your lentil frame, spray paint is easiest. But if craft paint is all you got, thin it down to make it flow like a glaze. I went with 3 parts paint, 1 part water, 1 part white glue and it worked great.

2.  Don’t touch your frame for several hours while the lentils are drying. Don’t shake off the extra. Don’t move it. Leave the dang thing alone. Seriously. If you move or shake off the extra too soon, you’ll get a really thin, spotty layer.  See?

Sept 2011 BLOG2

3. If you skimped on the glue and/or ignored tip #2 — don’t worry. Mix 2 parts glue + 1 part water and pour it over your frame, spreading gently with a foam brush. Then recoat with a thick coat of lentils and let it dry over night before shaking off the excess.

Happy straight from the pantry fall crafting!

100_3897

Featured on:

featured as-seen-on_150x150pixel top.10.csi

Linking up to:

The CSI Project, Skip To My LouCraft-O-ManiacC.R.A.F.T., The DIY ShowOff *  Stories of AtoZ, Tip JunkieSugar BeeToday’s Creative BlogSassy SitesMy Uncommon Slice of Suburbia * Someday CraftsLil LunaWe Are That FamilyBlue Cricket DesignsThe Thrifty Home, * House of Hepworths, *Remodelaholic FridayTidy MomWhipperberryKojo DesignsChic On A Shoestring, Momma’s Kinda Crafty, *Tatertots & Jello,  Be Different Act NormalFunky Junk Interiors * I Heart NaptimeUnder The Table and Dreaming
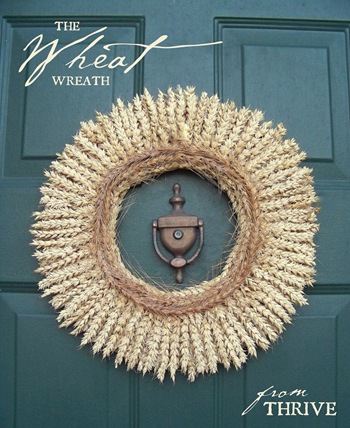
My first fall project of the year just went up on the front door.

wheat.1b

All that gleaning has sure paid off.

And this came together in a single naptime using a cardboard box for a wreath frame and wrapping it with scrap fabric like I did here.

(And do yourself a favor here and wrap some wire around your frame and make a hanging loop on the back before you start gluing on your wheat. I didn’t and it was a pain to do it after the fact.)

Wheat was attached using generous beads of hot glue for a first layer…

wheat.7

… and then second layer.  The ends where trimmed along the inside edge for a nice, clean look.

100_3499

Then extra wheat was glue along the inside edge so that none of the fabric showed through.

And just for fun, I added a double ring of red wheat near the inside edge. I love the rust color and extra contrast.

wheat.9b

I’m so excited to have this beauty up on the door, even if it is 97 degrees outside.

wheat.14

And if you want this look for your door without spending a grundle at the craft store, it’s not too late to glean! I found another field yesterday and grabbed two more bucketfuls. Good luck!

wheat.8

Featured on:

as-seen-on_150x150pixel featured

Linking up to:

The CSI ProjectSkip To My LouCraft-O-ManiacC.R.A.F.T., The DIY ShowOff *  Stories of AtoZ, Tip JunkieSugar BeeToday’s Creative BlogSassy SitesMy Uncommon Slice of Suburbia * Someday CraftsLil LunaWe Are That FamilyBlue Cricket DesignsThe Thrifty Home, * House of Hepworths, *Remodelaholic FridayTidy MomWhipperberryKojo DesignsChic On A Shoestring, Momma’s Kinda Crafty, *Tatertots & Jello,  Be Different Act NormalFunky Junk Interiors * I Heart NaptimeUnder The Table and Dreaming

One more day of high temps and I swear I’m gonna melt.

100_5487

It’s supposed to be Fall!

Even though there’s still warm/mild temperatures for most of us, now is the time to start watching for those inviting, organic accessories for your fall decor: corn stalks, grape vines, wheat bundles, and changing leaves.

88894034_sMxpdFkM_c

So how do you get those things for zero out of pocket if it’s not growing in your own yard?

Gleaning.

Do you know what it is? Have you ever done it?

Gleaning is basically collecting left over materials that the owner doesn’t want or need. For fall that means lots of opportunities to score left over wheat, corn stalks, grape vine, etc. after the main crop has been harvested.

If you’ve never tried it, you need to!

But before you start tromping through fields with scissors in hands, consider the following:

1. First and foremost, always always always ask before you take anything. Gleaning without permission is the love child of stealing and trespassing. Knock on the door or call the property owner and make sure it’s okay to glean.

2. If you don’t know who the owner is or how to get a hold of them, call the city or county recorder’s office and get the owner’s contact information.

3. Make sure you have an exact (or very close) address when you stop by or call a city/county clerk. The more information you provide, the quicker and easier it will be for them to help you.

BAD: “I’m looking for the property owner of that big field over by the freeway.”

GOOD: “I’m looking for the property owner of the field on the northeast corner of John Street and 80th Avenue.”

4. When you go to glean, be quick, be respectful, stay out of their way, bring your own equipment (scissors, garbage bags, etc.) and don’t ask for special accommodations. Remember: they’re doing you a favor.

5. Send a thank you note to anyone who helped you: the city clerk, the property owner, whatever. It only takes a few minutes and will make it much more likely that you’ll be welcomed back next year.

What and Where To Glean

My all-time fav:

1. WHEAT

Remember this project from the THRIVE archives?

100_0031

I made this project using gleaned wheat from my neighbor’s garden after she picked what she wanted. This would have run $20+ at a craft store after the coupon discount.

This year my neighbor didn’t plant wheat so I called the city recorder of the town where I saw a huge field that had just been harvested.

100_3102

Turns out the city owns that field and they gave me permission right then. Score!

100_3103

That tiny row of left over wheat right along the dirt patch yielded a bucketful. For wheat, oats or any other cereal grain, put the cut stems in a bucket—using a garbage bag for collection makes a huge mess and often breaks the stems.

2. CORN STALKS

corn.stalks

I use them every year on my front door and will this year, too (even though I’m planning some fun, big changes).

Talk to your to friends and neighbors with garden patches now about gleaning their left over stalks. Commercially harvested fields may now have a lot of stalks left over, but small patches that are harvested by hand are great places to look. Bring twine and hedge clippers to lop through and bundle your stalks. Green stalks will need a few weeks to dry completely and acquire that wonderful parchment color.

3. GRAPE VINE

pumpkin

Love, love, love.

But those shapes can get pricey, even with the wonderful 40% off coupons. Making your own shapes is easier than you may think so look around. Ask neighbors, friends, etc. if you can help trim back vines when their grapes have been harvested.  They get some help and you get the raw materials to make wreaths, swags, frames, pumpkins, whatever. Win, win.

4. LEAVES

SANY1296

They’re pretty much everywhere which makes this easy. Picking up leaves at a park or along a public walk way is usually no big deal. If you’re worried, it never hurts to call the local city public works department and double check.  If you see great leaves on private property, again–always ask before collecting! I’ve seen great leaves on lawns while I’m out running errands, pulled over and gone and knocked on doors before.

My favorite way to use leaves is to string them together on twine or fishing line for a simple, pretty bunting.

I usually store leaves in between the pages of large books while they dry out. The flattened, leathery leaves are easier to use for projects than the more brittle, curled shape you usually get with regular air drying.

5. CORN HUSKS

husk.pics Images: 1. Growing Corn 2. Amazon.com

Sure, you could go guy these at the grocery store, but you can also just save those husks after your next bbq. Trim off the thick, curved bottom end and press the individual husks in between book pages (just like leaves) so they dry smooth and flat. Husks are so under appreciated and versatile. Seriously, make sure you save some.

So go put some scissors, gloves and a bucket in your car and try your hand at gleaning!

Happy

please-for-the-love-let-it-cool-down-soon

Fall!

100_3175