Category

Food

Category

Baking and cooking with your kids is a great way to bond with them and have fun together. Kids just love getting messy in the kitchen, and they love the responsibility you give them even more.

By baking and cooking with kids, you can teach them the value of food and the skills required to support themselves when they’re older. If your kids love making potions in the bathroom, show them how they can make a potion in the kitchen that turns into something edible!

Almost all children love chocolate and some of the easiest things to bake with kids contain chocolate. Anything with melted chocolate is double the fun because it creates a gooey mess. But don’t forget you can teach your kids how to be clean and tidy in the kitchen too.

Try making some of these delicious chocolate treats that just about anyone can make whether they’re 5 or 85.

Just a word of caution. When you’re baking with the kids, make sure they’re supervised with anything hot or sharp. Also ensure all your kitchen appliances are in good working condition. Baking should be fun, not cause for a trip to the ER.

Chocolate Nests

All you need is chocolate and cereal, and maybe some treats to decorate. Pick whichever cereal you like, but since you’re mixing it with chocolate, don’t go too sweet. You can use Rice Krispies, corn flakes or even bran flakes.Just melt the chocolate (it’s best to do it in a bowl over another bowl or saucepan of hot water), mix it into the cereal and spoon it into cupcake cases. Add some decorations (chocolate eggs are great for Easter) and put them in the fridge to set.These chocolate treats are so easy any adult or child can make them. If you want to get the kids into the kitchen, but you’re not very confident with your skills, these are simple enough for anyone to do.

Fun Chocolate Treats You Can Make with Your Kids

Chocolate Cupcakes

Chocolate cupcakes are also easy enough for the kids to help out. They’ll need a bit of a helping hand with measuring, breaking eggs and handling anything hot, but they can do a lot of the tasks involved.

Have the kids mix, measure and pour, and they’ll feel so proud of themselves for helping in the kitchen. Once the cupcakes are out of the oven and have cooled down, let the kids have fun with decorating.

They may not be the prettiest cupcakes ever, but they’ll be a great achievement for your children.

Chocolate Brownies

You can have all kinds of fun with brownies too – they don’t have to be just plain chocolate. Try adding popping

Fun Chocolate Treats You Can Make with Your Kids

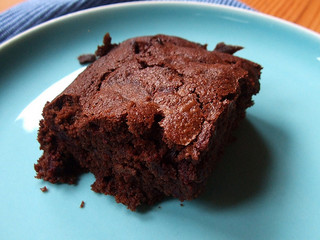
candy for a giggly time. You can use nuts, caramel, marshmallow, and peanut butter. There’s no limit to the different flavors you can add to your brownies. You can even try blondies – brownies with white chocolate. Brownies are another easy thing to put together with the kids. You can buy a ready-made brownie mix, or you can be a bit more daring and start from scratch. For extremely sumptuous brownies, use a good quality dark Italian chocolate, instead of just cocoa powder.

Who remembers going to their local sweet shop, picking up a little white paper bag and filling it with delicious penny sweets? I certainly do! It was the highlight of my day!

Here is just ten of my childhood favorites, which I’m happy to say you can buy online from retailers like A Quarter Of.

1. Barratts Shrimps

10 Sweets From Your Childhood That Will Make You Feel Nostalgic

Just looking at these deliciously sweet, pink shrimps takes me back to the mid-1970s. They were soft, sugary and well… delicious!

2. Double Dips

10 Sweets From Your Childhood That Will Make You Feel Nostalgic
I remember these Double-Dips fondly;  walking home from school, dipping away!  These days, you can even get cherry, orange and cola flavor fizz dips.

3. Parma Violets

10 Sweets From Your Childhood That Will Make You Feel Nostalgic
I can actually taste and smell these Parma Violets just by looking at this picture.

4. Anglo Bubbly

10 Sweets From Your Childhood That Will Make You Feel Nostalgic
What a classic! So many of us kids thought we were cool and grown up if we were allowed a Bubbly!

5. Milk Teeth

10 Sweets From Your Childhood That Will Make You Feel Nostalgic
Admit it… did you also pretend you had a pair of false teeth every time you bought these old fashioned milk teeth? I can taste them now, they had a very light coating of sugar on the outside too. Scrumptious!

6. Barratt’s Fruit Salad Chew Bars

10 Sweets From Your Childhood That Will Make You Feel Nostalgic
Does your mouth just ooze saliva when you think back to how great these fruit salad bars tasted? They were raspberry and pineapple flavored, and when you were a small child, they looked massive!

7. Mr. Tabs Mini Candy Bricks

10 Sweets From Your Childhood That Will Make You Feel Nostalgic
Mr. Tabs Mini Candy Bricks looked like mini colorful bricks that were packed with delicious fruity flavors and wrapped in a delicate little wrapper.

8. Candy Watches

10 Sweets From Your Childhood That Will Make You Feel Nostalgic
Who remembers nibbling these candy watches? They came on a little piece of white elastic which you placed on your wrist whilst so you could eat and play at the same time! If I recall correctly, they also made a candy necklace.

9. Matlows Refreshers Chew

10 Sweets From Your Childhood That Will Make You Feel Nostalgic
These classic chews will certainly bring memories flooding back. The chew was yellow in color and right in the center you’d find a wonderful fizz. I remember these tasty chews being a wonderful lemony flavor.

10. Flying Saucers

10 Sweets From Your Childhood That Will Make You Feel Nostalgic
How could I not include sherbet flying saucers? These were a must when you were a young child, they came in various colors and consisted of fruit flavor sherbet in a wafer shell. No visit to the sweet shop was complete unless you had a couple of these.

Well, there you have it, ten wonderful, sugary, fizzing and tasty sweets to bring back your childhood memories.

I’m pleased to say that all of the above can now still be bought online from this amazing online shop called ‘A Quarter Of‘. Believe me, you’ll certainly be amazed by the huge collection they have and the best thing of all is that they are still so cheap to buy.

Happy memories one and all.

Easter Egg Wheat Grass Centerpiece from THRIVE

So, it’s almost Easter. And you’re making omelets. Or cookies. Or anything with eggs.

Easter Egg Wheat Grass Centerpiece from THRIVE

No biggie.

Just crack open those white shells and toss the whole thing, right?

Wait! Don’t toss that!

Easter Egg Wheat Grass Centerpiece from THRIVE

With two seconds of prep and some wheat from your food storage, those shells and carton can double as cute, FREE centerpiece for Easter brunch.

Easter Egg Wheat Grass Centerpiece from THRIVE

These come together in nothing flat—so easy.

* Gently crack your egg shells on the narrow end, remove the egg yolk and white, and make something delicious.

* Rinse shells in hot, soapy water and dry. Dye with natural or store-bought dyes as you would for traditional hard-boiled eggs.

* Add a tablespoon-ish of potting soil to each egg …

Easter Egg Wheat Grass Centerpiece from THRIVE

… and cover with sprouted wheat. *

Easter Egg Wheat Grass Centerpiece from THRIVE

Cover with plastic wrap and make sure soil stays moist, but not soggy.

Easter Egg Wheat Grass Centerpiece from THRIVE

Wheat will start to sprout in a day or two, with 4-6 inches of growth about a week later.

Easter Egg Wheat Grass Centerpiece from THRIVE

If the grass gets too tall or shaggy, just grab your scissors and even it out.

Easter Egg Wheat Grass Centerpiece from THRIVE

The carton doubles as a display tray by trimming down the sides with your nicest dollar store scissors.

Easter Egg Wheat Grass Centerpiece from THRIVE

And you can change up the look depending on how many eggs you use:

FULL DOZEN

Easter Egg Wheat Grass Centerpiece from THRIVE

HALF DOZEN

Easter Egg Wheat Grass Centerpiece from THRIVE

SINGLE PLACE CARD

Easter Egg Wheat Grass Centerpiece from THRIVE.4

(name written on egg)

Easter Egg Wheat Grass Centerpiece from THRIVE

(name on egg carton)

And when you’re done, EVERYTHING gets composted or recycled so there’s nothing wasted.

So …

Egg shells and carton?

March 2013 BLOG

It’s What Not To Toss this weekend!

* – Spouting wheat is easy and simply involves soaking and rinsing whole wheat kernels in water so that they start to germinate. There’s a great video of process HERE.

This week while my kids were off track, we drug out the food coloring, cookie cutters and went totally crazy with dessert staple.


100_4570

I mean holy-cow-that’s-a-lot-of-food-coloring crazy.

Behold the Extreme Home Makeover edition of the basic Kellogg’s Rice Krispy treat.


Sept 2011 BLOG4-5

*EEK*


I kinda love them.


The end result was crazy-bright, marshmallowy mash-ups that are so stinkin’ cute and not much harder to make than the original.


100_4584


The sky’s the limit here for the colors, patterns and shapes you could use. Here’s what we came up with:


Ghosts & Stripes


100_4593


Bats


100_4605


Pumpkins & Stripes


100_4589


Plain Stripes & Even Quilt Block Shapes (ha!)


Sept 2011 BLOG4-6


Mini Bites


100_4596

Once you get started it’s sorta hard to stop.


100_4568


Everyone knows how to make these so I’ll skip the full tutorial thing. However, there were a few tweaks I made to pull these off that I’ll pass along:


1. To get the color super saturated, you’ll need copious amounts of food coloring – like a full teaspoon of the Wilton jells for most colors. For the black, it’s more like a full jar … um, seriously.  (Try not to think about it … it’s only once a year. 🙂


First batch with 1/4 tsp. food coloring jell: too pastel-y


100_4523


Second batch with a generous 1 tsp. jell: much better


100_4524


2. The other trick to getting a solid color is to use half the amount of cereal the original recipe calls for. Here’s what I wound up doing:


100_4527


3. To make the stripes, cut long strips from solid blocks of color (like on the tray above) and mush them together.


Sept 2011 BLOG4-2

This worked much better than taking small clumps of each color and trying to form it by hand.


100_4602


4. Use a generous amount of non-stick coooking spray on the cookie cutters. You’re welcome.


5. Let the cereal cool for 10-15 minutes at room temperature before cutting. That way the cereal mix will be somewhat set, but easier to work with. Once your shapes are made, go ahead and refrigerate to set.


Have Fun!


100_4612

This week while my kids were off track, we drug out the food coloring, cookie cutters and went totally crazy with dessert staple.

100_4570

I mean holy-cow-that’s-a-lot-of-food-coloring crazy.

Behold the Extreme Home Makeover edition of the basic Kellogg’s Rice Krispy treat.

Sept 2011 BLOG4-5

*EEK*

I kinda love them.

The end result was crazy-bright, marshmallowy mash-ups that are so stinkin’ cute and not much harder to make than the original.

100_4584

The sky’s the limit here for the colors, patterns and shapes you could use. Here’s what we came up with:

Ghosts & Stripes


100_4593

Bats


100_4605

Pumpkins & Stripes


100_4589

Plain Stripes & Even Quilt Block Shapes (ha!)


Sept 2011 BLOG4-6

Mini Bites


100_4596

Once you get started it’s sorta hard to stop.

100_4568

Everyone knows how to make these so I’ll skip the full tutorial thing. However, there were a few tweaks I made to pull these off that I’ll pass along:

1. To get the color super saturated, you’ll need copious amounts of food coloring – like a full teaspoon of the Wilton jells for most colors. For the black, it’s more like a full jar … um, seriously.  (Try not to think about it … it’s only once a year. 🙂

First batch with 1/4 tsp. food coloring jell: too pastel-y

100_4523

Second batch with a generous 1 tsp. jell: much better

100_4524

2. The other trick to getting a solid color is to use half the amount of cereal the original recipe calls for. Here’s what I wound up doing:

100_4527

3. To make the stripes, cut long strips from solid blocks of color (like on the tray above) and mush them together.

Sept 2011 BLOG4-2

This worked much better than taking small clumps of each color and trying to form it by hand.

100_4602

4. Use a generous amount of non-stick coooking spray on the cookie cutters. You’re welcome.

5. Let the cereal cool for 10-15 minutes at room temperature before cutting. That way the cereal mix will be somewhat set, but easier to work with. Once your shapes are made, go ahead and refrigerate to set.

Have Fun!

100_4612

Just in time for Thanksgiving, these quick, easy and very kid-friendly treats are almost as fun to make as they are to eat.  And the best part is that most of us have this stuff lying around from Halloween so maybe even free (or at least cheap!)

tt

Great pared with place cards or as a dessert on your holiday table, try whipping up a batch of these gobblers as part of your Thanksgiving menu.

100_0194

For each turkey you’ll need:

100_9879

Cut the bottom off one of your cookies as straight and level as possible.  Then pop the small left-over piece in your mouth quickly before anyone notices that it’s gone.

100_0149

Melt chocolate chips for 30-60 seconds, just until they’re smooth and easy to spread.

Oct 20102

Coat the trimmed cookie with chocolate using the back of a spoon …

100_0157

… add the candy corn …

100_0159

… and set aside to dry for a few minutes.

Dip the Kiss (wrapped or unwrapped) in chocolate  …

100_0165

… and place on the edge of the whole cookie.  Let both pieces set for a minute or two before assembling.

100_0168

To attach the turkey feathers, coat the cut edge of the cookie with chocolate …

100_0181

… and place it directly behind the kiss.  “Glue”on mini M&M’s for the head and waddle using more of the melted chocolate.

100_0187

Voila!

Ridiculously cute turkeys just begging to get bit.

And the best part is that you can make these little guys as simple or fancy as you’d like:

mct

100_0098

ft

mdt

These turkeys have been a Thanksgiving staple in my family courtesy of my awesome Aunt Claudia.  And this is a great project for little fingers while the grown-ups are getting last-minute dinner stuff ready.  Just be prepared—there’ll probably be a lot of licked fingers so you may want each kid to make their own. 😉

Hope you enjoy making—and eating—these fun Turkey Treats …

Oct 20101

Every  … last … bite!

htg

*********************************************

Thank You to the awesome blogs that featured this project:

Okay … I didn’t actually use a paper clip.  I got a little too MacGyver on the title.  But, I did make honest-to-goodness homemade fruit snacks out of zucchini and kool-aid.  And you can do it without a dehydrator, too.

And that kind of know-how would so impress MacGyver.

Blog Pics

Curious?

It’s super easy, cheap and way better for the kiddos than the high fructose corn syrup / modified corn starch numbers at the store.

There’s a few different versions of this recipe floating around the web, but this is my own recipes that, in my humble opinion, tastes even better, uses much less sugar and can actually work in the oven if you don’t have a dehydrator.  I have made several batches over the last few days and hope my trial and error process helps someone out. 

Homemade Fruit Snacks

Or the: Your Kids Will The Entire Batch In Two Minutes and You Finally Have Something To Do With All That Zucchini Besides Bread and Muffins Recipe

For this recipe you’ll need:

 100_3268

Wash, peel and halve your zucchini, even if you’re using small, tender squash.

100_6971

You want to get all of the peel removed so that the zucchini meat dehydrates properly and looks in no way healthy.  This is critical for the kids to buy into the idea.  Halve your zucchini if you’re using baseball-sized ones like I did.  It makes them much easier to work with.

Remove the seeds and pulp from the inside with a spoon, making sure the meat has a nice, even thickness.

100_6974

When you’re done the zucchini should look like this:

peel-free and a fairly even thickness.

100_6978

Cut the zucchini in long strips about 1/4” – 3/8” thick. 

100_7834

Don’t worry about being precise, just eyeball it.  Wider strips will work fine, too—just allow for extra drying time.

Cut the strips into 1 inch pieces.

100_7836

These will shrink up by half in the dehydrator giving you a bite sized piece. 

Aug 201050

Heat water, sugar and drink mix over high heat. 

Add the zucchini as soon as the sugar is dissolved and bring to a full boil.  Reduce heat and simmer covered for 30 minutes.

100_3272

Drain thoroughly reserving cooking liquid and allow to cool in the strainer for ten minutes. 

Dump zucchini out onto dehydrator trays or plastic wrap lined cookie sheets and let dehydrate.

Store in ziplock bags until they’re eaten up.

** Then lather, rinse, repeat. **

The next batch of zucchini can be cooked in the left-over cooking liquid with the same favor and texture.

***************************************************

Drying In A Dehydrator:

Dry snacks for about a day, being sure to rotate trays.  Snacks are done with they’re still soft and pliable, but dry to the touch with a matte finish.

Drying In The Oven:

Line sheets with plastic wrap, but do not spray with cooking spray.(I used wax paper in this picture and it stuck horribly and discolored during the drying.  Plastic wrap has worked beautifully on all of the batches since then).

100_7376

You can either spread it around loosely with a spatula …

100_7379

… or go the Martha Stewart route and line them all nice and neat.

100_7380

The Martha way looks pretty, but it takes forever to do.  And both ways cooks just as well so there’s not an advantage either way.

As you can see, the pieces will shrink by about half and darken in color during their drying time.

100_7394

Set your oven between 140 – 170 degrees.  (My oven’s lowest setting was WARM – 170 degrees).  If your oven won’t go below 200 degrees, prop the door open with a hand towel and keep the temperature down a bit.

The drying time in the oven, as well as with the dehydrator, will vary depending on the piece sizes and humidity.  I placed the batch below in the middle rack of the oven at 170 degrees right after lunch.  I turned the oven off around 11 pm when I went to bed and kept the door closed all night. 

100_7398

In the morning they were almost done, so I scraped all the pieces together with a spatula to move them around, spread them back out and finished them in the oven at 170 degrees for about another 40 minutes.  Again, drying times will vary.

100_7401

(Again, use plastic wrap to line your pans. I used wax paper here and although the flavor and texture were fine, the paper discolored and didn’t look very appetizing.)

When they were done, the 1 inch long pieces ended up at 1/2” inch bites and the 1/2” inch pieces ended up the size of mini M&Ms and were chewier.

100_7399

The smaller length pieces were also tough to use in the dehydrator because they kept falling through the cracks on the tray.   They also dried out much faster than the bigger pieces.  That made them much harder and chewy like jerky.  My kids liked the soft, bigger pieces much better.

100_7861

These snacks won’t win any beauty contests, but I’d rather give my kids 0.9 oz. of yummy homemade fruit snacks with all of the extra vitamins from the garden than the 0.9 oz. of the store bought variety with all the fillers and junk.

Oh, and these were supper cheap.

The store brand single serve packs work out to be about .20 each.  The homemade variety ran me .06 each when I bought sugar (and used the cooking liquid for two batches) and .02 a serving when I used sugar on hand.

Edited to add:

We have achieved SOUR homemade fruit snacks!

Oh yeah.

These are sooooo good!

Mix 4 c. zucchini, 3 c. water, 1 c. sugar or splenda and 10 orange Kool-aid packs.

(Yes, you really do need 10 packs.)

100_3452

Bring to a boil and then simmer for 15-20 minutes until soft.  Let cool for 10 minutes before transferring to trays.

100_3450

Then dehydrate as usual.

You can go the bite-sized route with this snacks, but my kids prefer leaving them 3-4 inches long.

Why?

They make the cutest little sour gummie worms. Yum.

Oh. my. heck.

So ridiculously good!  Enjoy!

Signature

PIN THIS TO SAVE FOR LATER

Homemade Fruit Snacks Out of Zucchini