When we wrote about cheap patio paving ideas last month, a lot of you were interested in knowing more about how to use reusable patio paving molds as that was the best option for DIY garden pathways and patio designs.
Hence today, I thought of talking more about these wonderful plastic molds that can be used in a variety of ways in your garden.
What are Reusable Garden Patio Paving Molds?
As the name suggests, these are reusable molds mainly made of Polypropylene Plastic (PP) Resin that can be used to create beautiful garden pathways, patios and designer walkways around your house.
They are extremely easy to use and currently provides the simplest and cheapest DIY option for your garden.
Typically, reusable patio paving molds have a 2 inch depth and come in various patterns.
How to Use Reusable Patio Paving Molds for Garden Pathways
Using reusable patio paving molds in your garden is as easy as it can get.
You will need:
Your garden patio mold (obviously)
Store bought concrete mix or pre-mixed concrete
Water
Flat Trowel
Bucket or wheel barrow or anything else where you can mix the concrete with water and carry easily around your garden.
Steps to Use:
1) First mark the area where you want to create your pathway or base of your patio.
Prepare this area by removing any lose stones or anything else that may come in the way.
2) Mix the concrete with water and get it ready for use.
3) Place the mold where you want to start and carefully start pouring the concrete mix in the gaps ensuring the patterns of the mold get filled properly.
4) Use a trowel to flatten the concrete to your liking.
5) Once the concrete is semi-dry, remove the mold and place it wherever you want to continue next.
Note: Do not wait for the concrete to dry to remove the mold. If you do, you may not be able to remove the mold later on.
6) Keep reusing till your pathway or patio base is complete.
7) Once your pathway or patio design is done and the concrete has dried out, you will notice gaps between the shapes where the mold was placed. You can either fill these gaps with stones, plant grass, add soil or just fill up the gaps with concrete once again if you wish.
For pathways, you may not want to fill the gaps at all as this gives the stepping stones effect.
You get reusable garden molds in the market in a variety of shapes. From abstract patterns to circular, rectangles etc.
Depending upon your usage, you can buy the shape that best suits your needs or even buy multiple molds to create unique patterns.
Where to Buy?
Reusable patio paving molds for your garden, concrete mix and trowel can be bought at any home improvement store.
You can even buy these on Amazon and other online retailers.
Other Uses
Most individuals use reusable plastic garden molds for building patio designs and beautiful pathways.
However, these molds are quite versatile and can be used in other creative ways.
For example, you could use the molds to plant seeds of specific flowers of different colors. With this, you will have flowers blooming in various patterns in your garden.
You could plant may be red flowers on one shape and yellow flowers in the other.
You could also add soil and plant grass in various shapes.
Depending upon the pattern of your mold, you can use them in your garden in a way that gives it a unique aesthetic appeal.
Final thoughts
I just love my reusable garden patio paving mold. It has helped me create a garden the way I wanted it to be without the huge expenses and heavy labor involved.
If you enjoy spending time in your garden, maintaining it yourself, you will enjoy working with these reusable molds for sure.
It never ceases to amaze me how a relatively boring corner of the house can be completely transformed with a simple hanging décor.
With my love for using flowers to give a fresh look to my home, coupled with spotting a barren wall that felt like it needed something, I immediately got working on creating a simple hanging flower holder.
What I ended up making, was so simple yet charming that it gave me that satisfying feeling after my little experimentation was over.
So this is how I made my super simple DIY hanging flower holder.
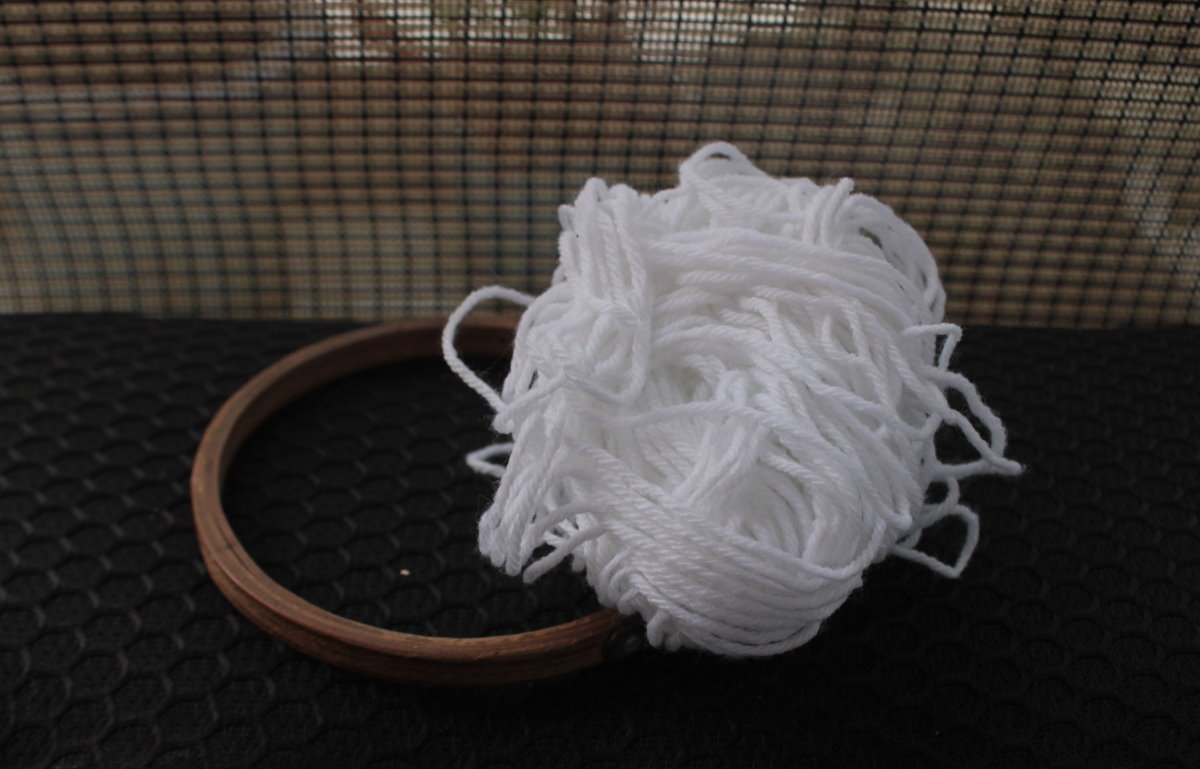
What you need?
You just need two items for this beautiful hanging flower holder, both of which were sitting happily in my arts and crafts drawer:
Embroidery hoop
Yarn or jute rope
Note that I had white yarn leftover from another project and hence I used that. You can use any color you like and it really changes the look especially depending upon the flower you plan to use in the end.
Also note that I used an embroidery hoop as that is what I found in my house. You can use any circular object as long as it fits the final purpose of this project.
Steps to create the hanging flower holder
Step 1:
Take the embroidery hoop and separate the inner and outer part. For this craft we will only be needing the inner smaller part.
Step 2:
Make a knot around the smaller hoop and start wrapping the hoop with the yarn until the whole wooden portion is covered.
Step 3:
Start wrapping the yarn around the diameter of the hoop, making sure to go above and under to create crisscrossing loops.
Step 4:
At the top, tie a piece of yarn to create a loop so that you can hang the piece of décor.
For the final step, put some dry or fresh flowers through the crisscrossed loops. And that is it! Hang it somewhere high and watch it spin around!
Final thoughts
This really is as simple as it gets with DIY crafts. Please do try it and let me know how it went.
I am now off to get some more flowers. I plan on changing the flowers regularly. That way the wall will always look fresh and colorful.
I also plan to hang paper flowers that I have seen in various craft shops. Maybe I will even make my own paper flowers. Looks like a new project is coming up soon.
Also one final note. It’s not necessary to hang just flowers with the hanging flower holder that we created. Simply use your imagination and you can actually add anything you desire giving the look that you want for your wall and corners of your house.
There is something romantic about using reclaimed wood for your home DIY projects. Now I realize that is quite a claim but I honestly believe most people would agree with me if they knew more about what is reclaimed wood, where does it come from and why we should be using it for our home remodeling ventures.
Given below, I have tried to answer as many questions as possible regarding reclaimed wood, its uses, benefits, drawbacks, nature etc. These questions should act as a guide for those trying to understand what reclaimed wood is all about and how to use them.
What is reclaimed wood?
As the name suggests, reclaimed wood is wood that has been reclaimed or repurposed for usage in another project.
This means that the wood in question had already been used either in a past commercial or residential property. Wood is periodically taken down from old properties due to various reasons. This wood is then processed further to make them reusable in various other tasks. It becomes as good as new as far as the new owner is concerned.
Where does reclaimed wood come from?
Reclaimed wood mainly comes from old commercial properties that are no longer in use and is to be taken down. This includes old factories, barns, warehouses, woodsheds, outhouses etc.
Note that some reclaimed wood can come from old residential properties as well. Reclaimed wood has a reputation for having a character of its own with some users preferring to learn more about its history, where it has been used before and the unique patterns formed after processing, before buying the wood.
Why should I use reclaimed wood?
There are several reasons for using reclaimed wood but the two most important reasons would be environment and unique characteristics with rich history.
Environment: According to the Food and Agriculture Organization of the United Nations, our world is experiencing about 10 million hectares of deforestation each year.
Environmental issues such as carbon emissions, clean energy, climate change, deforestation need to be in the forefront of our thought-process before any activity.
Reclaimed wood helps in a big way to curb deforestation. Since this wood has already been used, reusing it simply makes sense so that new trees do not have to be cut down.
By using reclaimed wood for any of your home, commercial or remodeling projects, you are helping the environment, reducing your carbon footprint and lowering the rate of annual deforestation.
Unique characteristics with a rich history: This is another significant reason why so many people prefer using reclaimed wood.
As mentioned already, reclaimed wood is wood that has already been used in a past commercial or residential property. This wood develops its own unique characteristics over time.
For example, there could be a nail mark that after reclaiming and processing has left a distinctive pattern on the wood. Cutting and shaving of the wood before past use also may have left patterns and marks that have become a part of that wood board.
Add to that, certain reclaimed wood come from old properties with a rich history. It could have belonged to a museum in the past or part of a barn belonging to a historical family in the locality.
This lends a lot of character to the reclaimed wood which standard wood simply do not possess.
In fact the unique characteristics, history and the fact that reclaimed wood is better for the environment are the main reasons I had mentioned there is something romantic about using reclaimed wood for any of your DIY or home projects.
Why is reclaimed wood better?
Wood in general is better for the environment than many other materials used for various parts of a property.
Plus reclaimed wood helps in reducing deforestation, adds to the character of your furniture, flooring etc.
Wood that is being torn down from existing properties may simply go to waste if not reused.
All this makes a compelling reason why reclaimed wood is better than other materials or acquiring new timber.
How to buy reclaimed wood?
Reclaimed wood can be bought from big stores such as Home Depot or from local dealers in your area as well.
Note reclaimed wood can also be bought online via the major ecommerce giants and other sites specializing in raw materials.
While I realize the way we shop has changed due to the Covid-19 pandemic, I still recommend to buy reclaim wood after checking it out personally at a store instead of buying online.
There is nothing wrong with buying online and its perfectly safe. However, as I explained above that reclaimed wood has its own unique characteristics and patterns, you may want to see it for yourself before buying. It will also give you a chance to know more about its past history.
What can reclaimed wood be used for?
Reclaimed wood can do everything that standard newly acquired timber can do.
It can be used for both residential and commercial properties. Reclaimed wood is currently being used for making furniture, flooring, window panes, exterior frames etc.
Basically there is no limit to the uses of reclaimed wood. If you can use standard wood for a project, then you can use reclaimed wood as well.
Is reclaimed wood cheaper than new?
This is a yes and no question. Certain varieties of wood can be much cheaper than when bought brand new. However, since reclaimed wood has to be recovered first from existing properties that are being torn down, the availability of the wood can fluctuate.
Whenever availability becomes low and demand remains fairly strong, the price of the wood will rise.
It is advisable to check with a few dealers and stores before purchasing reclaimed wood to get the best deals.
What kind of wood is reclaimed wood?
Reclaimed wood can be a mixture of various types of wood depending upon from where it has been salvaged. Typically reclaimed wood can be Oak, Pine, Chestnut etc.
A dealer may have sourced all their reclaimed wood from a single source or multiple sources. This will dictate if the wood is a mixture or of a single variety.
How long does reclaimed wood last?
This depends upon the past usage of the reclaimed wood. If the wood was from a fairly new property, then it will last as long as any new wood. If the wood was acquired from a property which was built several decades ago, then obviously that much of the wood’s age will be reduced.
However, it is quite reasonable to assume reclaimed wood will last one lifetime. Genuine wood usually do last for a long time and most reclaimed wood is heavily processed to make it as good as new.
Is reclaimed wood safe?
In general, reclaimed wood is extremely safe.
However, just like any other case for building projects, you have to exercise some caution. You need to check whether the salvaged wood has a bug problem. You also need to verify what kind of chemicals or preservatives were used to process the wood after reclaiming.
As long as you check on those matters, reclaimed wood is completely safe to use.
Should you sand reclaimed wood?
Yes, from floor sanding to tabletops, you can sand your reclaimed wood to create an even finish on the board.
Note that some dealers already give you the finished product while others sell raw salvaged wood that needs finishing such as sanding the wood.
How do you seal reclaimed wood without changing color?
Many experts feel you should use a polyurethane solution or sealer if you do not want to change the color of the reclaimed wood.
Note that using standard sealants and polish will alter the final shade of the wood after finishing.
Can I stain reclaimed wood?
Yes you can stain your reclaimed wood to give it the final finishing and look that you want.
Can you paint reclaimed wood?
Yes you can paint reclaimed wood. Note that some reclaimed wood may have paint stains from their old usage. You need to remove this before applying your own fresh coat of paint on the wood.
What are the drawbacks of using reclaimed wood?
I personally think that there are no genuine drawbacks to using reclaimed wood.
However, you need to understand because this is wood that has been salvaged, the wood may have existing nail marks, indentations or faded out old paint. Some reclaimed wood boards are uneven in size.
Mind you some people actually like this aspect of reclaimed wood as it gives a distinctive pattern after the finishing process to make it as good as new.
Final Thoughts
Reclaimed wood is my favorite. I just love a great dining table, patio furniture or flooring that is made out of old reclaimed wood with a unique character and rich history.
If you are still wondering if reclaimed wood is for you or how it works, just remember that reclaimed wood is just like any other wood used in DIY projects. It is just that in this case the wood had already been used in a past property and has been salvaged.
By using reclaimed wood for your home or any DIY remodeling projects, you are not only adding an unparalleled charm to your furniture, you are also helping our world from deforestation.
Did you know that making your own home-based fertilizer for plants is as easy as making a cup of coffee? Quite Literally.
I myself was quite astonished by this in the beginning. However, after a bit of research, I was excited and could not wait to try it at home.
Now you may have guessed by now that the secret ingredient in creating an all-natural home-based fertilizer for your precious plants is coffee grounds.
So that you can understand the entire process before you go ahead and feed your plants some coffee, we shall cover the following topics today:
Why Garden Plants or Home Plants Lose Nutrients?
How Coffee Grounds Help Enrich the Soil?
How to Make Your Own Fertilizer at Home?
Important Precautions When Using Coffee Grounds as Fertilizer.
1) Why Garden Plants or Home Plants Lose Nutrients?
Instead of going into the technical details, I am going to give a very simple answer. The reason plants in your home or your garden lose nutrients is that they use up all that is there in the soil over time.
Think of a potted plant. They are relying on the soil in the pot for their nutrients. However, there is a limited supply as the roots have access only to the soil in the pot. As time goes by, the plant starts using up the nutrients, depleting them from the existing soil.
Once the soil has lost the nutrient content, you will see your plants getting weaker with each passing day. They lose their brightness, they feel pale and shed leaves.
This is the reason why you need to replenish the soil of a potted plant either in your house or in your garden with nutrients from a natural fertilizer.
2) How Coffee Grounds Help Enrich the Soil?
Coffee grounds are rich in nitrogen. Apart from this, they do have several other minerals in varying quantities such as potassium, iron, calcium, phosphorus etc.
Many gardeners claim it is not just what coffee grounds add to the soil that is of benefit. What coffee grounds remove from the soil is a huge help as well. There have been reports that coffee grounds can help absorb metal contamination from the soil in a garden.
So considering the nutrients that are being added and the contamination that is being removed, coffee grounds make excellent fertilizers that enrich the soil.
3) How to Make Your Own Fertilizer at Home?
Now, this is the really easy part. At the start of this post, I mentioned making your own home-based all-natural plant fertilizer was as simple as making coffee.
Well, that is it.
Simply go ahead and brew your ideal cup of coffee as usual. However, unlike most other times, do not discard the leftover coffee grounds. Keep them in a separate jar or any kind of container. Wait till they dry and your home-based fertilizer is ready for use.
Just in case you do not make coffee at home, you can easily source coffee grounds from a café. Most cafés would be happy to get rid of their coffee grounds as it is just a waste product for them. Some even neatly pack their coffee grounds and give it to whoever wants them.
4) Important Precautions When Using Coffee Grounds as Fertilizer.
Now while coffee grounds definitely contain a lot of nutrients that enrich the soil and help plants grow, there are a few precautions you must take before using them on your plants.
Ideally use only a little at first to see how your plant reacts.
Remember coffee grounds are ultimately the same as your coffee drink. What this means is that they contain caffeine and are acidic in nature. Not all plants can thrive if the soil suddenly gets a high dose of those two elements.
So my strong advice would be to add little coffee grounds to your soil to check whether there is an adverse effect on your plant. If you see the plant is thriving, then use it regularly to mix with the soil. If you see stunted growth or any other issue, do not use it for that particular plant.
You have to do this individually for all your plants. Do not go spreading coffee grounds all over your garden as that can cause some plants to grow well and others to wither quickly.
Final Takeaway
Coffee grounds contain several nutrients that can help enrich the soil of your garden. They can also help in the removal of metal contamination.
Coffee grounds are also possibly the simplest way of making home-based plant fertilizer. They are environment friendly, do not cost anything extra and are a good example of converting waste into a useful product.
As long as you are taking the precautions as mentioned above, you should be fine. Also just in case, your garden has more plants that prefer acidic soil, then coffee grounds can be the perfect fertilizer for you.