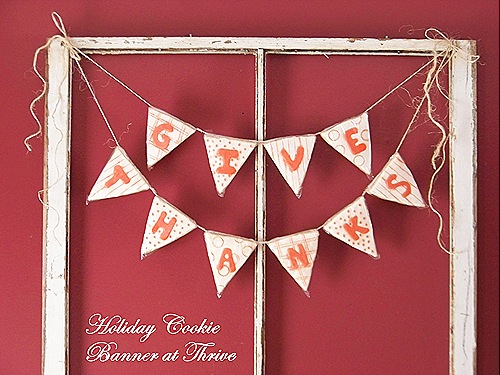
Inspired by all the cute holiday banners floating around out in Blog Land, this delicious version does double-duty as holiday decor and a treat for your guest to take home with them.
Soft and thick sugar cookies stand in for the traditional fabric and paper pennants, while the royal icing gets a festive upgrade with fun “tattooed” patterns.
Best of all, this was simple and easy to make using items from the pantry that I already had on hand, so FREE!
(Just a note: There are pictures from two different batches so please ignore the differences of colors.)
Want to make your own?
For this project you’ll need:
To make the pennants, I cut out a simple template using my nicest junk mail and a pair of blunt-nose scissors from the kids’ pencil box. The size doesn’t really matter as long as it will fit in a sandwich-size plastic zipper bag.
I used my mom’s sugar cookie recipe and rolled it out almost a half inch thick for a super-soft cookie. Trace and cut out your pennants using a butter knife …
… smoothing out any rough edges and baking until just barely golden on the edges.
When completely cool, pipe the letter outlines and around the edge of the cookie with royal icing …
… then flood the inside with more icing …
… and smooth out with a butter knife. And don’t worry if your letters look a little bit like blobs (mine did). Simply scrape away any problem spots with a knife.
Let set for 5-10 minutes and then lightly score decorations in the frosting with a thin knife, cap lid or other interesting shape.
For the “tattoo” color, add a drop of food color to a plate with a teaspoon of water and mix …
… then dip your cap or drag a knife through the color and then through the icing for subtle “tattooed” designs.
No worries if you goof … just blot away color with a paper towel.
Let background icing set before filling the letters carefully with another color.
Let finished cookies set for a few hours to fully dry. Really. Do not rush this.
To assembly the banner, cut the tops off enough zipper bags to cover your letters …
… insert each letter …
… carefully turn over and pull excess plastic taut, taping in place.
Cut a generous length of ribbon/twine/rope, etc. and place above cookie …
…tucking the loose plastic into a neat triangle-ish shape …
…folding over the twine and taping in place. The twine should rest along the top edge of the cookie pennant and be able to slide easily.
To help the banner hang better and keep the cookies more securely attached, attach an extra strip of tape to the top corners so that the twine lays flat across the top and doesn’t pull up at the ends.
Attach the rest of the letters the same way in reverse order or your banner will read backwards.
To keep the cookies from bunching together, wrap a piece of tape between each pennant.
And for the fun part, hang your awesome cookie banner proudly during the celebration …
… and then slide the cookies off the twine to send home with guests for a fun good-bye treat.
And that’s it! Easy, delicious, unique, FREE!
And how cute would this cookie banner look for Christmas? New Years? A birthday party? Welcome home party?
I’m already plotting.
***************************************************
A few THRIVE tips to save you some headaches:
1) Do not rush the drying on the icing or bad, bad things will happen. Oh, and double-check the order on those letters. If you mess up either of these important steps, you end up with this lovely mess.
Yes, this was my afternoon yesterday.
2) If you totally mess up a cookie, don’t freak. Just scrape off the icing and frost again. I ended up doing that on all of mine after “skipping” tip #1.
3) Help out the flavor of your royal icing substantially by subbing out the vanilla extract for a stronger flavor. I love almond, but orange, butter or lemon would be great, too.
4) Cut out a few extra pennants. You may end up needing them – I did.
5) I have really dark walls so I purposely went for light colors and simple patterns. But this would look great with dark, rich colors and bold patterns. How great would olive green and brown pennants look with cream or dark yellow letters?
***************************************************
Wishing everyone a warm and safe holiday weekend!
Linking up to the wonderful showcases on my sidebar, including:


10 Comments
How adorable! Such a cute idea! I bet your guests will be impressed!
Hey Girl!!! I gave you a Stylish Blogger Award…. check it out here!! 🙂
http://keepinitthriftyandrea.blogspot.com/
These are awesome! What a clever idea. I think I might just have to make a birthday banner of cookies for my daughter.
I love this too! and I am in town until Sunday so YES I will be @ aunt Terri's. I MAY have planned this trip solely around that event! =) Will you be there too??
I featured you today over at Today's Top 20! You did an awesome job!!!
Amanda
todaystoptwenty.blogspot.com
This is really a great idea!!
What a great idea, I think I will give it a try for our next birthday party. Thanks for sharing. Visiting from www.lifeisaparty.ca
You are a genuis! We're having a retirement party for my in-laws in a few weeks and this will be sooooo much more awesome than a paper banner. Thanks so much for sharing!
GREAT! This looks like a very fun project, quite yummy indeed!
Looks fun to make and yummy to eat!
Meredith From A Mother Seeking Come find me on my blog, A Mother Seeking…