27 Results

thrift

Search

Welcome to the holiday season everyone!

Halloween costumes and decorations were packed up this morning in gleeful anticipation of Thanksgiving. I hate the blitz to Christmas and the rush to throw red and green up too soon. Because there are so, so many things to be thankful for. And I know that for me, the more time I spend focusing on my blessings and the spirit of Thanksgiving, the more likely I am to remember the true spirit of Christmas.

So … first up on the Thanksgiving decorating agenda?

cover

I made this little beauty with the last of my gleaned wheat and some scrap chocolate satin.

The frame was a double thickness of cardboard wrapped in scrap fabric, just like I did for my wheat and burlap wreaths.

100_5353_00

Two tones of wheat were hot glued in a chevron pattern to give this little frame some fun pattern and texture.

100_5356

The edges on the outside …

100_5360_00

… and inside of the frame were covered with a double layer of wheat.

100_5361_00

I was going to print off a quote or picture on scrapbook paper and tape it to the back (which would look great), but I decided to leave it open and tie a simple ribbon bow from scraps.

And don’t worry if you don’t have any gleaned wheat laying around. Any dried flowers, seed pods, weeds or even wheat from the craft store would work. You could also get a similar look by skipping organics all together and using two tones of burlap or muslin. Hey, rock what ya got, right?

A quick bow and a cheapie thumb tack later … welcome Thanksgiving.

 100_5376_00

This little half wall next to my computer is the perfect spot for this holiday frame .

100_5381

Tomorrow I’ll show you what I put beneath the frame to finish off the wall.

Until tomorrow … (Edited to add)

Here’s the link to the Thanksgiving subway art I added below the frame HERE:

100_5462

Hey thanks guys!

craft.gossip.feature

Linking up to:

Skip To My LouCraft-O-ManiacC.R.A.F.T. *  Stories of AtoZ, Tip JunkieSugar BeeToday’s Creative BlogSassy SitesMy Uncommon Slice of Suburbia * Someday CraftsLil LunaWe Are That FamilyBlue Cricket DesignsThe Thrifty Home, * House of Hepworths, *Tidy MomWhipperberryKojo DesignsChic On A Shoestring, Momma’s Kinda Crafty, *Tatertots & Jello, Be Different Act NormalFunky Junk Interiors * I Heart NaptimeUnder The Table and Dreaming

How many of you are stocking up on Halloween candy?

20e59d96ecd7f4b5_halloween_candy_aisle_1_2_1

It’s the usual drill of buying bags, emptying treats into a bowl by the front door and then recycling the empty bags, right?

candy11

Wait! Don’t Toss That!

100_4921

Those bags got the candy to your house just fine – why not put them to use to round up candy from the neighbors, too?

Just cut handles from whatever you’ve got on hand — fabric scraps, ribbon, VHS tape, curling ribbon, whatever – and tape them in place with duct or packing tape.

100_4910

And that’s it. No buying treat bags. No bulky plastic pumpkins to store.

100_4905

And when this little princess is done with her treats, everything gets recycled or reused—no waste, no extra cost.

100_4896

Love that.

Candy bags?

October 2011 BLOG3-5

 It’s What Not To Toss this weekend!

Linking up to:

Skip To My LouCraft-O-ManiacC.R.A.F.T. *  Stories of AtoZ, Tip JunkieSugar BeeToday’s Creative BlogSassy SitesMy Uncommon Slice of Suburbia * Someday CraftsLil LunaWe Are That FamilyBlue Cricket DesignsThe Thrifty Home, * House of Hepworths, *Tidy MomWhipperberryKojo DesignsChic On A Shoestring, Momma’s Kinda Crafty, *Tatertots & Jello, Be Different Act NormalFunky Junk Interiors * I Heart NaptimeUnder The Table and Dreaming,

Chalk this quick little post up to impulse shopping at it’s finest. Sheesh.

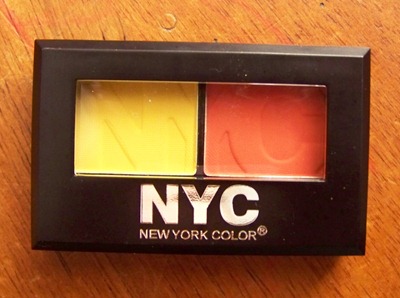
I was walking through Wal*Mart yesterday on my way to the toilet paper isle when this $2.24 wonder practically blinded me from cosmetics.

100_4945

Wow, that’s bright.

I am so, so not a make-up person — a minimalists at heart who skips make-up all together most days. But for some reason, the freakishly-bright-Halloween-hey-why-not mood came over me and into my cart it went. And while the kids where down for naps and I was supposed to be folding laundry had free time, I started playing around on my otherwise un-prepped and un-plucked eyes.

The result?

A little something I like to call  The Candy Corn Cat Eye

 October 2011 BLOG3

What do you think?  Kicky or creep?

Obviously I’m no 16-year-old YouTube make-up tutorial wiz, but for some reason I really enjoyed brushing wide strokes of garish color all over my eyelids with reckless abandon.

100_4970

And stepping outside my everyday routine makes me want to do other wild and crazy things today … like take my hair out of a clip, wax my upper lip and get some bangs-ha!

100_4965

Or maybe go someplace special with my all-dolled-up-self … like Target.

Ah, the power of make-up.

cat.1

So what are you doing for Halloween?

Do you dress up?

Do you do fun little things like wear funky socks, play with your make-up or drag out the black polish?

Discuss.

Linking up to:

DIY ShowOff Fall Festival, Skip To My LouCraft-O-ManiacC.R.A.F.T. *  Stories of AtoZ, Tip JunkieSugar BeeToday’s Creative BlogSassy SitesMy Uncommon Slice of Suburbia * Someday CraftsLil LunaWe Are That FamilyBlue Cricket DesignsThe Thrifty Home, * House of Hepworths, *Tidy MomWhipperberryKojo DesignsChic On A Shoestring, Momma’s Kinda Crafty, *Tatertots & Jello, Be Different Act NormalFunky Junk InteriorsI Heart NaptimeUnder The Table and Dreaming

After weeks of waiting, Fall decided to show up this weekend.

{About time. Sheesh.}

The only problem is that my little girl is awfully short on fall and winter clothes. So instead of heading to the store, I searched through my boys’ outgrown clothes and fabric stash to come up with new duds without spending a dime.

Here’s what I had to work with:

October 2011 BLOG2-4

a boring sweater, a couple ripped pairs of khakis and a stretched out camo henley.

Screams “girly,” huh?

#1 – Sweater to Cardigan

I started by removing the collar (1) and cutting down the center (2) to make a cardigan shell. (I put tape down first and then cut the sweater to prevent major fraying. I pulled the tape off carefully and gave the edges a quick zig zag.)

October 2011 BLOG2-8

I made the easiest seam binding ever (3) by cutting the bottom edge of a t-shirt below the seam – no need to fold or iron. The seam binding was pinned in place (4) and then stitched in place with a straight stitch.

I could have stopped right there, but wanted to add a little more frill. I played around with the look and chose the tight ruffles instead the loose folds.

October 2011 BLOG2-9

And those ruffles were a cinch to make: I cut 1” strips of t-shirt fabric and ran a gathering stitch down the middle. The ruffles were pinned on top of the binding and then stitched in place.

October 2011 BLOG2-12

The result was a cute little cardigan with plenty of ruffles and spunk.

#2 – Cargo Pants to Skirt

Next up with a simple skirt with using as much of the existing hems from two old pairs of my son’s cargo pants as possible.  The legs were cut off leaving the top part of the pants: waistband down to just below the front zipper. To make the skirt piece, I sewed pieces of two pairs of pant legs together with the seems out (1) and used a gathering stitch along the top to create just enough gather for the skirt piece to fit the pants(3).

 October 2011 BLOG2-3

The skirt piece was pinned to the pants (3) and stitched in place with a straight stitch for a shabby look (4). After a quick run through the wash, the seems softened up for the casual look I was after. (Of course you could always skip the rough look and keep those seems on the inside, too. )

Twenty minutes later I ended up with an upcycled skirt that just happened to match perfectly with that cardigan.

skirt

Maybe some of her brother’s rough ‘n’ tumble attitude came through in the fabric, eh?

#3 – Boys Henley to Girls Embellished Tee

The last refashion project started with this Old Navy camo henley. It was the right length, but too wide (1). I grabbed a shirt from my daughter and used it for a template, trimming away the extra fabric on the sides (2) and shortening the sleeves.

October 2011 BLOG2-10

  I sewed one long seem from the shirt cuff to the bottom hem with a zig zag stitch (3) and added some rosettes to the collar to soften the look (4).

And total cheater alert here: I hot glued the rosettes and then hand stitched them to the shirt. I know you’re not supposed to do that, but I was in a hurry and it worked fine. This shirt has gone through the washer and dryer over a dozen times and is holding up great.

This has to be one of my favorite girls shirts. Ever.

100_4935-1

100_4803-1

So …

take a look at your kids’ closets, out-grown clothes piles and fabric stash and see what you can whip up. 

What you’re ready to toss may just go …

October 2011 BLOG2-6 October 2011 BLOG2-7

October 2011 BLOG2-11

You might be surprised how many adorable upcycles /refashions you’ll come up with from seemingly nothing.

Linking up to:

Skip To My LouCraft-O-ManiacC.R.A.F.T. *  Stories of AtoZ, Tip JunkieSugar BeeToday’s Creative BlogSassy SitesMy Uncommon Slice of Suburbia * Someday CraftsLil LunaWe Are That FamilyBlue Cricket DesignsThe Thrifty Home, * House of Hepworths, *Tidy MomWhipperberryKojo DesignsChic On A Shoestring, Momma’s Kinda Crafty, *Tatertots & Jello, Be Different Act NormalFunky Junk Interiors * I Heart NaptimeUnder The Table and Dreaming

Thanks everyone for your patience this week while we got everything transferred over to the new system.(Thanks Jon & Eric!)  It’s soooo nice to be blogging on a computer that isn’t 8 years old.  Now back to the regularly scheduled programming. 🙂

***

I believe the children are the future. Teach them well and let them lead the way …

Sorry. 80’s tangent.

What I’m trying to say is:

When you find a girl with mad crafting skills, hand over the glue gun and get out of her way.

Check out this hat!

hat.17

I so wish I could claim credit for this awesome number, but the round of applause goes to this talented, 13-year-old rock star, Miss{K}.

miss k

Isn’t she sweet? I’m lucky enough to be neighbors with Miss{K} and her amazing mama Miss{A}.

When Miss{A} showed me these pictures, my jaw dropped. Seriously people … Miss{K} is 13 and she just “threw these together.” I asked Miss{A} if I could share the incredible hats that Miss{K} put together for a local Halloween craft festival they went to over the weekend.

I love this project since it can double as decor and a great costume. I’m not big into dressing up for Halloween any more, but I’d totally wear this all month if I had one.  Seriously … if you see me at the grocery store you’ve been warned. The other thing I love is that you could easily adapt these hats to Rock-What-Ya-Got and make your own version using items you already have on hand.

Multi-Colored Tulle Hat

hat.11

Miss {K} loosely wrapped orange, purple and green tulle around the brim and hot glued it in place. The tulle “flower” was made by tying regular bows out of the same colors of tulle and hot gluing them in place. Two rosettes were made from the 1”satin ribbon and tucked in beside the bows, a little scrap of black tulle stands in for a leaf, and a glitter spider adds the  final touch.

Black Widow Hat

hat.14

Same fun look with black and red glitter tulle using a braided band of tulle around the brim.

Purple Potion Hat

hat.15

Miss{K} glued the tulle in bunches around the brim, added a tulle bow and a finishing black glitter spider.

I totally want all three. For me.

*Swoon*

hat.12

Hopefully Miss{K}’s awesome hats will inspire you to make your version using items from around your house, Rock-What-Ya-Got-style. (Or even from the store, tulle and ribbon are pretty cheap).  I’m so planning on making one of these for me and my girls using what we have on hand: scrap t-shirts and ribbon in the same colors.

If you make one, send me an email or post it on Thrive’s facebook page—I’d love to see it!

Thanks again Miss{K} and Miss{A} for sharing your wicked-awesome hats!


Linking up to:

DIY Show Off Fall Festival, Skip To My LouCraft-O-ManiacC.R.A.F.T. *  Stories of AtoZ, Tip JunkieSugar BeeToday’s Creative BlogSassy SitesMy Uncommon Slice of Suburbia * Someday CraftsLil LunaWe Are That FamilyBlue Cricket DesignsThe Thrifty Home, * House of Hepworths, *Tidy MomWhipperberryKojo DesignsChic On A Shoestring, Momma’s Kinda Crafty, *Tatertots & Jello, Be Different Act Normal * I Heart NaptimeUnder The Table and Dreaming

These are my daughter’s church shoes. She’s going through a glitter phase right now.  A biiiggg, happy glitter phase.

100_4368

She’s got a red Wizard of Oz pair that look just as bad. Time to send those shoes over the rainbow straight to the trash, right?

100_4370

Wait! Don’t toss those!

With a little spray paint love, those shoes may just have a few heel clicks left in them.

Enter Krylon Glitter Blast spray paint. Or as I like to call it, the Oh-My-Heck-This-Stuff-Is-Expensive-And-Better-Work-Miracles spray paint.

glitterblast

(And no this isn’t a sponsored post. Bummer.)

I’ve seen the buzz all over blogland about this stuff and wondered if there was anyway it could save my girl’s shoes. 

I had serious reservations about buying a can since you guys know that spending money on crafts this year is a no-no in my house.  But I totally struck out at all FOUR of the thrift stores in my area … and I was staring down at least $12 for another cheapy Walmart pair with the same glitter ratio … so spending $6 after coupon {cough, choke} on a can of magic glitter might be the smart way to go after all.

So I did. And it worked!

A little painters tape around the inside and ribbons …

100_4376

… and a few squirts of paint over the whole thing …

… and a little black sharpie action on the vinyl bows …

… and voila!

100_4391

Rainbows appear, bird sing, shoes saved. I don’t think we’re in Kansas anymore, Toto.

Even though this paint is a little touchy to use, it still worked great. I loved how the shoes turned out and am so glad I gave it a try.

100_4393

I only bought one can to start since it was so pricey, but  I can’t wait to grab a can of the red and get those Dorothy shoes back to their yellow-brick-road best.  And I love that I still have lots of paint left and can touch up her shoes whenever I need to.

And for those of you without glitter shoes, this technique will work for any pair of shoes.

That means you can rock cheap shoe refashions for everyday use, Halloween costumes, or even school dances.

Here’s a few Man-Behind-The-Curtain tips to save you a few headaches:

1. Use a coupon. {Oh good heavens use a coupon.} My can was $6 after the coupon and is only half the size of a regular can of spray paint.

2. Use short bursts. Long sprays will clog your nozzle in two seconds flat.

3. Watch the pressure. This stuff has a nasty habit of getting too much pressure built up and oozing glitter paint out the top. To stop that from happening, pull up lightly on the spray button whenever you hear a hissing noise. This seems to release the pressure kind of like the valve on a pressure cooker. My friend warned me about the oozing problem and recommended the pulling-up-on-the-cap trick. Worked great.

4. Use two light coats for the best coverage. As I’ve gone back through these pics I’ve liked the coverage, but think the toe area could use a touch more paint. I’m going to give them a quick recoat this afternoon.

5. Be sure to use the clear coat sealant. The paint will wear off very quickly without it.

So there you go.

Scuffed up shoes?

Sept 2011 BLOG4-8

It’s What Not To Toss this weekend!

100_4305-1

Another holiday, another chance to blow $5 on Halloween t-shirts at Old Navy or Target or Walmart or whatever.

But you know me—that’s $30 bucks I’d rather not shell out. Plus, I love the idea of making my own designs and using up my never-ending fabric stash.


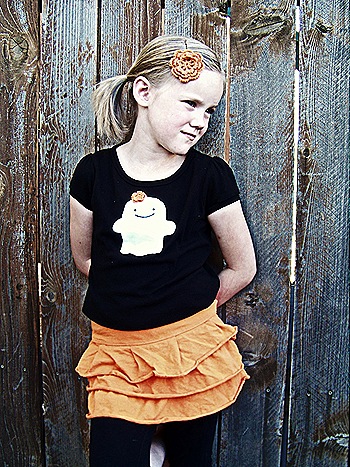
Besides, how could you not want to make your own when you have ridiculously cute crocheted flowers like these to work with?

shirt.2

I scored these beauties a few weeks ago at a bloggers meet-up from the awesome ladies at Riley Blake Designs. As soon as I saw them I knew they’d be perfect for Halloween sewing.

You’ll love how easy it is to make your own tees inspired by favorite prints, fabrics or clothes already in the closet—a perfectly coordinated outfit that comes together in 15 minutes flat.

Want to make your own?

To make this project you’ll need:

100_4209

As for the actual shirt designs, I looked no further than the RBD catalog and fell in love with this fun Halloween print.

riley blake

I loved the ghost and skeleton and made up a pattern to match. (Although I can’t wait to make the owl, spider and bat next!) And if I wasn’t in the middle of my THRIVE challenge, I would so be making matching skirts out of this fabric for both my girls.

*Swoon*

I used plain ‘ol shirts as the base, cut my Halloween shapes out of scrap t-shirt material and just straight stitched around the edge.

Sept 2011 BLOG3-1

And the best part is that you can use shirts that have existing designs. I just pinned right over top of this bird and stitched away—no interfacing, no fusible webbing, no ripping out a bunch of embroidery.

Sept 2011 BLOG3

I wanted the little faces to match the fabric as much as possible so I cut out the eyes and mouth with an craft knife, traced the design with my nicest glue BIC pen …

100_4261

… and then carefully painted over the pen marks using the only black paint I had on hand: interior latex satin paint.

100_4264(Yeah, wasn’t actually kidding about using house paint peeps. Rock What Ya Got., huh? 🙂

Flowers were hand switched in place after the paint was dry.

Sept 2011 BLOG3-3

L*O*V*E*

100_4362100_4360

Kid #3 loves hers and is already plotting which homemade tights to wear with her new Halloween digs tomorrow.

Sept 2011 BLOG3-5(Want to make your own tights? Click here.)

Right now she’s leaning towards skull/green flower shirt + black skirt + Dr. Gru tights + Wizard of Oz shoes.  Oh boy.

So there you go! Have fun making your own Halloween tees to match your favorite skirts, pants or fabric prints!

shirt.3

Linking up to:

Skip To My LouCraft-O-ManiacC.R.A.F.T*  Stories of AtoZ, Tip JunkieSugar BeeToday’s Creative BlogSassy SitesMy Uncommon Slice of Suburbia * Someday CraftsLil LunaWe Are That FamilyBlue Cricket DesignsThe Thrifty Home, * House of Hepworths, *Tidy MomWhipperberryKojo DesignsChic On A Shoestring, Momma’s Kinda Crafty, *Tatertots & Jello, Be Different Act Normal * I Heart NaptimeUnder The Table and Dreaming

100_3957

It dropped another five degrees today which means another chance to use around-the-house items to add some fall lovin’  to our newly painted upstairs (more on that later this week.)

100_3959

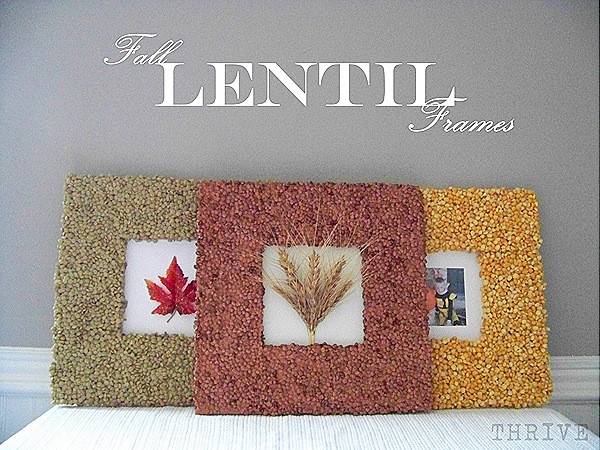
The end result was three, texture-licious frames in yummy fall colors straight from the pantry and recycling bin.

100_3944

100_3900

100_3925

Want to make your own?

To make these frames you’ll need:

100_3784

(Edited to add: I’ve gotten a few emails about lentils. You can find them next to the rice or in the bulk food section of your grocery store. They run $0.60 – $1.25 / lb.)

As always I hope you’ll rock what ya got and make this look work for you without a trip to the store.

I made simple, three-layer frames from {unused} pizza boxes and wood glue …

100_3789

… and covered the raw edges with paper scraps for a nice, clean edge.

100_3793

Frames got a quick coat of paint in the closest color I had to my lentils using my nicest fountain drink palette and a foam brush …

100_3802

… just to make sure none of that cardboard showed through.

Craft wire was wrapped around the frames to make a simple hanging loop for the back.

100_3805

Frames were propped up on some cans and a thick coat of white school glue was applied with a cheapie foam brush.  More is more here, people. Don’t skimp. Lentils were gently poured on in a thick layer and pressed carefully in place.  Do NOT shake off the extra until the glue has dried several hours.

100_3821

The sides of the frame were covered the same way after the top had thoroughly dried.  Pictures and mats were taped in place. Easy. Quick. Done.

Love the texture, but not the color?

No biggie.

I loved—LOVED—the orange lentil frame, but hated it with my living room wall color.  Boo. {Maybe I’ll have to make another one for Halloween.}

Sept 2011 BLOG1

So I just painted over it.  A little copper craft paint and the problem was solved.

100_3965

Much better match up against those grey walls.

Love.

100_3967

A few THRIVE tips to save you some headaches:

1. If you’re painting your lentil frame, spray paint is easiest. But if craft paint is all you got, thin it down to make it flow like a glaze. I went with 3 parts paint, 1 part water, 1 part white glue and it worked great.

2.  Don’t touch your frame for several hours while the lentils are drying. Don’t shake off the extra. Don’t move it. Leave the dang thing alone. Seriously. If you move or shake off the extra too soon, you’ll get a really thin, spotty layer.  See?

Sept 2011 BLOG2

3. If you skimped on the glue and/or ignored tip #2 — don’t worry. Mix 2 parts glue + 1 part water and pour it over your frame, spreading gently with a foam brush. Then recoat with a thick coat of lentils and let it dry over night before shaking off the excess.

Happy straight from the pantry fall crafting!

100_3897

Featured on:

featured as-seen-on_150x150pixel top.10.csi

Linking up to:

The CSI Project, Skip To My LouCraft-O-ManiacC.R.A.F.T., The DIY ShowOff *  Stories of AtoZ, Tip JunkieSugar BeeToday’s Creative BlogSassy SitesMy Uncommon Slice of Suburbia * Someday CraftsLil LunaWe Are That FamilyBlue Cricket DesignsThe Thrifty Home, * House of Hepworths, *Remodelaholic FridayTidy MomWhipperberryKojo DesignsChic On A Shoestring, Momma’s Kinda Crafty, *Tatertots & Jello,  Be Different Act NormalFunky Junk Interiors * I Heart NaptimeUnder The Table and Dreaming

Last week I found myself walking through Target with the wedding registry for some friends and ended up picking these funky everyday dishes.

rag.4

Of course I spaced gift wrap until I got home. Actually that doesn’t really surprise me because buying bags and tissue paper is one of my biggest pet peeves.

Total waste of money.

I dug through my wrapping stash at home and picked this plain white craft paper over the SpongeBob SquarePants birthday variety.

rag.6

Then I dug through the Bat Scrap organizer for some scrap ribbon and came up with nothing long enough that would match.

Nada. Zilch.

That is until I remembered the four massive bins of old shirts still waiting to be recycled, upcycled or stash-busted.

rag.7

  No problem.

I cut a couple of 1” strips with a rotary cutter to wrap around the box of plates …

rag.5

… and some 1/4” strips that pulled nice and tight to make them nice and thin like string or yarn.

That weird shaped stack of bowls got a simple confetti colored tie …

rag.2

… while the box got a quick wrap and easy knots around the corners.

rag.9

Easy. Fast. Done.

So give rag ribbon a try.

I bet you could pull together a quick shabby-chic wrap for your next party using fabric you already have on hand AND in colors that match the gift inside.

Because us women care about stuff like that.

rag.3

Happy wrapping and stash-bustifying!

Linking up to:

Skip To My LouCraft-O-ManiacC.R.A.F.T., The DIY ShowOff *  Stories of AtoZ, Tip JunkieSugar BeeToday’s Creative BlogSassy SitesMy Uncommon Slice of Suburbia * Someday CraftsLil LunaWe Are That FamilyBlue Cricket DesignsThe Thrifty Home, * House of Hepworths, *Remodelaholic FridayTidy MomWhipperberryKojo DesignsChic On A Shoestring, Momma’s Kinda Crafty, *Tatertots & Jello,  Be Different Act NormalFunky Junk Interiors * I Heart NaptimeUnder The Table and Dreaming

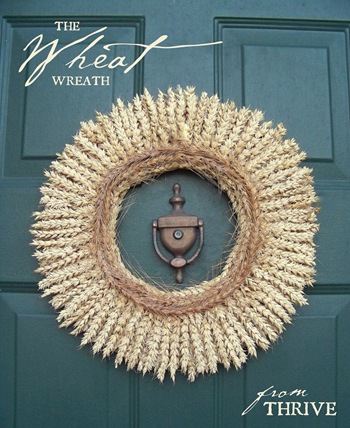
My first fall project of the year just went up on the front door.

wheat.1b

All that gleaning has sure paid off.

And this came together in a single naptime using a cardboard box for a wreath frame and wrapping it with scrap fabric like I did here.

(And do yourself a favor here and wrap some wire around your frame and make a hanging loop on the back before you start gluing on your wheat. I didn’t and it was a pain to do it after the fact.)

Wheat was attached using generous beads of hot glue for a first layer…

wheat.7

… and then second layer.  The ends where trimmed along the inside edge for a nice, clean look.

100_3499

Then extra wheat was glue along the inside edge so that none of the fabric showed through.

And just for fun, I added a double ring of red wheat near the inside edge. I love the rust color and extra contrast.

wheat.9b

I’m so excited to have this beauty up on the door, even if it is 97 degrees outside.

wheat.14

And if you want this look for your door without spending a grundle at the craft store, it’s not too late to glean! I found another field yesterday and grabbed two more bucketfuls. Good luck!

wheat.8

Featured on:

as-seen-on_150x150pixel featured

Linking up to:

The CSI ProjectSkip To My LouCraft-O-ManiacC.R.A.F.T., The DIY ShowOff *  Stories of AtoZ, Tip JunkieSugar BeeToday’s Creative BlogSassy SitesMy Uncommon Slice of Suburbia * Someday CraftsLil LunaWe Are That FamilyBlue Cricket DesignsThe Thrifty Home, * House of Hepworths, *Remodelaholic FridayTidy MomWhipperberryKojo DesignsChic On A Shoestring, Momma’s Kinda Crafty, *Tatertots & Jello,  Be Different Act NormalFunky Junk Interiors * I Heart NaptimeUnder The Table and Dreaming