It never ceases to amaze me how a relatively boring corner of the house can be completely transformed with a simple hanging décor.
With my love for using flowers to give a fresh look to my home, coupled with spotting a barren wall that felt like it needed something, I immediately got working on creating a simple hanging flower holder.
What I ended up making, was so simple yet charming that it gave me that satisfying feeling after my little experimentation was over.
So this is how I made my super simple DIY hanging flower holder.
What you need?
You just need two items for this beautiful hanging flower holder, both of which were sitting happily in my arts and crafts drawer:
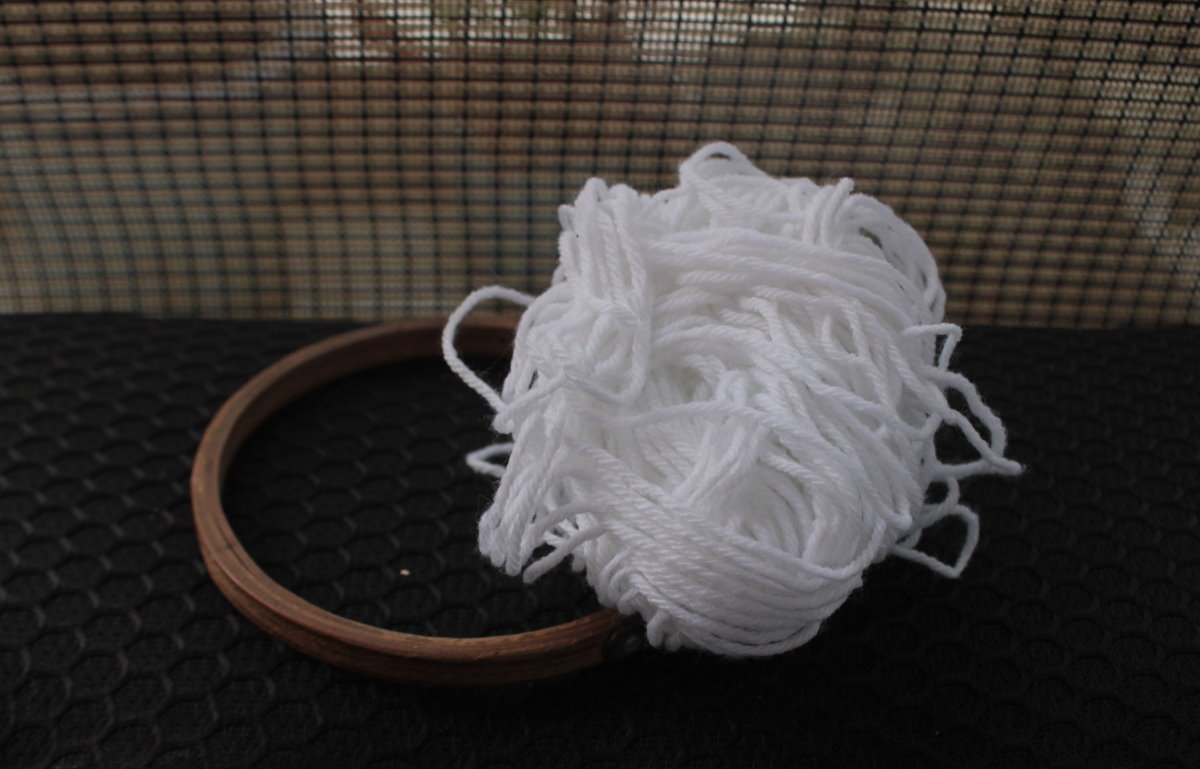
Embroidery hoop
Yarn or jute rope
Note that I had white yarn leftover from another project and hence I used that. You can use any color you like and it really changes the look especially depending upon the flower you plan to use in the end.
Also note that I used an embroidery hoop as that is what I found in my house. You can use any circular object as long as it fits the final purpose of this project.
Steps to create the hanging flower holder
Step 1:
Take the embroidery hoop and separate the inner and outer part. For this craft we will only be needing the inner smaller part.
Step 2:
Make a knot around the smaller hoop and start wrapping the hoop with the yarn until the whole wooden portion is covered.
Step 3:
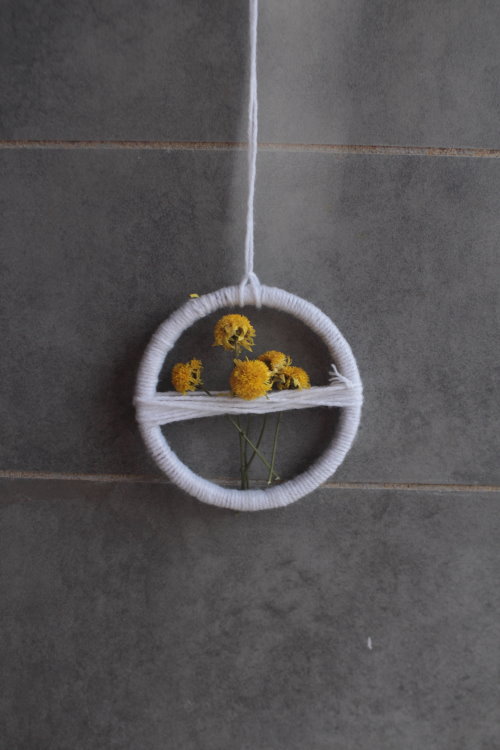
Start wrapping the yarn around the diameter of the hoop, making sure to go above and under to create crisscrossing loops.
Step 4:
At the top, tie a piece of yarn to create a loop so that you can hang the piece of décor.
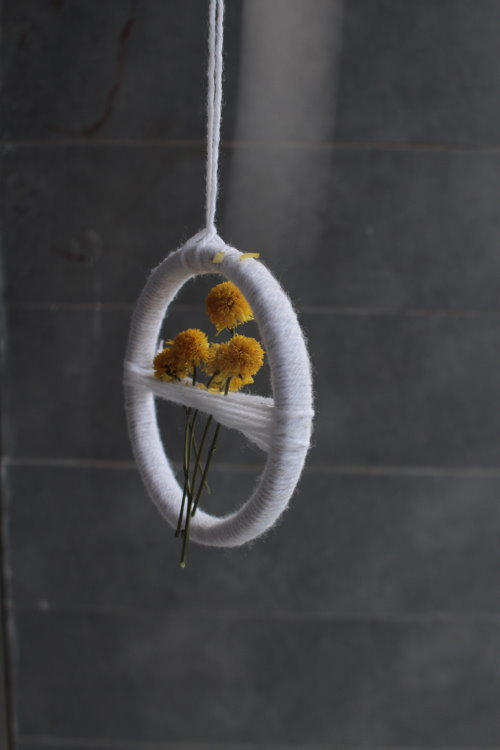
For the final step, put some dry or fresh flowers through the crisscrossed loops. And that is it! Hang it somewhere high and watch it spin around!
Final thoughts
This really is as simple as it gets with DIY crafts. Please do try it and let me know how it went.
I am now off to get some more flowers. I plan on changing the flowers regularly. That way the wall will always look fresh and colorful.
I also plan to hang paper flowers that I have seen in various craft shops. Maybe I will even make my own paper flowers. Looks like a new project is coming up soon.
Also one final note. It’s not necessary to hang just flowers with the hanging flower holder that we created. Simply use your imagination and you can actually add anything you desire giving the look that you want for your wall and corners of your house.
Well it’s too small for kid #6 and has a few stains here and there which makes passing it down to younger kids a no-go.
Time to trash that striped number, right?
Wait! Don’t toss that!
With a little Edward Scissorhands love, that sweater or cardigan can yield mittens and hats —even with those pesky stains.
(Good thing, too, since winter in Utah this year has been a little like living on the ice planet Hoth. Add to that six kids who keep jumping head-first into snow drifts and I’m having a hard time keeping enough dry hats and mittens around.)
*Cue the back ups.*
Chop off the sleeves and nix any trim or zippers. Open plain sweaters up along a side seam.
Use a hat for your guide and make sure you have enough material to cut twice the length of your hat + side seam allowance.
Cut the extra fabric away and fold in half with right sides together.
Cut around hat leaving room for a seam allowance.
Stitch around the top and serge or zig zag the raw edges.
And those stains? Yeah, totally covered them with some scrap t-shirt fabric. Just stitched in place.
I got one kids size hat out of this 5T sweater. Adult sizes would easily yield a hat from both the front and back pieces.
So don’t stop there!
What about those sleeves? Or any extra sweater material?
When I opened up the sleeves, I realized I had enough material for another hat.
Trim up the arm and scrap pieces to even rectangles. Measure from the border and trim pieces 1/2” longer than the height of your finished hat.
Fold each piece in half and round the raw edge at the top to match the curve of your hat piece …
… so that it looks like this.
Then just pin and stitch together. Serge or zig zag edges.
Done and done, right?
Nope.
There’s still left over material from the tops of the sleeves. What about that?
Mittens!
That same t-shirt scrap kicked out two more little hearts while the folded sleeve edge made some quick and easy seam binding for the cuffs.
Fold over and hem raw edges. You could totally cheat and just whip out the hot glue gun, too. Leave the edges plain or go nuts adding ribbon, buttons, etc.
Sew a gathering stitch along the top edge and gather in nice and tight. Stitch in place.
This little skirt had a flat front with no extra fabric so my skirt doesn’t quite meet in the back.
No big woop. Our tree is up against a wall and you can’t even tell.
See?
Fuller skirts like these would have enough fabric for a traditional skirt fit.
So go dig out those outgrown dresses and dress up that tree.
For the first time in eleven long years, all six of my kiddos are in school—five in elementary and one in preschool!
That means that I now have dedicated time to get back to spending some quality time over here at Thrive while my kids have a blast with their friends at school.
It also means that I had to shell out for six kids to go back to school. Thankfully, though, a little planning and creativity paid off big for us. Here’s what we did.
#1 – DIY It: The more you create, the less you spend
Shoes
My girls are still on the glitter kick which means expensive, blinged out shoes for school.
Or does it?
Baby Girl headed straight for some $30 graffiti-glitter-rhinestone-rainbow numbers while I wondered toward something more in our budget … like plain $5 black canvas numbers from the boys’ section at Walmart.
Baby Girl wasn’t excited … like at all … until we wondered over to the sewing section and I let her pick out her own bling to make her custom shoes. And to my surprise, we walked out with some fuchsia $0.57/yd. sequined trim that went on in two seconds flat with a little super glue.
Holy cow. LOVE.
Trendy. Funky. Sparkly. Blessedly less over-the-top than those $30 numbers.
Baby Girl loves them.
I love them.
Mr. Thrive loves the extra $24 we didn’t spend.
And she totally rocked that first day of preschool.
$2-3 School Spirit Shirts
I’ve already seen the PTA fliers for the school spirit shirts in the kids’ backpacks …and they’re cute …and they support school programs … but at $10-$20 each x 5 kids in school, it’s just not happening.
*Sigh*
Thankfully our dollar store has surprisingly nice, basic t-shirts in solid colors right now. So a plain shirt + $1 worth of vinyl = custom school spirit shirt for $3 or less. And while we were at it, we grabbed a few old, stained shirts from the kids’ closets and bleached them, too. Completely original, yet very school-spirit-ish shirts for a bucks worth of vinyl?
Score!
We went the bleach route and simply added a vinyl design, lightly bleached around the design with a spray bottle and then peeled off the vinyl. A quick rinse with cold water and a run through the wash and the kids were set. I used my Silhouette to cut my designs, but rock what ya got! This works great with contact paper or freezer paper + scissors and/or a craft knife. Heck, you could even make designs with painters or duct tape. Go crazy!
And since there are roughly a billion bleach shirt blog posts out there, I’ll skip the tutorial and just pass along a few tips I found in making our shirts:
Use a garbage bag
Slip a large garbage bag over a hanger and then place the shirt over top. This keeps the bleach from bleeding through to the back side and keeps everything neat.
(Shirt with vinyl design applied and ready for bleaching)
Experiment with spray bottle settings
Using a full-sized spray bottle on the SPRAY setting produced a fun, blotchy finish.
Love this one.
Go Tigers!
(Tiger image from 123rf.com; Collegiate Black FLF front can be downloaded free HERE)
In this CTR shirt that I made for my niece, I used that same full-size spray bottle set to STREAM and the bleach beaded up on the shirt and ran down the front. I love the look of the run-off and the slightly blurry finish from the bleach stream soaking in behind the vinyl design.
(CTR design was created using Dymaxion Script which free to download HERE)
For this last shirt, I used a small travel size spray bottle for a fine mist and ended up with this even, faded look.
This time I bleached the front and back of the shirt. The garbage bag kept the bleach from bleeding through.
(Eagle design from 123rf.com; Certificate font can be downloaded for free HERE)
Find cute designs
I made shirts using designs from three places: my kids’ school, the Silhouette store and online images.
School: I asked the secretary at my kids’ school for a digital copy of the school logo/mascot and she happily emailed me a black and white copy. I imported it into my Silhouette and started cutting. My kids were super excited to be able to cut their mascot. Plus I can use this design to make teacher gifts for the holidays and teacher appreciation. (For internet safety, I’m not posting that one, but it turned out great.)
Silhouette Store: For $1 each, their shapes are a cheap and fun way to find thousands of designs. It’s like the iTunes store for crafters. And they just added Batman shapes. Kid #4 is going to be ecstatic. 🙂
Online Graphic Websites: I purchased designs like the tiger and eagle for $1 each from 123rf.com. I wanted to do something a little more grown up for my older kids and decided to design my own logos with their school mascots. While the Silhouette can trace and cut any digital image, I’m a stickler for honoring the copyrights of online images and only use royalty-free or paid designs that I have permission to use. There’s so many websites with free or cheap images that there’s no reason to play dirty.
Create Your Own: For all you crafty/artistic types, make your own designs! You can draw or create your image on the computer and cut it free hand from freezer paper or contact paper.
#2 – Buy Year Round
Rather than buy clothes in big, expensive spurts, I’m on the watch for clothing deals year ‘round. I grab staples like jeans and coats at garage sales, thrift stores and clearance sales as I see them. That way back to school shopping is about a few new items to update, not completely overhaul a wardrobe. Mr. Thrive laughed when I bought the kids’ new school backpacks the week after school got out for the summer, but our local store had the popular $20-$25 backpacks slashed to $9 each. Done and done. And when Kid #2 who is brutal on shoes found his favorite pair for 50% off, I bought one pair in his size and another identical one in a half size bigger. For the price of one pair, I got two and was prepared for that day a mere three months later when Kid #2 was ready for new shoes yet again.
#3 – Budgeting for clothes when you don’t have a clothing budget
Back to school shopping used to stress me out because the reality is that we didn’t have a clothing budget for our family at all. Whenever someone needed new shoes or pants, we’d eek it out of our monthly gas or food budgets. But Mr. Thrive came up with a great idea at the beginning of this year that has allowed us to budget for ongoing clothing, birthday and school expenses on our limited income. He set up a savings account for each of our kids separate from their personal savings accounts. When we did our taxes, we put $50 in each kid’s account. Then every two weeks $5 goes into each one. For us that’s $30 a paycheck and is what we can afford—your family may do more or less. It may not seem like a lot of money, but it adds up.
Now, whenever one of our kids needs clothes or field trip money, I just take it out of their account. No worrying. No stretching gas. No panic when they grow through three shoes sizes in one year and we’re already tight on grocery money. The money is there and my kids are taken care of. So the $6 for Baby Girl’s glitter shoes came straight out of her account and not the gas tank. And $2 came out of each of my older kids’ accounts to cover their spirit shirts. And since the money is constantly being replenished, I don’t have to worry about choosing between new jeans or groceries next month because I know we’ll need both.
So what creative, free and/or cheap things do you do to help your kids get ready for back-to-school?
Thanks for your kind comments on my door painting fail – so glad I’m not the only one who’s screwed up a DIY project.
And I’ll give a quick disclaimer right now: painting your floors can look AWESOME and is a great solution for a cheap face lift until you can replace flooring outright.
However … however, if you rush this project, you’ll screw it up royally and probably wish you had taken help from a professional house painter. Guess which route I took?
Yeah.
After horribly trashing the floor around the door with not one, but two spray painting fiascos, I couldn’t take it anymore and wisely plunged into tackling the floor. I mean, come on … really? How long could you greet friends at the door with a floor that looked like that?
But at the same time … finish one project, woman, and then move on.
The entry floor was covered with the same peel-n-stick vinyl tiles that we have in the kitchen. The original linoleum was a dark, heavy 70’s brown, so the white vinyl was a big improvement. But just like the kitchen floor, these tiles were 10 years old and seriously showing their wear. This is freshly scrubbed.
See? It never looks clean. And that was before several layers of spray paint over spray.
So after a quick wipe down, that floor got two coats of oil based primer.
Seriously, oil based primer is the greatest stuff ever. I was giddy with how much better it all ready looked. I let that dry for a couple days and then rolled on a coat of white semi-gloss paint (what I had on hand).
And then …yup, you guessed it … I went stupid again.
Instead of letting that paint dry for 2-3 days minimum before taping over it, I waited a mere 18 24 hours until it felt dry and started taping away. Laying out the grid was easy …
… I just followed the lines of the vinyl tiles.
Then I rollered on a second coat of white semi-gloss paint over the entire floor to help seal the tape edges so that the next layer of brown paint wouldn’t seep under the tape. Again, only waited a day and then charged ahead with the brown. I rolled on two coats using the same paint I used on the front door. I waited a day, and then started carefully pulling up the tape. And at first, it looked wicked awesome.
But on the second square something really, really bad started to happen: the paint under the tape started coming up. Everywhere. In huge pieces.
Oh, snap.
I wanted to cry … really, really cry.
But I didn’t, because Mr. Thrive wasn’t thrilled about the huge door mess that had created the floor mess that was now a painted floor mess. And I was determined to save this project and actually finish a project for once. So I lightly sanded down the worst of the edges and and carefully started touching up the peeled off areas in each square. (Thankfully just the white semi-gloss lifted and not the primer underneath.) And while not perfect, I was relieved to see that with some patience, it was completely fixable.
Phew.
But … but … after finishing my touch ups, I left the paint tray on the stairs and went upstairs for a minute … and my three year old daughter saw the very full paint tray just sitting there and wanted to help momma with the painting … and she tried to pick it up to go down the stairs and paint … and dropped the heavy tray … and watched all of that white paint land on the carpeted stairs and splatter across the newly painted floor … and then probably panicked that momma would be mad and promptly ran back up the stairs, tracking big paint foot prints on all the steps that hadn’t been covered by the paint to start.
And anytime you have a 1/3 of a gallon land on your floor, you know there’s not a snowballs chance that it’s coming out.
That’s when I cried.
For a full five minutes I lost it and cried like a baby.
But then I took a deep breath … and hugged my baby girl and apologized to her for yelling and being mad when I was the one who left the paint out … and I put my big girl pants on and started to hustle.
Because it was two o’clock in the afternoon … and Mr. Thrive was going to be home at seven … and I didn’t want him to have to walk into that kind of mess … or stress over how on earth we’d pay not only for new flooring in the entryway, but also for the stairs. So I scraped as much of the paint out of the carpet as I could … and wiped all the excess paint off the floor … and took a few quick, crappy pictures to blackmail my children with as my mind raced as to how on earth I was going to fix this mess. (Edited to add: yes, yes I was having flashbacks to this moment.)
Oh, and did I mention that we had company coming in from out a state in just two weeks?
The floor I knew could be repainted. Again.
But the stairs? The only thing I could think off was to rip the carpet off the bottom tread and hurry down to Lowe’s and see if could match it. I knew I couldn’t get it installed before Mr. Thrive got home, but I was hoping that having the replacement stuff already ordered would soften the blow. So I grabbed a hammer and a pair of pliers and started yanking.
Holy cow. We vacuum and sweep twice a day and that’s how much dirt was under the carpet and pad. It’s probably ten years worth … but still. Ewwww.
I was completely grossed out … and even more worried about what to do … but the reality was that I couldn’t afford new carpet—even a small amount of replacement carpet – so the choice was to live with the huge paint stains on the carpet plus one naked tread at the bottom –or- figure out a way to rock-what-ya-got.
And so I took a deep breath … and then another … and then made an executive decision. And I started yanking and pulling and ripping until all of the carpet going upstairs was gone and I was left with this:
And suddenly I had not only an unfinished door and an unfinished floor, but was now waist deep in a stair project.
And that’s where things got interesting. Back in a bit.