Did you know that wallpapers have been around since the 18th century? That’s a really long time and it is not surprising that wallpapers have not just survived but thrived even in the times of modern home décor.
While the industry has come a long way since its nascent days, the overall value proposition of wallpapers have pretty much remained the same.
I personally love wallpapers and feel it can be a great addition to your room décor giving it the extra bit of life or spark that we all crave.
So here are some of my personal reasons for using wallpapers at my home and why I always recommend to my friends and family as well.
1) Hand Painted Art
Great art can completely alter the look of a room. Boring spaces can be converted into exciting, breath-taking areas of the house.
Enter hand painted wallpapers. I have often been amazed by the artistic beauty of hand painted art as well as crafts. I was instantly drawn to the beauty of hand painted wallpaper when I first came across them few years back.
When it was time to redecorate our home, I ensured at least couple of the rooms had one side of the wall covered with these artistic wallpapers. I love how these wallpapers transformed a simple wall into a masterpiece.
It was like I had got a professional artist to paint a picture on my walls. While wallpapers can come with great designs, I personally am extremely attracted to the hand painted styles as those speak so much more to me than generic patterns.
2) Cost-Effective
While getting quotes for painting and wallpapers, I was quite surprised by the cost-effectiveness of wallpapers regardless of quality and design.
Honestly, cost was one of the factors that helped me take a decision to opt for wallpapers on one side of the wall in each of our rooms.
Quality with a value proposition is definitely something I look for when planning my room decorations.
3) Durable
I have used wallpapers before as well and have seen them in my parents house. They always seem to last a long time without any need for replacement.
Unless the wall behind the wallpaper is itself damaged, most wallpapers will last for many years to come.
So durability is another factor why I love wallpapers in the house.
4) Mix and Match
I love it how we can have multiple wallpapers around the house to create a special one of a kind look.
Mix and match aspect of wallpapers is definitely a big thumbs up for me.
5) Easy to Install
This is definitely an important reason for me to choose wallpapers.
I just cant go through long days painting around the house, waiting for things to dry, cope with the paint smell etc.
With wallpapers, you can have it all completed within a day provided you do it properly. Of course you can have a professional install it for you just in case you are worried your wallpapers will end up with air bubbles and will need removal.
6) Cover Up Wall Defects
As much as we want our homes to be perfect, some defects always creep in our walls in certain areas. Instead of having to go through extensive repairs, you can simply use wallpapers to hide these defects while enhancing the appearance of the same wall.
So simple addition of wallpapers can transform bad patches from defective to artistic.
Final Thoughts
The above given reasons were my personal reasons for choosing wallpapers. I of course do love good paint as well with unique textures.
However, wallpapers can save a lot of trouble and time while adding to the creative value of your room décor.
It never ceases to amaze me how a relatively boring corner of the house can be completely transformed with a simple hanging décor.
With my love for using flowers to give a fresh look to my home, coupled with spotting a barren wall that felt like it needed something, I immediately got working on creating a simple hanging flower holder.
What I ended up making, was so simple yet charming that it gave me that satisfying feeling after my little experimentation was over.
So this is how I made my super simple DIY hanging flower holder.
What you need?
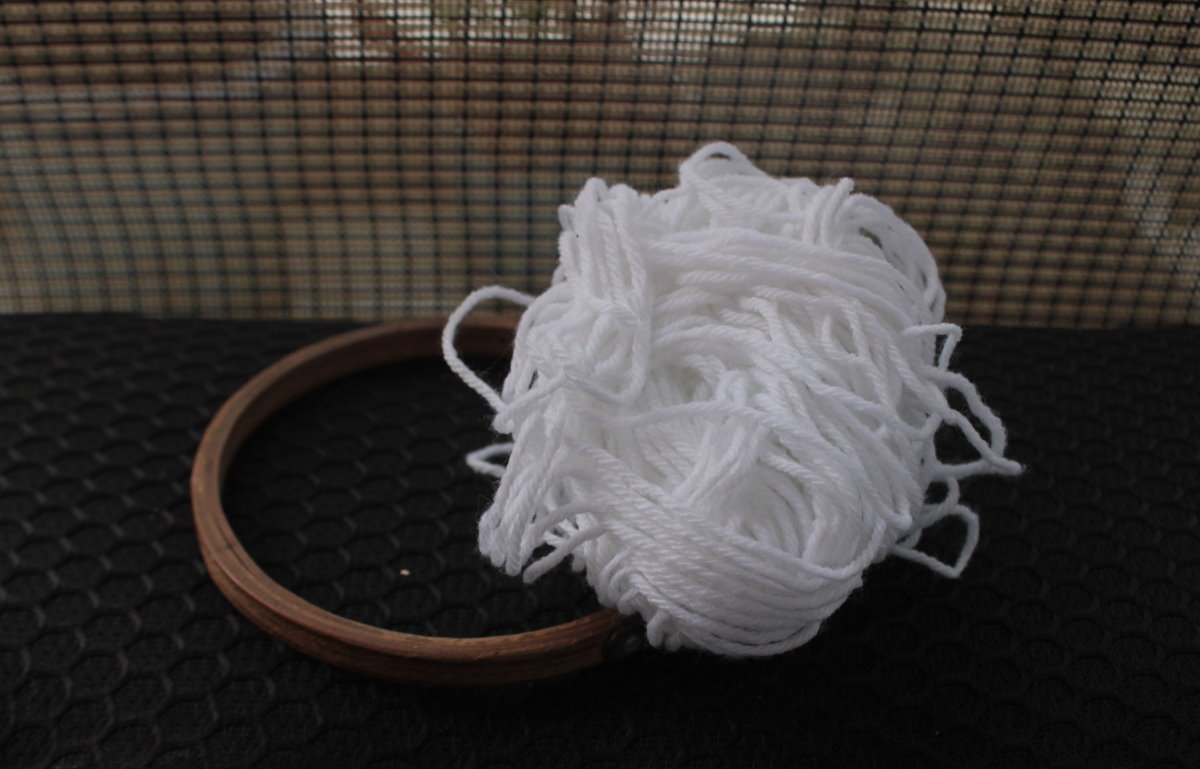
You just need two items for this beautiful hanging flower holder, both of which were sitting happily in my arts and crafts drawer:
Embroidery hoop
Yarn or jute rope
Note that I had white yarn leftover from another project and hence I used that. You can use any color you like and it really changes the look especially depending upon the flower you plan to use in the end.
Also note that I used an embroidery hoop as that is what I found in my house. You can use any circular object as long as it fits the final purpose of this project.
Steps to create the hanging flower holder
Step 1:
Take the embroidery hoop and separate the inner and outer part. For this craft we will only be needing the inner smaller part.
Step 2:
Make a knot around the smaller hoop and start wrapping the hoop with the yarn until the whole wooden portion is covered.
Step 3:
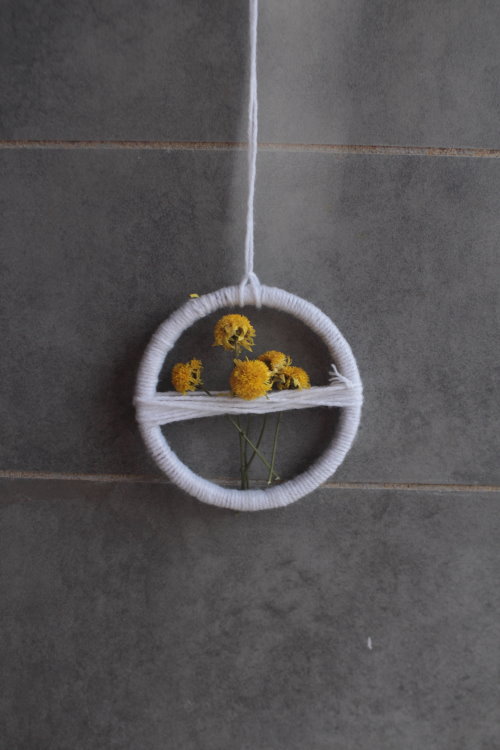
Start wrapping the yarn around the diameter of the hoop, making sure to go above and under to create crisscrossing loops.
Step 4:
At the top, tie a piece of yarn to create a loop so that you can hang the piece of décor.
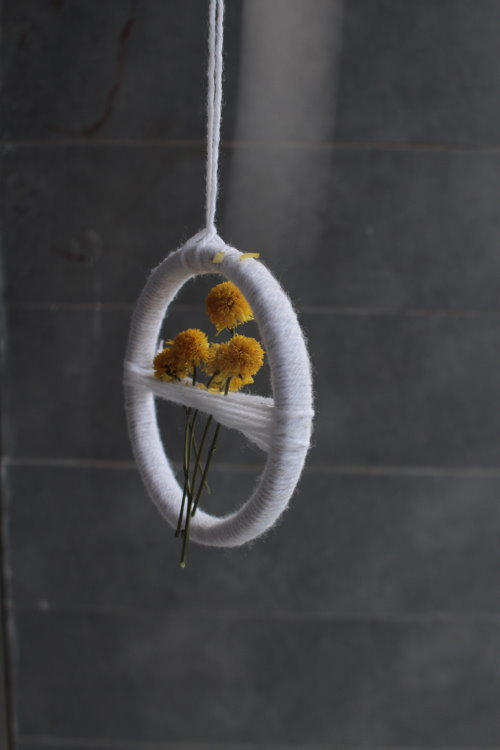
For the final step, put some dry or fresh flowers through the crisscrossed loops. And that is it! Hang it somewhere high and watch it spin around!
Final thoughts
This really is as simple as it gets with DIY crafts. Please do try it and let me know how it went.
I am now off to get some more flowers. I plan on changing the flowers regularly. That way the wall will always look fresh and colorful.
I also plan to hang paper flowers that I have seen in various craft shops. Maybe I will even make my own paper flowers. Looks like a new project is coming up soon.
Also one final note. It’s not necessary to hang just flowers with the hanging flower holder that we created. Simply use your imagination and you can actually add anything you desire giving the look that you want for your wall and corners of your house.
Winter can be a hard time, and with the coronavirus pandemic, this winter looks set to be harder than ever before.
Sprucing up your home this winter can be a great way to keep busy and improve your overall mood – after all a change can be as good as a rest.
Christmas Decorating
This one is great fun for all members of the family. This winter spreading the festive cheer is more important than ever before, so consider going all out with your decorations, inside and out, to help bring some festive fun to your family and your neighbors up.
The great thing about Christmas decorating is that there’s something for everyone. Whether you want to create a winter wonderland for the kids or pick a tasteful natural theme, the world is your oyster at Christmas.
Time For A Renovation?
Winter might not seem like the obvious time to do work on your home but it can be a really fantastic time to change things up. Rustic is very much back in fashion now so why not try out some new wooden fittings for the kitchen?
Some quality new garden furniture which will be a great investment for the warmer months as well as providing a great place to have socially distanced visits from friends and family. No matter the size or scale of what you want to do you can be sure that you’ll find just the thing at Kefauverlumber.com
Invest In Some Cozy Blankets
There’s nothing better when it’s bitter and cold outside than snuggling up under a blanket to watch a film with the family. Blankets can add a great splash of color to your home as well as providing much-needed warmth and comfort in the colder months.
You can get the kids involved again with this one by having them choose their own blankets to use on family nights at home. Consider getting a blanket box to keep them in to reduce clutter.
Candles
Candles can be a great way to improve the atmosphere of your home – though of course, you will need to be careful that they’re out of the reach of any little ones! Candles are another great addition to make your home extra cozy this Christmas.
Whether you choose a festive scent or a calming scent like lavender you can really improve the atmosphere of your home with the right choice of candle.
Bring The Outdoors Inside
This doesn’t have to be limited to the standard Christmas tree! Plants and flowers have all kinds of benefits for your health and mood so winter is the perfect time to consider investing in some home plants. You could go for poinsettias for that Christmas vibe, and they will last well into January with the right care.
You could even try some indoor herbs or create an indoor fruit or vegetable garden. This can be a great one to get the kids involved with to teach them about the world around them and caring for another living thing.
It’s time to actually spruce up the ‘ol front porch for the 4th.
Turns out, though, I’m fresh out of décor for the 4th of July or porches in general.
And as usual, my budget is zero dollars and zero cents.
That means I’m left with whatever I can make out of my classy craft stash of old, stained shirts and trashy I’ve-been-through-six-kids stuffed animals.
Nice.
But with a little creative cutting, sewing and repurposing, I still managed to come up with:
3 pillows + 3 ways + 3 stuffing types
As always I hope you can take this idea andRock What Ya Gotand make your own version without a run to the store.
#1 – Striped Pillow with zippered close + old throw pillow
I grabbed two stained polo shirts, pieced together wide stripes for the front and added a solid (red) piece for the back. Stained fabric? No biggie. Use the back side … no one cares or will notice. I added some top stitching for extra awesome points along the stripes, a zipper at the bottom and slid in an old throw pillow to finish. Done and done.
#2 – Blue Star pillow with button closure + fiberfill stuffing
I ironed Heat’n’bond ultra to the back of some scraps and then cut stars on my Silhouette machine (hand cutting works great, too). Shapes were ironed on and top stitched for again—extra awesome points. Because I’m lazy I loved the wide hem on the bottom of the shirt, I used that look to finish the pillow. Fronts and backs were pinned together right sides OUT and then stitched completely shut. How’d I get the stuffing in? Easy! I just flipped the pillow over (to the old front of the shirt) and inserted the stuffing through the three buttons that ran down from the neckline. (Yup, I totally left them attached to save time.) Once the pillow was stuffed, I buttoned the shirt back together, flipped it over and voila! Finished pillow with a sneaky closure.
#3 – Camo U.S.A. pillow + old stuffed animal fluff
Oops, I did it again. I pulled a few ratty stuffed animals out of the ‘toss’ pile and pulled out all the stuffing to add to this pillow. So sick of still having Easter plush around the house. Those clearance isle Easter Bunnies that are falling apart need to go bye-bye. I cut the letters on my Silhouette CAMEO, but again, scissors work great, too. The side seems were already in place from the shirt and the top/bottom edges were machine stitched closed in two seconds flat. I left a small opening along the bottom to stuff the pillow and whip stitched it closed.
So there you go – 4th of July flair no matter what you have on hand!
Now go grab those fabric scraps. Slip cover an old throw pillow or two. Use the buttons on a t-shirt for a quick closure. Put the stuffing in those unused stuffed animals to work.
Bet you come up with something flat-out-free and fabulous!
Have you been recycling old shirts, chopping up boxes and turning cake pans into stars? Have you found awesome deals on line and scored some great deals? I hope so.
But if you’re like me and still have a few items on your shopping list (plus the never ending need for more of those staples), make a conscious effort to save money AND support your local businesses.
Why?
Because I’m an official in my city and can tell you how much local businesses drive our economy. I’ve seen first hand how money spent in local stores impacts our communities several times more than online sales. You want more money for roads-schools-police in your neighborhood? Shop local. You want lower property taxes and bond costs? Shop local. When Main Street shops get overlooked, the recovery for all of us is slower.
And stop – before you go there – I’m here to myth-bust about local being more expensive. Shopping local isn’t just a noble idea, but a savvy way to save. You really can get awesome deals. Really.
Yes, they’ve got amazing deals on up-scale catalog furniture—they’re famous for that and their selection rocks.
But I’ve got four – FOUR – great reasons to swing by THIS WEEK and in 2013 even if you’re on a shoe string budget like me and not in the market for a new couch:
1. CLOTHES
DownEast has the cutest, comfiest, most affordable stand-up-in-the-wash-like-a-champ clothing staples like camis and layering tees that everyone needs.
Finding affordable clothes that are actually modest and cute is getting harder and harder. That’s why I’ve fallen in LOVE their in-house DownEast Basics line.
I have two daughters who are crazy tall with wicked cases of plumbers butt. Since I have yet to make camis and tees successfully out of cardboard, these were at the top of my list. Plus it buys me a little more time with those shirts that are getting a little too short. See?
Baby girls was ticked when I told her it was time to retire her favorite black tee. Add a DownEast lace cami and problem solved.
Ah, way better.
This lace one was under $5 and layering tees are 2/$15 right now. Yeah, I’m stocking up. Mr. Thrive loves the price and everyone at church and school appreciates that my girls are no longer mooning them.
DownEast also has designer denim and accessories for 60-80% off what your kids want you to fork out at the mall. And when those cute jeans that you or your daughter want are high two figures (or even three), slashing that price by way more than half gets your attention very quickly. It’s all name brand stuff, but the prices are so low that I’m seriously not allowed to say them out loud … or in print … or even show you pics. I’ve been in their stores several times over the last few weeks and can tell you I checked it all out … and saw the prices … and maybe drooled a little bit since we’re Rock What Ya Got at our house and I’m not used to having “cool” stuff be in my price range – ever.
So don’t worry about the mysterious hey-I-can’t-tell-you-the-brand-names-thing. Let’s just think of it as the designer blinged-out denim Who-Shall-Not-Be-Named. Or the designer blinged-out denim brands that I could tell you about, but then I’d have to …. well, you get the idea.
2. DESIGNER from-the-huge-catalog-companies LINENS, HOME DÉCOR, and KIDS STUFF
(wait … that’s probably #2, 3 and 4. 🙂
DownEast gets the overstocks, seconds and discontinued items from some of the biggest catalog and department stores. Monogramed 300 thread count sheets with the wrong letter or kids backpacks with the wrong name. No biggie. Five minutes with a seam ripper and you’ve got sheets-curtains-bedding-backpacks-suitcases-lunch boxes-pillows-you-name it for half of what you’d spend on the cheapy generics at the box stores. Yeah, half. At least. And the quality kicks butt.
I’ve been on the look out for new sheets for my girls’ room after kid #6 went all Edward Scissorhands on us, but I have completely struck out at thrift stores and online. Again, cardboard is not an option so I’m looking for cheap. Yup … found a complete set (flat, fitted, shams) at DownEast for thrift store prices. Perfect color, too.
3. HOLIDAY DECOR
Do you need stockings still? Or are you thinking that you’ll need to replace them next year if you can find a good sale after Christmas? They’re 50% right now. That means stockings like these are $2.50 – $5 each. They’re thick and heavy and will last for years to come. My favorite is the red and white striped wool number.
But confession: no one in my house is named Jean-Luc.
These were $30 in the catalog and I snagged the 100% wool yummieness for way less that I could have found the fabric even with a coupon (under $5!). Since I don’t have any old wool sweaters or friendly sheep around, this worked out handy. And kid #4 who has a thing for snowmen? Snagged that one for him for $2.50.
I also found this ridiculously cute Santa sack for under $5.
And confession … it’s not the right name (although you may just find yours!)
But … you got it. It’s a cinch to cover or remove and I know the kids are going to freak out when they see that Santa left his sack at our house.
4. AWESOME CLEARANCE & WEEKLY SALES
I’m a THRIVE-r so I went straight for the clearance and sales racks.
Holy cow. Can I just show you my score?
Kid #3’s backpack was a $10 clearance find from Wallys. It was made out of paper (apparently) and lasted us all of four months. I found this extra-thick-padding-and-reinforced-seams backpack AND matching lunch box with the easy-washable-so-you-don’t-get-the-funky-sour-milk-smell liner that she’ll love. Catalog price for the backpack alone was $40. DownEast had it for $11.99. Catch one of their awesome sales and you’ll pick it up for 30-50% off that like I did. And the lunch box? Picked that up for $3.
But kid #3’s name isn’t Gaby. Or Sophi. Big whoop. My seam ripper took care of both in just a few minutes. I could even just cover over the stitching with a cute applique or name tag. Such an easy fix.
Or how about this crazy-cute sleeping-bag-blanket-roll? I’ve seen these in popular children’s catalog and they’re $80+.
Yup … a mere $80. Kid #6 really, really wants one of these for Christmas. Thanks to DownEast’s low prices + great sales, I got the whole furry puppy head, sleeping bag and paws for less than a Pillow Pet. Of course no, my daughter isn’t a Paiyton. I’m going to turn on White Christmas after the kids go to bed and take care of that. I’ll have that name off before anyone gets their life saved by Phil Davis. Easy peasy.
I even did something for myself that I haven’t done in months … I bought a new shirt. I had big, big plans to hack apart a sheet and refashion the heck out of it, but I’m running short on time and wanted something special to wear to church for our Christmas program. I figured I’d grab a cheap-o shirt at the thrift store … or Wallys … or Tar-jay. Instead I found this $10 number that looks awesome even when I’ve been caring kid #6 around all day.
I may have worn it three days in a row over the last week already. I get compliments all the time which is a really big deal for me. Not because I’m vain, but because I usually am so focused on making sure the kids are covered that I never take care of me. Any other moms out there guilty, too? And while I’m so proud of how my kids look at Christmas or Easter, I usually sit next to them in something worn out and frumpy. This year I realized how important it is to treat myself with the same kindness and respect that I give my family. If it was important for my family to look nice for the holidays, it should be nice for me to as well. Finding a shirt for myself that didn’t make me feel like I was “taking away” from my family’s needs made me float. Turns out stick-to-the-basics pricing can still be cute, too.
So skip the traffic at the malls and box stores.
Skip the expense of rush of shipping online.
Check out DownEast for those Christmas items still on your list and save yourself some of that well earned money.
*Disclaimer: I received a gift card to shop at DownEast, but all opinions, stories about my daughter’s plumber’s butt, plans to watch White Christmas, hygiene-pushing “hey-I-really-love-this-shirt-and-seriously-live-in-it” confessions and civic-geek passion for shopping local are 100% mine.
Fold over and hem raw edges. You could totally cheat and just whip out the hot glue gun, too. Leave the edges plain or go nuts adding ribbon, buttons, etc.
Sew a gathering stitch along the top edge and gather in nice and tight. Stitch in place.
This little skirt had a flat front with no extra fabric so my skirt doesn’t quite meet in the back.
No big woop. Our tree is up against a wall and you can’t even tell.
See?
Fuller skirts like these would have enough fabric for a traditional skirt fit.
So go dig out those outgrown dresses and dress up that tree.
Well, despite my hours of dedicated research on Pinterest, my kids still arrived at ‘bored’ last weekend. *Sigh* It’s only been a couple of weeks and apparently all the park trips, splash pads and kid crafts just aren’t cutting it anymore. And movies, coloring and playing outside were also nixed. Bummer.
But those stacks and stacks of pictures got me thinking … and I looked over my ginormous ugly-stained-ripped-worn-out t-shirt stash and started thinking.
And suddenly I decided that it might just be time to turn the kids loose and let them design their own silly pillows any way they’d like. It’s stash-busting, sewing-teaching and time-killing all in one.
The end result was pure delicious awesomeness. See?
Crazy robot monster? Sure.
Superhero shield? Bring it.
Random ‘spider head’ pillow? Okay.
I {HEART} Cherries? Yes ma’am.
And these were so ridiculously fun to make.
Me and my dirty half dozen blew off two solid days working on these and they were giggly and excited the whole time. I loved that they were bending over backwards to help with dishes and laundry to give mom time to finish sewing their pillows.
So this isn’t a tutorial so much as it is a list of tips and ideas to get the wheels turning and hopefully save you a few headaches.
1. There are no rules! I’ve been terrified to sew with knits because I don’t have a zig zag on my vintage Featherweight, nor do I own a serger. Who cares—you’re not making clothes! Pillows don’t have to hold up to the wear and tear of being pulled on and off of little bodies. If you’ve got a zig zag or serger, by all means, use it. But if you don’t (or are scared to try), don’t sweat it. Just use lots of pins to keep the fabric from pulling and stretching, GO SLOW, and lengthen your stitches. Our pillows have been beat to death and drug around everywhere in the last two weeks and they’re holding up great. (They came through the wash like champs, too).
2. Give your kids total control over their designs – no mom ‘fixing’ or ‘helping.’ Period. When their design was finished, I just drew a seam allowance for the pillows by simply pinning the pattern to the fabric and tracing a .5”ish line around the edge.
3. Let your kids help with the cutting, pinning, sewing and stuffing as much as possible. It’s going to be messy, imperfect and slow, but totally awesome. You know your kids’ ability levels – help when needed and then get out of the way.
My older kids (including my 6 yr. old) cut out there designs by themselves. It was sloppy and jagged.
I mean really sloppy and jagged.
Who cares?! The rough edges will be covered up by the seam and my kids were so proud of themselves.
4. Keep the pillow shapes simple. If your kid’s design is really small or oddly shaped, apply it to a square, rectangle or circle pillow. The basic shape of the superhero shield and spider head where fine as-is, but the small cherries and alien robot monster would have been impossible to make without attaching them first to an easy-to-sew rectangle base.
5. Sewing applique pieces: I attached large shapes like the cherries and alien body by simply pinning the shape to the pillow top and straight stitching around the edges. Contrasting thread helped little details really pop.
The smaller pieces were ironed on using lite-weight heat’ n ’bond and then top-stitched for extra durability.
But … rock-what-ya-got!
If you want to skip sewing on details, do it! Just use a heavy weight iron-on product. If you only have fusible webbing, that’ll work, too! If you don’t have anything but a sewing machine handy, just sew the whole thing together. See? No rules!
6. Fun extras like handles for shields or pockets for treasures can be attached for extra awesome powers.
7. Scraps make the sweetest dress up gear ever. See?
Best project outfit ever, kid. Well done.
8. Get creative for stuffing ideas. I had a little bit of store-bought stuffing on hand, but not nearly enough for four pillows. The solution? I had the kids pick out stuffed animals from the toys bins that were ready to be tossed and remove the stuffing. The old, dirty fabric from those stuffed animals got a rinse in the washer and then joined my fabric stash. 🙂
Both types of stuffing work great and it saved me a trip to the store. Love that.
So give Silly Pillows a try.
We’re sure liking them at our house. 🙂
A lot.
And if you liked this project, please share it on Pinterest, FB or twitter using the tabs below. Thank you!
It dropped another five degrees today which means another chance to use around-the-house items to add some fall lovin’ to our newly painted upstairs (more on that later this week.)
The end result was three, texture-licious frames in yummy fall colors straight from the pantry and recycling bin.
Want to make your own?
To make these frames you’ll need:
(Edited to add: I’ve gotten a few emails about lentils. You can find them next to the rice or in the bulk food section of your grocery store. They run $0.60 – $1.25 / lb.)
As always I hope you’ll rock what ya got and make this look work for you without a trip to the store.
I made simple, three-layer frames from {unused} pizza boxes and wood glue …
… and covered the raw edges with paper scraps for a nice, clean edge.
Frames got a quick coat of paint in the closest color I had to my lentils using my nicest fountain drink palette and a foam brush …
… just to make sure none of that cardboard showed through.
Craft wire was wrapped around the frames to make a simple hanging loop for the back.
Frames were propped up on some cans and a thick coat of white school glue was applied with a cheapie foam brush. More is more here, people. Don’t skimp. Lentils were gently poured on in a thick layer and pressed carefully in place. Do NOT shake off the extra until the glue has dried several hours.
The sides of the frame were covered the same way after the top had thoroughly dried. Pictures and mats were taped in place. Easy. Quick. Done.
Love the texture, but not the color?
No biggie.
I loved—LOVED—the orange lentil frame, but hated it with my living room wall color. Boo. {Maybe I’ll have to make another one for Halloween.}
So I just painted over it. A little copper craft paint and the problem was solved.
Much better match up against those grey walls.
Love.
A few THRIVE tips to save you some headaches:
1. If you’re painting your lentil frame, spray paint is easiest. But if craft paint is all you got, thin it down to make it flow like a glaze. I went with 3 parts paint, 1 part water, 1 part white glue and it worked great.
2. Don’t touch your frame for several hours while the lentils are drying. Don’t shake off the extra. Don’t move it. Leave the dang thing alone. Seriously. If you move or shake off the extra too soon, you’ll get a really thin, spotty layer. See?
3. If you skimped on the glue and/or ignored tip #2 — don’t worry. Mix 2 parts glue + 1 part water and pour it over your frame, spreading gently with a foam brush. Then recoat with a thick coat of lentils and let it dry over night before shaking off the excess.
And this came together in a single naptime using a cardboard box for a wreath frame and wrapping it with scrap fabric like I did here.
(And do yourself a favor here and wrap some wire around your frame and make a hanging loop on the back before you start gluing on your wheat. I didn’t and it was a pain to do it after the fact.)
Wheat was attached using generous beads of hot glue for a first layer…
… and then second layer. The ends where trimmed along the inside edge for a nice, clean look.
Then extra wheat was glue along the inside edge so that none of the fabric showed through.
And just for fun, I added a double ring of red wheat near the inside edge. I love the rust color and extra contrast.
I’m so excited to have this beauty up on the door, even if it is 97 degrees outside.
And if you want this look for your door without spending a grundle at the craft store, it’s not too late to glean! I found another field yesterday and grabbed two more bucketfuls. Good luck!